An oscilloscope, a versatile tool widely used in the field of electronics, allows for the visualization and analysis of electrical signals. Whether you are a seasoned electrical engineer or a hobbyist tinkering with electronics, understanding how to effectively utilize an oscilloscope is essential. In this article, we will delve into the basics of using an oscilloscope, equipping you with the knowledge needed to navigate its functions, interpret waveforms, and make accurate measurements. From setting up your oscilloscope to troubleshooting common issues, we will guide you through the intricacies of this powerful instrument, empowering you to confidently handle any electrical signal analysis task that comes your way. So, let us embark on this informative journey and unlock the full potential of your oscilloscope!
Introduction to Oscilloscopes
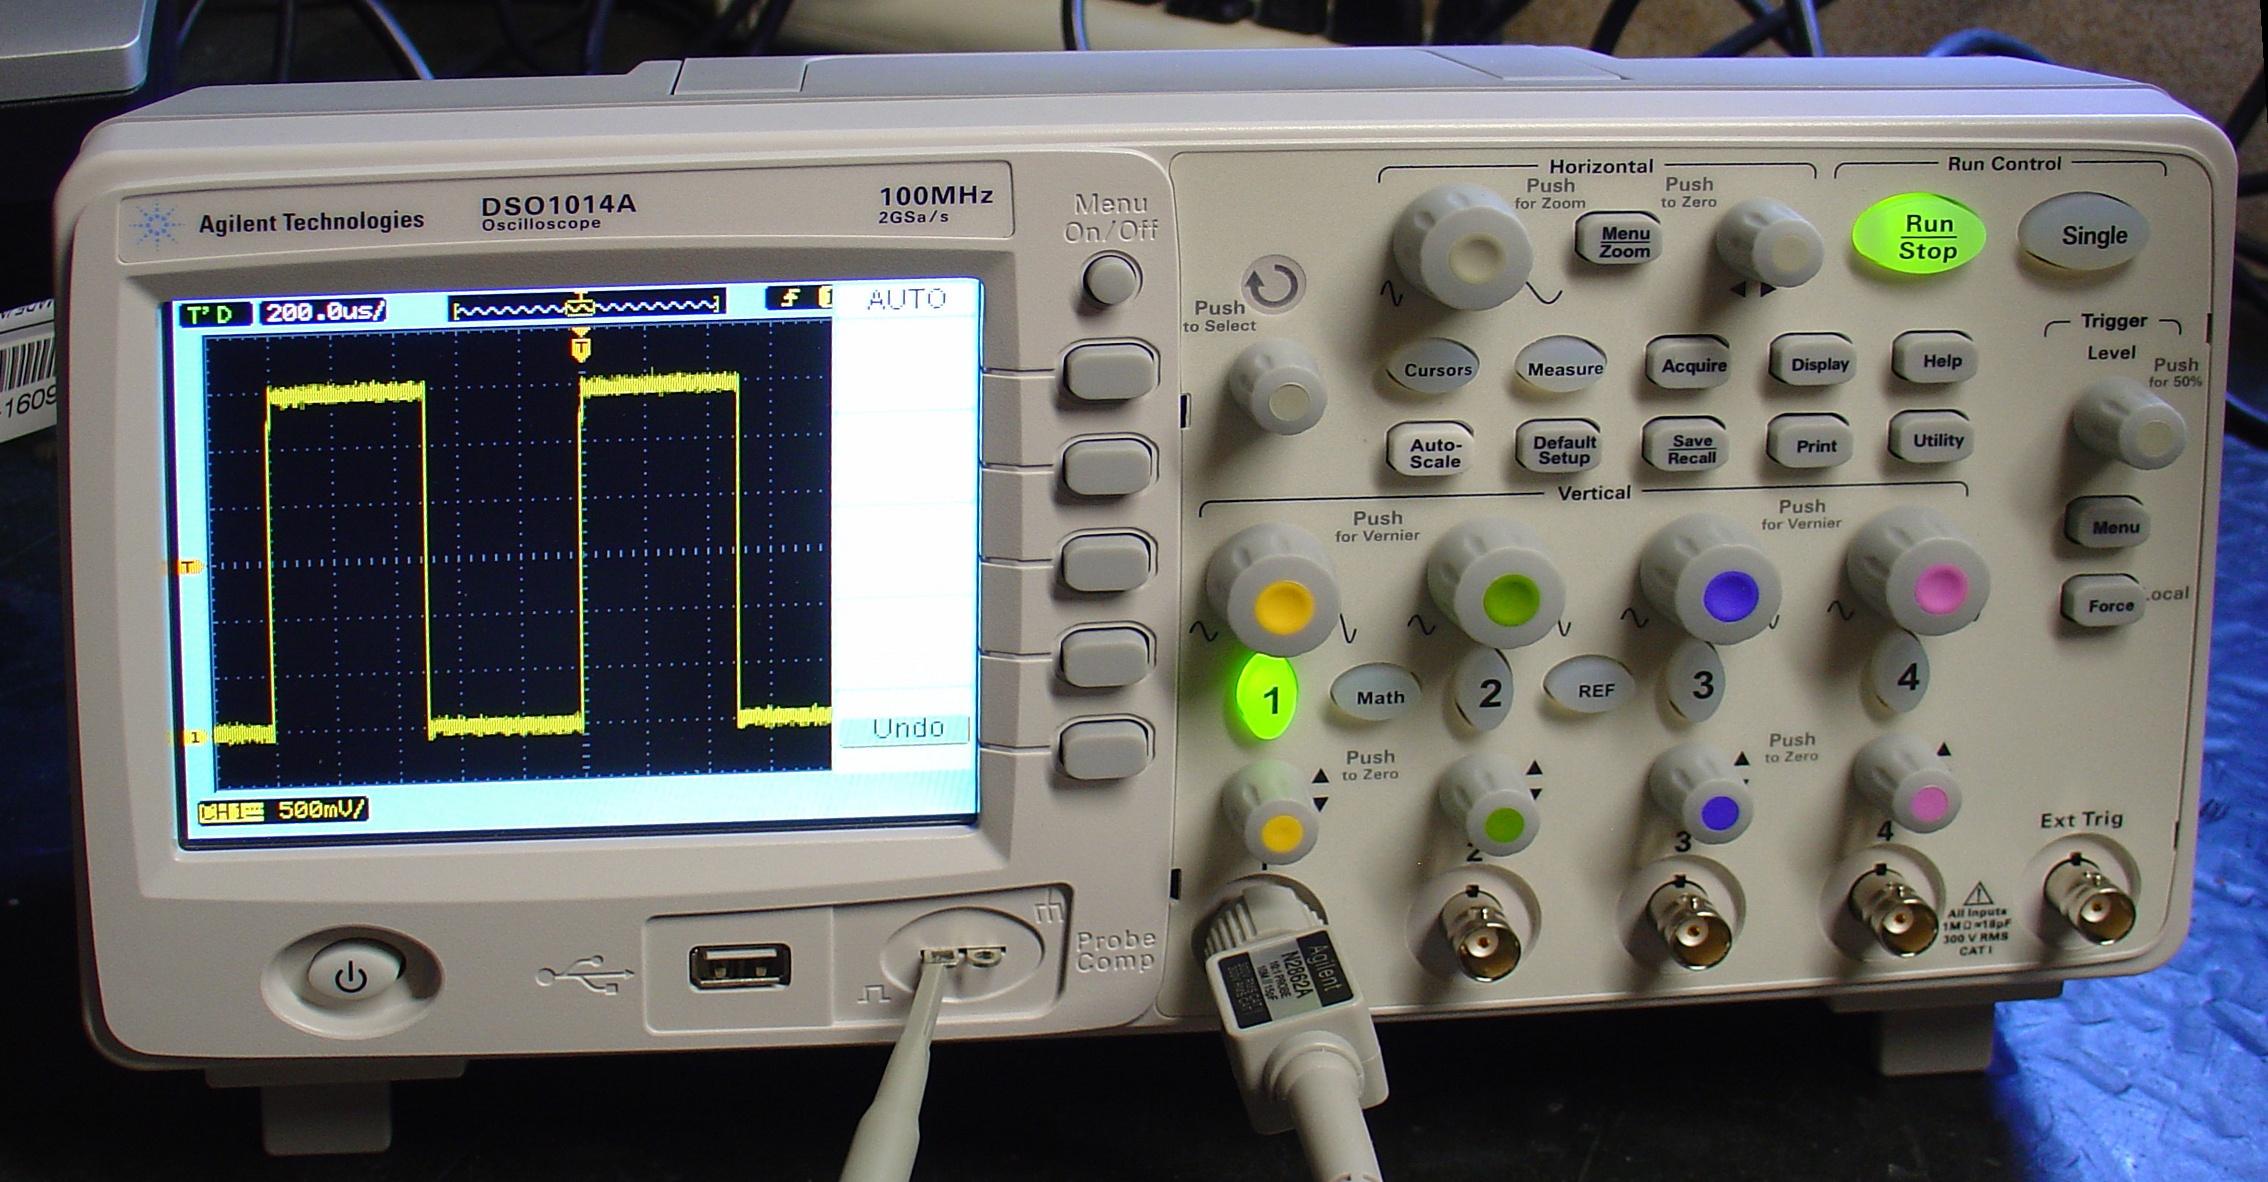
An oscilloscope is a powerful tool used to measure and analyze electrical signals in various electronic systems. It consists of a display screen, input ports, and a set of controls that allow you to observe and interpret waveforms. Whether you are an electronics hobbyist, a student, or a professional engineer, understanding how to use an oscilloscope is essential for troubleshooting, designing, and testing electronic circuits.
To begin using an oscilloscope, the first step is to power it on. Most oscilloscopes have a power button located on the front panel. Once powered on, you will see a blank screen waiting to display waveforms. Connect the probe of the oscilloscope to the signal source you want to observe. The probe typically has a ground clip that should be connected to the ground reference of the circuit for accurate measurements.
Once the oscilloscope is connected to the signal source, adjust the vertical, horizontal, and trigger controls to get the desired waveform display. The vertical control adjusts the amplitude or voltage level of the waveform. The horizontal control determines the time-base or the rate at which the waveform is displayed. The trigger control allows you to stabilize the waveform on the display. It is important to adjust these controls correctly to obtain an accurate representation of the signal.
Now that you have set up the oscilloscope, it’s time to interpret the waveforms. The horizontal axis represents time, while the vertical axis represents voltage. The waveform displayed on the screen shows how the voltage changes over time. You can measure different parameters of the waveform, such as peak voltage, period, frequency, and pulse width, using the built-in measurement tools of the oscilloscope. These measurements are crucial in understanding the behavior of electronic circuits and diagnosing any issues they may have.
In addition to basic waveform analysis, modern oscilloscopes often offer advanced features that enhance their functionality. These may include auto-scale, math functions, digital signal processing, and memory capabilities. Auto-scale automatically adjusts the vertical and horizontal controls to display the waveform optimally, thus saving time in setup. Math functions allow you to perform mathematical operations on waveforms, such as addition, subtraction, and multiplication. Digital signal processing features enable you to analyze complex signals, such as audio or serial data. The memory capability allows you to capture and save waveforms for later analysis or documentation.
In conclusion, learning how to use an oscilloscope is a fundamental skill for anyone working with electronic systems. By understanding the basics of setting up an oscilloscope, interpreting waveforms, and utilizing its advanced features, you can effectively analyze and troubleshoot electronic circuits. Whether you are a beginner or an experienced professional, an oscilloscope is a versatile tool that empowers you to explore the intricate world of electrical signals. So grab an oscilloscope and start unraveling the mysteries of waveforms!
Understanding the Basic Components and Functions
An oscilloscope is a powerful tool used in electrical engineering to visualize and measure voltage over time. Whether you are a seasoned professional or just starting out, having a solid understanding of the basic components and functions of an oscilloscope is essential. In this post, we will explore the key elements that make up an oscilloscope and how they work together to provide accurate measurements.
-
Display Screen:
The display screen is the heart of the oscilloscope. It is where the voltage waveform is displayed in real-time. The screen is typically divided into a grid, with horizontal and vertical lines representing time and voltage respectively. Some oscilloscopes also offer additional features like color display and touchscreen capabilities for enhanced user experience. -
Input Channels:
Input channels are the ports on the oscilloscope where you connect your signal source. Oscilloscopes can have multiple input channels, allowing you to measure and compare multiple signals simultaneously. Each channel typically has its own probe, which connects to the signal source and converts the analog signal into a digital format that can be displayed on the screen. -
Timebase Control:
The timebase control determines the horizontal scaling or the time duration represented by each division on the screen. By adjusting the timebase control, you can zoom in or out on the waveform, allowing you to analyze the signal at different time resolutions. This is particularly useful when looking for glitches or transient signals that may occur in very short time intervals. -
Vertical Control:
The vertical control is responsible for adjusting the voltage scaling or the amplitude represented by each division on the screen. It allows you to expand or shrink the vertical size of the waveform, making it easier to analyze the signal’s peak-to-peak voltage or its amplitude at different levels. The vertical control is crucial for accurately measuring the signal’s characteristics. -
Triggering:
Triggering is an essential feature that helps stabilize the displayed waveform on the screen. It ensures that the desired part of the signal is repeated in a stable and predictable manner. The trigger control allows you to specify the trigger source, such as a specific voltage level or an external signal. By properly setting the triggering parameters, you can observe the waveform with clarity and precision.
In conclusion, of an oscilloscope is fundamental to effectively using this powerful tool. The display screen, input channels, timebase control, vertical control, and triggering all work together to provide a comprehensive measurement and analysis platform. By mastering these key elements, you will be able to confidently explore and interpret voltage waveforms in various applications, ultimately improving your understanding of electronic circuits and systems.

Proper Setup and Connection Techniques
When it comes to using an oscilloscope, are crucial to obtaining accurate and reliable measurements. Whether you are a beginner or an experienced user, following these guidelines will help you make the most of this powerful instrument.
1. Grounding: Before you start connecting your oscilloscope, ensure that it is properly grounded. This helps in avoiding ground loops and reducing noise interference. Connect the grounding clip to a reliable earth ground or use a ground lead provided by your oscilloscope manufacturer.
2. Probe Connections: To connect your probe to the oscilloscope, make sure it is powered off. Begin by connecting the ground lead of the probe to the ground terminal of the oscilloscope. Then, carefully attach the probe tip to the point you want to measure. Keep in mind that the connections should be secure and clean to avoid any signal degradation.
3. Channel Setup: Once the connections are made, you need to configure the channels on your oscilloscope. Adjust the voltage scale and time base settings according to your signal’s amplitude and frequency. It’s essential to set the voltage range correctly to avoid clipping or distortion of the waveform.
| Proper Voltage Ranges | Frequency | Voltage |
|---|---|---|
| Low Frequency | 1 Hz – 1 kHz | 1V – 10V |
| Medium Frequency | 1 kHz – 1 MHz | 100mV – 1V |
| High Frequency | > 1 MHz | 10mV – 100mV |
4. Probing Techniques: While using your oscilloscope, it’s important to employ proper probing techniques to ensure accurate measurements. Avoid excessive pressure on the probe to minimize possible loading effects. Additionally, keep the probe’s ground and signal wires as short as possible to reduce unwanted noise pickup.
- Remember: Ground clips should be connected only to proper ground points.
- Use: Shielded probe cables for improved noise immunity.
- Minimize: Loop areas to reduce inductive effects.
5. Calibration: Regular calibration of your oscilloscope is essential to maintain accurate measurements. Consult the manufacturer’s guidelines or a professional calibration service to ensure your instrument is properly calibrated. This will help provide reliable results and avoid measurement errors.
By following these , you can utilize your oscilloscope to its full potential. Remember to always refer to your oscilloscope’s user manual or seek professional guidance when in doubt. With practice and attention to detail, you’ll become adept at obtaining accurate measurements and troubleshoot electrical systems effectively.

Interpreting and Analyzing Oscilloscope Waveforms
An oscilloscope is a powerful tool used in electronics to measure and visualize electrical waveforms. is crucial for understanding the behavior of circuits and diagnosing any potential issues. In this post, we will explore how to use an oscilloscope effectively and make the most out of its capabilities.
To begin analyzing an oscilloscope waveform, start by connecting the probe of the oscilloscope to the test point on the circuit you want to measure. It is important to select the appropriate voltage range on the oscilloscope to ensure accurate readings. Once connected, the oscilloscope will display the waveform on its screen, allowing you to observe its shape, amplitude, frequency, and other essential characteristics.
Understanding the various features of an oscilloscope is essential for interpreting waveforms accurately. Most oscilloscopes offer options to adjust the time base, voltage scale, and trigger settings. The time base determines the horizontal scale of the waveform, while the voltage scale determines the vertical scale. Adjusting these settings appropriately will help you visualize the waveform in a way that makes it easier to analyze.
When analyzing waveforms, pay attention to the shape and amplitude. The shape indicates the type of waveform, such as sine, square, or triangular, whereas the amplitude represents the maximum voltage of the waveform. Additionally, the oscilloscope can help identify the frequency of the waveform. By measuring the period between repetitive patterns, you can determine the frequency using the formula frequency = 1/period.
In some cases, it can be beneficial to capture and save waveforms for future analysis. Many oscilloscopes offer the option to save waveforms to a USB device or a computer. By saving waveforms, you can compare different measurements easily and identify any changes or anomalies. This can be particularly useful for troubleshooting circuits or documenting test results.
When analyzing waveforms, it is crucial to have a clear understanding of the specifications and tolerances for the circuit you are working with. This will help you determine whether the waveform is within the expected parameters or if there are any abnormalities. Referencing the circuit’s datasheet or consulting the manufacturer’s guidelines can provide valuable insights in this regard.
In conclusion, is an essential skill for anyone working in electronics. By understanding the features and settings of the oscilloscope, you can effectively measure and visualize waveforms. Paying attention to the shape, amplitude, and frequency of the waveform, as well as saving and comparing waveforms, will aid in troubleshooting circuits and ensuring their proper functioning.
Advanced Tips and Tricks for Optimal Oscilloscope Usage
1. Utilize the Trigger Function: The trigger function is a powerful tool for stabilizing waveforms and capturing specific events on your oscilloscope. Experiment with different trigger types such as edge, pulse width, and video to ensure accurate measurements. By setting the trigger level and mode correctly, you can eliminate unnecessary noise and focus on the signal of interest.
2. Use Math Functions: Take advantage of the math functions available on your oscilloscope to perform advanced analysis on waveforms. Whether it’s calculating frequency, integrating signals, or performing FFT (Fast Fourier Transform), these functions can provide valuable insights into the behavior of your signals. Be sure to explore the various math options provided by your oscilloscope to unlock its full potential.
3. Master the Measurement Tools: Accurate measurements are essential when working with an oscilloscope. Familiarize yourself with the built-in measurement tools such as cursors, automatic measurements, and statistics. These tools can save you time and effort by automatically calculating parameters such as voltage, frequency, rise time, and more. Take advantage of their convenience to validate your measurements and ensure precise results.
4. Customize Your Oscilloscope: Most modern oscilloscopes offer customization options to tailor the display and functionality according to your preferences. Take time to explore the available settings, such as waveform color, grid type, and interface layout. By personalizing your oscilloscope, you can create a more efficient and comfortable workspace, enabling you to focus on the task at hand.
5. Interpret Waveform Anomalies: When troubleshooting or analyzing signals, it’s crucial to understand the meaning behind waveform anomalies. Familiarize yourself with common abnormalities like overshoot, ringing, and jitter to identify potential issues in your circuits or signals. Use appropriate measurement tools and oscilloscope functionalities to quantify and analyze these anomalies, aiding in resolving problems and improving overall performance.
Q&A
Q: What is an oscilloscope and what is it used for?
A: An oscilloscope is a device used to measure and display electronic signals. It is commonly used in electronics, telecommunications, and engineering fields for troubleshooting, analyzing waveforms, and testing circuits.
Q: How does an oscilloscope work?
A: An oscilloscope works by displaying the voltage of an electrical signal on a graph called an oscillogram. It generates this representation by capturing and amplifying the signal, and then plotting it on a screen with the vertical axis representing voltage and the horizontal axis displaying time.
Q: What are the basic components of an oscilloscope?
A: An oscilloscope typically consists of four main components: the display screen, vertical channels, a timebase, and triggering controls. The display screen shows the waveform, while the vertical channels handle signal inputs. The timebase controls the speed or duration of the captured signal, and triggering allows you to synchronize the waveform display.
Q: How should I set up an oscilloscope?
A: Begin by connecting the probe to the signal source. Choose the appropriate voltage range and connect the probe to the appropriate input channel. Adjust the vertical and horizontal scales to set the desired waveform display size. Ensure the trigger settings are appropriate for your signal, and then power on the oscilloscope.
Q: How can I interpret the waveform displayed on the oscilloscope?
A: The waveform displayed represents the amplitude and frequency of the signal. The vertical axis shows the voltage level, while the horizontal axis displays time. By analyzing the shape, period, amplitude, and frequency of the waveform, you can gain insights about the signal’s characteristics and troubleshoot issues.
Q: What are some typical applications of an oscilloscope?
A: Oscilloscopes are used in a wide range of applications. Some common ones include analyzing electronic circuits, measuring the frequency and amplitude of signals, debugging and troubleshooting circuits, testing and calibrating electronic equipment, and observing electrical waveforms.
Q: Are there any safety precautions to consider while using an oscilloscope?
A: Yes, it is important to follow safety precautions when using an oscilloscope. Always ensure that the power supply and equipment you are measuring are properly grounded. Avoid high voltage sources unless using proper insulation. Additionally, handle the oscilloscope and probes with care, especially while making connections to live circuits, to prevent electric shock or injury.
Q: Are there any limitations to be aware of when using an oscilloscope?
A: While oscilloscopes are versatile tools, they do have some limitations. For instance, they have bandwidth limitations, meaning they can only accurately measure signals within a specific frequency range. Higher-end oscilloscopes offer greater bandwidths. Additionally, they may have limited memory depth, affecting the duration of the captured signal.
Q: Can I use an oscilloscope for digital signal analysis?
A: Yes, many modern oscilloscopes are equipped with advanced triggering and decoding capabilities for digital signals. These features allow you to analyze digital waveforms, measure rise and fall times, find glitches, and decode protocols like SPI, I2C, and UART.
Q: Where can I learn more about using an oscilloscope?
A: Numerous resources are available to learn more about using an oscilloscope. Online tutorials, manufacturer guides, textbooks, and training courses are great places to start. Additionally, joining electronics forums or seeking guidance from experienced professionals can provide valuable insights and practical tips. In conclusion, mastering the art of using an oscilloscope can greatly enhance your understanding and troubleshooting capabilities in the realm of electronics. By following the step-by-step guide discussed in this article, you now have the knowledge required to confidently operate this powerful tool. Remember, a thorough understanding of the oscilloscope’s functions, as well as a keen eye for waveform analysis, will enable you to accurately measure voltages, frequencies, and time intervals, ultimately helping you diagnose and fix electrical issues with precision. Whether you’re an electronics enthusiast, a hobbyist, or a professional in the field, the oscilloscope is undoubtedly an invaluable asset in your arsenal. So go ahead, put your newfound skills to the test, and explore the endless possibilities that this remarkable device offers. Happy oscilloscope adventures!


