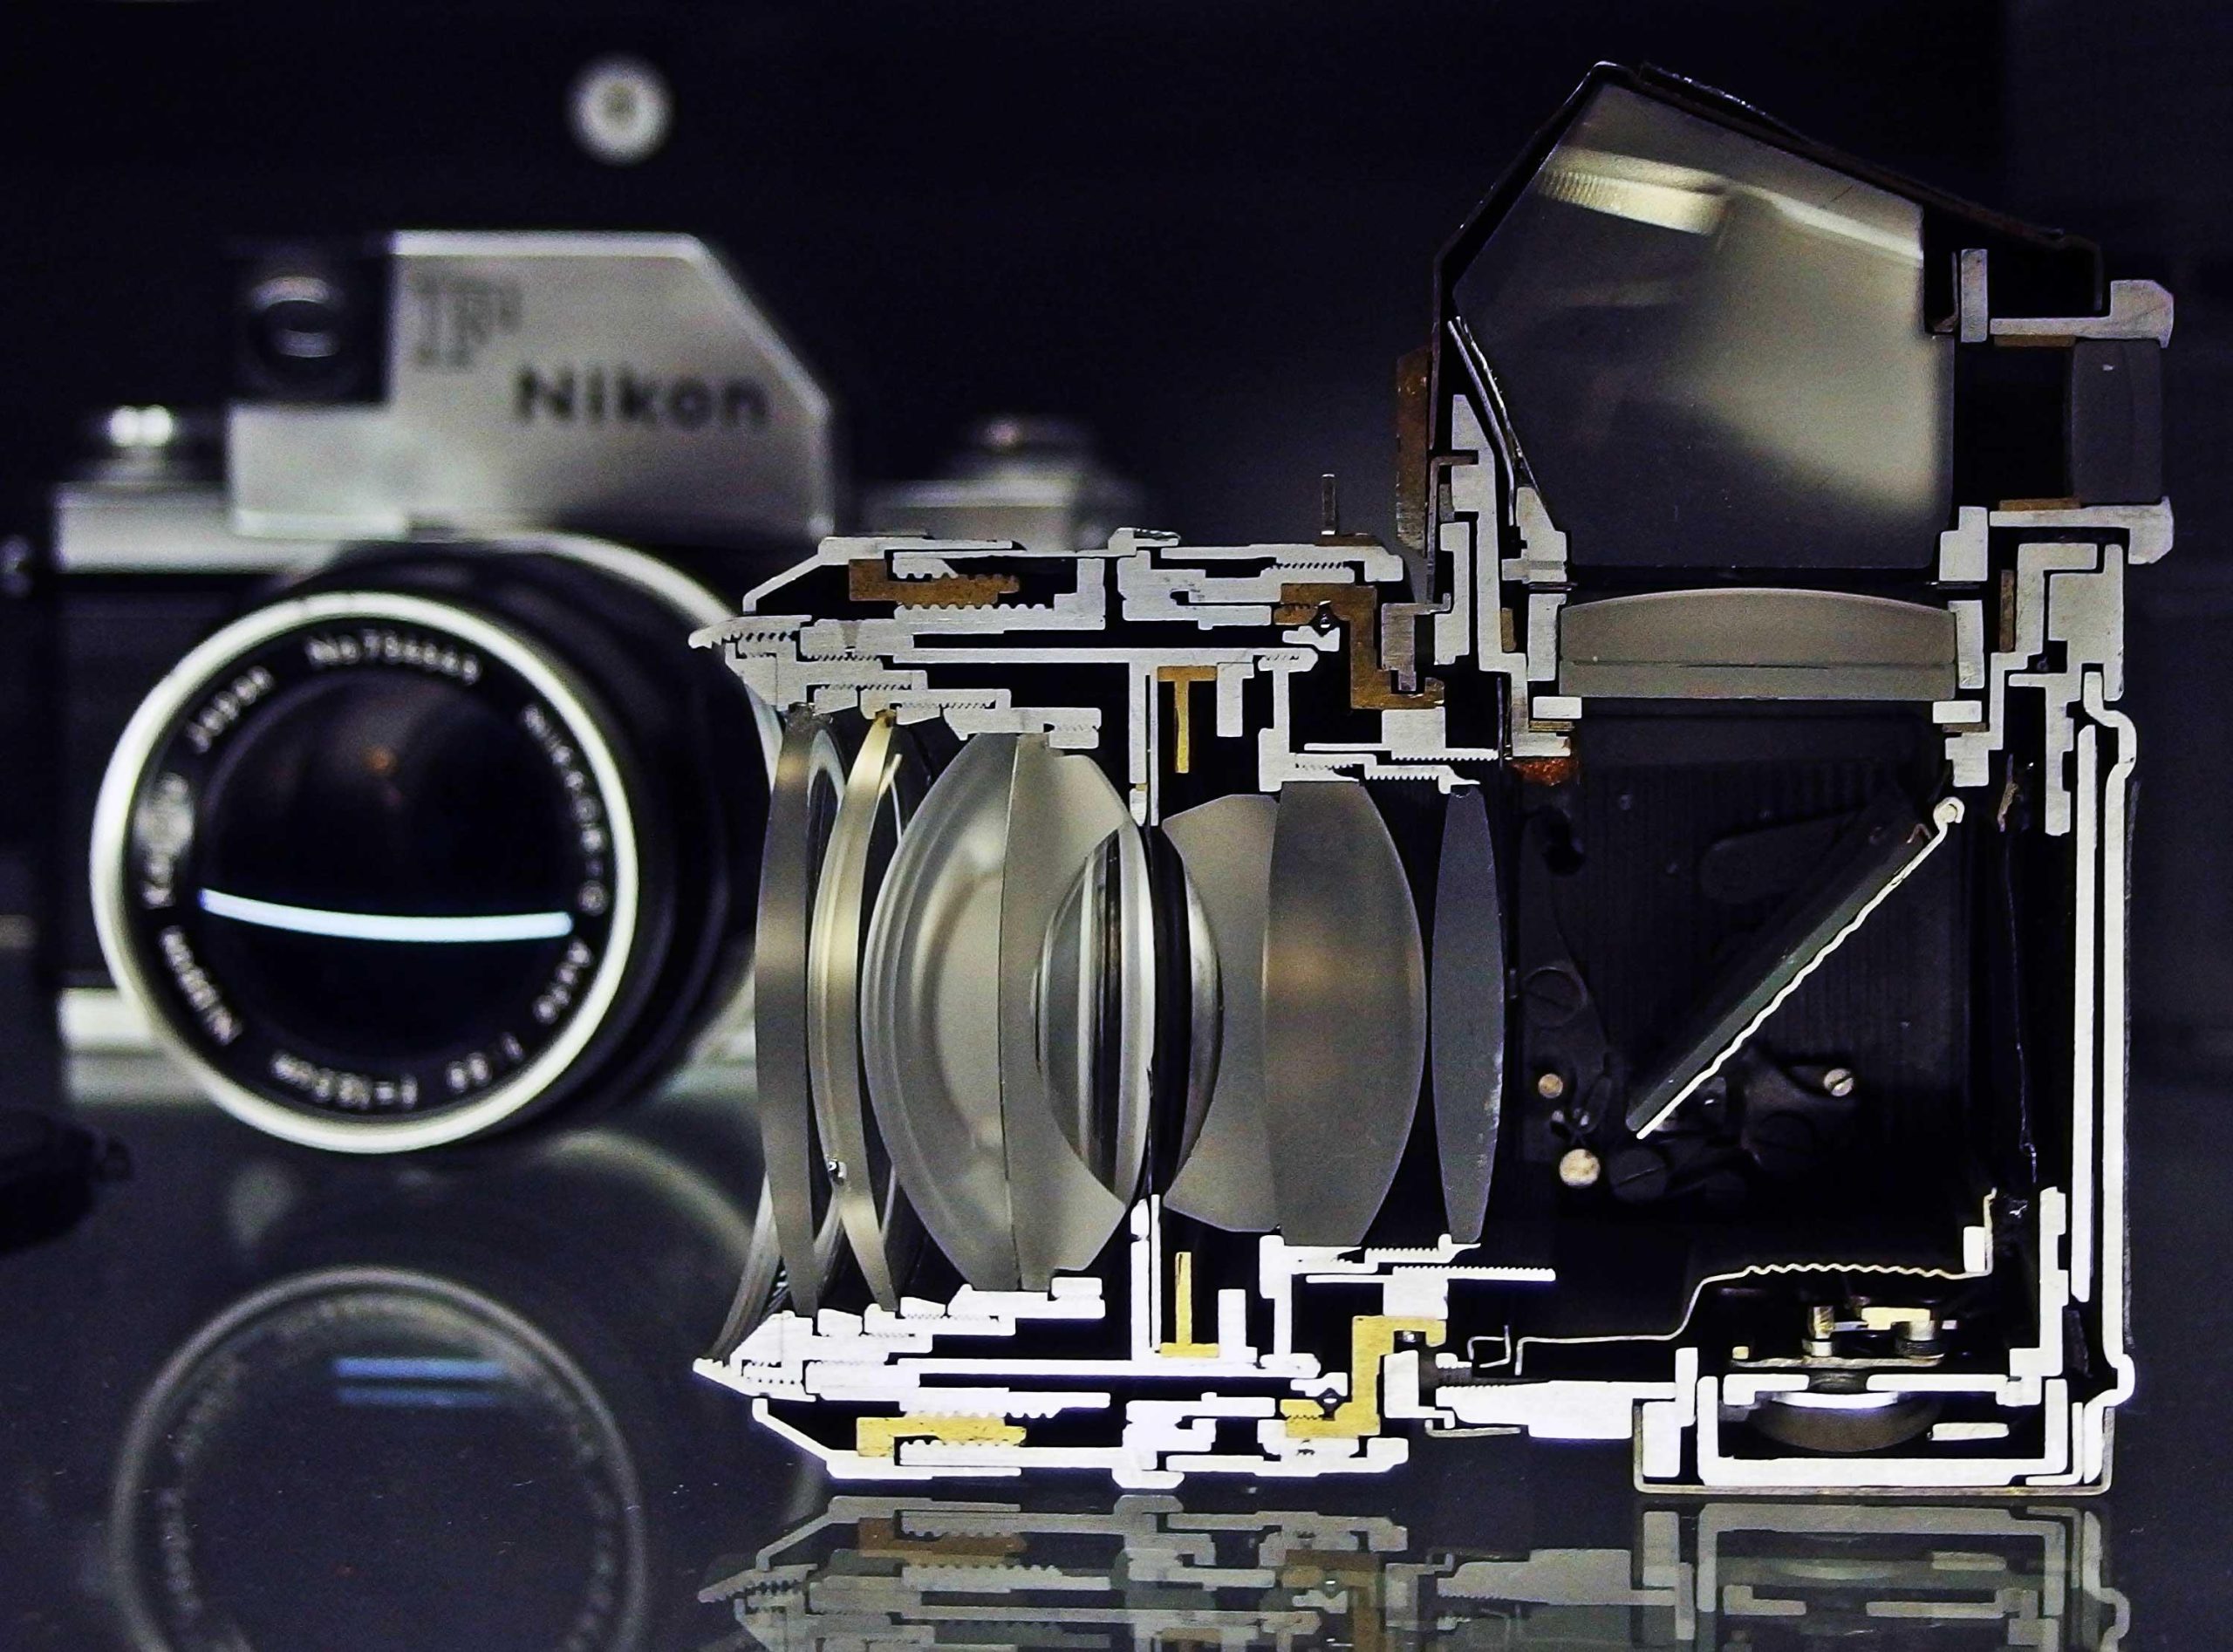
SLR cameras, with their advanced features and versatile capabilities, have long been the go-to choice for professional photographers and enthusiasts alike. Whether you are just stepping into the world of photography or seeking to enhance your skills, understanding how to effectively utilize these powerful devices is crucial. In this article, we will delve into the fundamental aspects of SLR cameras and provide you with a comprehensive guide on how to unlock their potential, enabling you to capture stunning photographs with precision and creativity. So, grab your camera and prepare to embark on a journey that will take your photographic skills to new heights.
Getting Started with an SLR Camera
Aspiring photographers often gravitate towards SLR cameras due to their versatility and the possibility to capture stunning, professional-quality images. If you’re new to the world of SLR cameras, getting started may seem a bit overwhelming at first. But fear not! With a little guidance, you’ll soon be on your way to capturing breathtaking photos.
<h2>1. Familiarize Yourself with Camera Controls</h2>
<p>The first step in using an SLR camera is to familiarize yourself with the various controls and buttons. These differ slightly between camera models, but there are some common features you should get acquainted with:</p>
<ul>
<li><strong>Shutter Button:</strong> Located on the top of the camera, this button allows you to capture an image when pressed halfway to focus and fully to take the photo.</li>
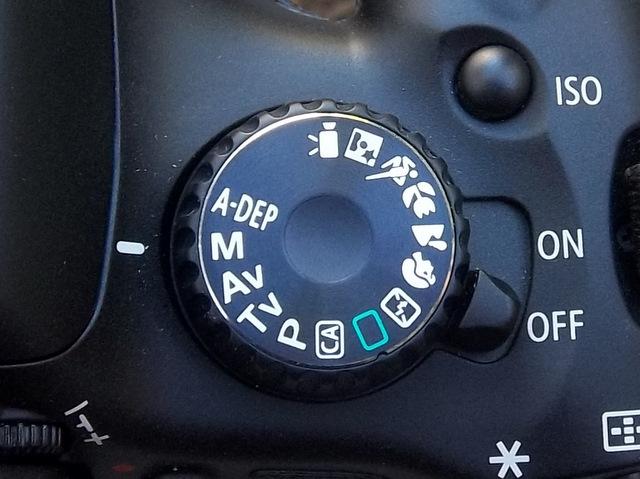
<li><strong>Mode Dial:</strong> Usually situated on the top or side, the mode dial lets you choose between different shooting modes such as manual, aperture priority, and shutter priority.</li>
<li><strong>Aperture Ring:</strong> Found on the lens, this ring controls the size of the camera's aperture, which affects the depth of field and the amount of light entering the camera.</li>
</ul>
<h2>2. Master the Exposure Triangle</h2>
<p>To achieve well-exposed images, you must understand the exposure triangle. It consists of three crucial settings: aperture, shutter speed, and ISO. A balance between these settings is necessary to achieve the desired exposure:</p>
<table class="wp-table">
<thead>
<tr>
<th>Setting</th>
<th>Role</th>
</tr>
</thead>
<tbody>
<tr>
<td>Aperture</td>
<td>Determines the amount of light entering the camera and controls the depth of field.</td>
</tr>
<tr>
<td>Shutter Speed</td>
<td>Controls the duration of the exposure and freezes or blurs motion.</td>
</tr>
<tr>
<td>ISO</td>
<td>Determines the camera's sensitivity to light, affecting the level of noise in the image.</td>
</tr>
</tbody>
</table>
<h2>3. Practice Focusing Techniques</h2>
<p>Sharp focus is essential to capturing stunning images. Most SLR cameras offer various focusing modes for different shooting scenarios. Some common focusing techniques to explore include:</p>
<ul>
<li><strong>Manual Focus:</strong> By manually adjusting the focus ring on the lens, you have complete control over what's in focus.</li>
<li><strong>Auto Focus:</strong> Ideal for fast-paced situations, autofocus allows the camera to automatically focus on the subject with the help of built-in sensors.</li>
<li><strong>Single Point Focus:</strong> This mode lets you select a specific focus point in the frame, providing precise control over what you want to be sharp.</li>
</ul>
<h2>4. Get Creative with Composition</h2>
<p>Composition plays a significant role in creating visually appealing photos. Experiment with different techniques to compose your shots, such as:</p>
<ul>
<li><strong>Rule of Thirds:</strong> Divide the frame into a 3x3 grid and place the subject or main points of interest along these lines or at their intersections.</li>
<li><strong>Leading Lines:</strong> Use lines within the scene, such as roads or fences, to draw the viewer's eye towards the subject.</li>
<li><strong>Foreground Interest:</strong> Incorporate interesting elements in the foreground to add depth and create a more immersive experience for the viewer.</li>
</ul>
<h2>5. Practice and Experiment</h2>
<p>Like any skill, mastering the use of an SLR camera requires practice. Don't be afraid to experiment with different settings, lighting conditions, and subjects. Each photo you take is an opportunity to learn and improve. Over time, you'll develop your unique style and gain confidence in your abilities as a photographer.</p>
Understanding the Basics: Shutter Speed, Aperture, and ISO
When it comes to using a SLR camera, it is important to understand the basics of shutter speed, aperture, and ISO. These three elements work together to control the exposure of your photographs and enhance your overall image quality. Let’s dive into each one of them:
1. Shutter Speed
Shutter speed refers to the amount of time that the camera’s shutter remains open when taking a photo. It determines how long the sensor is exposed to light. A fast shutter speed, like 1/1000th of a second, freezes the action and is ideal for capturing fast-moving subjects like sports or wildlife. On the other hand, a slow shutter speed, such as 1/30th of a second, allows more light in and is great for capturing motion blur in creative photography or low-light situations.
2. Aperture
The aperture is the size of the opening in the lens through which light passes. It is measured using f-numbers or f-stops. A lower f-number, like f/2.8, means a larger aperture and more light entering the camera. This results in a shallow depth of field, where the subject is in focus while the background is blurred. Conversely, a higher f-number, like f/16, means a smaller aperture and less light. This creates a larger depth of field, where both the subject and background are in focus. Using aperture creatively allows you to control the composition and focus of your images.
3. ISO
ISO determines the camera’s sensitivity to light. A low ISO setting, such as ISO 100, is perfect for shooting in bright conditions, as it produces sharp and noise-free images. However, in low-light situations, you may need to increase the ISO, like to ISO 800 or higher, to ensure proper exposure. Keep in mind that higher ISO settings can introduce noise or graininess into your images, so finding the right balance is essential.
Putting It All Together
Now that you understand the basics of shutter speed, aperture, and ISO, it’s time to put them into practice. Experiment with different settings to see how they affect your images. Remember, photography is all about creativity and understanding these fundamentals will help you capture stunning photographs with your SLR camera.
Conclusion
By mastering shutter speed, aperture, and ISO, you have a solid foundation for using a SLR camera. These three elements work together to control exposure, depth of field, and image quality. Take your time to practice and understand how they impact your photography. With patience and creativity, you can unlock the full potential of your SLR camera and capture breathtaking images.
Exploring Different Shooting Modes and Manual Settings
Using a SLR camera allows you to have full control over your photography. One of the most powerful features of a SLR camera is the ability to explore different shooting modes and manual settings. These options give you the creative freedom to capture images exactly as you envision them. In this post, we will dive into the various shooting modes and manual settings, and how you can use them to enhance your photography skills.
-
Shooting Modes:
- Auto Mode: This mode is perfect for beginners or when you’re in a rush. The camera automatically adjusts the exposure, focus, and other settings to produce a well-exposed image.
- Aperture Priority Mode (Av/A): In this mode, you control the lens aperture setting, while the camera adjusts the other settings accordingly. This is great for controlling depth of field, allowing you to blur the background or keep it in focus.
- Shutter Priority Mode (Tv/S): With this mode, you set the desired shutter speed, while the camera sets the aperture and ISO settings. It’s ideal for capturing motion, freezing fast-moving subjects, or creating motion blur effects.
- Manual Mode (M): This mode gives you full control over all settings, including aperture, shutter speed, and ISO. It offers the most creative freedom, allowing you to experiment and achieve your desired results.
-
Aperture:
- Aperture refers to the size of the opening in the camera lens through which light passes. It affects two main aspects: depth of field and brightness.
- A lower aperture value (e.g. f/2.8) results in a wider opening, allowing more light to enter the camera. This produces a shallower depth of field, with the subject in focus and the background blurred.
- A higher aperture value (e.g. f/16) narrows the opening, resulting in less light entering the camera. This increases the depth of field, keeping both the subject and background in focus.
-
Shutter Speed:
- Shutter speed refers to the length of time that the camera’s shutter remains open, exposing the image sensor to light. It affects the amount of motion blur and the overall exposure of your photo.
- A faster shutter speed (e.g. 1/1000) results in a shorter exposure time, freezing fast-moving subjects and reducing motion blur.
- Slower shutter speeds (e.g. 1/30) allow more time for the sensor to capture light, resulting in motion blur. It’s useful for creating artistic effects, such as light trails or silky waterfalls.
-
ISO:
- ISO measures the sensitivity of your camera’s image sensor to light. Higher ISO values allow for better low-light performance but can introduce more digital noise in your photos.
- Use a lower ISO setting (e.g. ISO 100) when shooting in bright conditions. This reduces noise and produces cleaner images.
- Increase the ISO value (e.g. ISO 800 or higher) when shooting in low-light situations, but be cautious as higher ISO values can introduce noise.
-
White Balance:
- White balance ensures that the colors in your photos appear as natural as possible, regardless of the lighting conditions.
- Use the camera’s preset white balance modes (such as daylight, cloudy, or tungsten) to adjust the color temperature accordingly.
- Alternatively, you can set a custom white balance by using a white or gray card to calibrate the camera to the specific lighting conditions.
By exploring the different shooting modes and manual settings of your SLR camera, you can unleash your creativity and take your photography to the next level. Experiment with aperture, shutter speed, ISO, and white balance to capture stunning images that truly reflect your vision. Remember, practice makes perfect, so don’t be afraid to experiment and learn from your results. Happy shooting!
Mastering Techniques for Focus and Depth of Field
Understanding how to use a SLR camera is key to capturing stunning photos with precise focus and a captivating depth of field. With the right techniques, you can take your photography skills to the next level and unlock the full potential of your SLR camera. In this post, we will explore various methods to master focus and depth of field, enabling you to create visually striking images that truly stand out.
1. Aperture Priority Mode: One of the simplest ways to control depth of field is by using the aperture priority mode on your SLR camera. By adjusting the aperture, you can control how much of your image is in focus and create a shallow or deep depth of field. Larger aperture (smaller f-stop number) results in a shallower depth of field, while smaller aperture (larger f-stop number) increases the depth of field.
2. Manual Focus: While autofocus can be convenient, mastering manual focus is essential when you want to have full control over the areas of your image that you want to be in sharp focus. Take the time to practice adjusting the focus ring on your lens, ensuring that your subject is crisply in focus while creating a pleasing blur in the background.
3. Selective Focus Technique: This technique is particularly useful in portrait photography, where the subject is the main focus and the background is intentionally blurred. To achieve this effect, position your subject farther away from the background and use a large aperture setting. By isolating your subject and blurring the background, you can create a captivating image that draws the viewer’s attention to the main subject.
| Aperture vs. Depth of Field | |
|---|---|
| Aperture | Depth of Field |
| Large (Small f-stop number) | Shallow (only a small part of the image is in focus) |
| Small (Large f-stop number) | Deep (a larger portion of the image is in focus) |
4. Utilize Focus Points: Most SLR cameras offer multiple focus points, allowing you to select the specific area in the frame that you want to be in sharp focus. Experiment with different focus points and compositions to achieve the desired effect. This technique is especially helpful when capturing subjects with off-center compositions.
5. Practice Depth Stacking: Depth stacking is a technique where you capture multiple images at different focus distances and then merge them together to create a final image with a greater depth of field. This is particularly useful when photographing landscapes or architectural structures, where you want to maintain sharp focus throughout the entire scene. Use software like Adobe Photoshop or specialized focus stacking programs to blend the images seamlessly.
By mastering the techniques mentioned above, you will have a solid foundation for achieving exceptional focus and creating stunning depth in your photographs. Remember, practice makes perfect, so don’t hesitate to experiment and develop your unique style. With time and dedication, you’ll be amazed at the incredible images you can capture with your SLR camera.

Pro Tips: Composition, Lighting, and Lens Selection
Creating visually appealing and compelling images with a SLR camera requires careful attention to composition, lighting, and lens selection. These pro tips can help take your photography to the next level by allowing you to capture stunning and captivating shots.
-
Composition: The way you frame your subject can greatly impact the final image. To create a well-composed photo, consider the rule of thirds. Imagine breaking your image into nine equal parts using two horizontal and two vertical lines. By placing your subject or points of interest along these lines or at the intersecting points, you can create a more balanced and visually pleasing composition. Experiment with different perspectives, angles, and focal lengths to add depth and interest to your shot.
-
Lighting: Lighting plays a crucial role in photography, and understanding how to use it effectively can enhance the overall mood and quality of your images. In natural light photography, it’s often best to shoot during the “golden hours,” which are the first and last hours of sunlight when the light is soft and warm. Experiment with backlighting, sidelighting, and front lighting to create different effects and shadows. If shooting indoors or in low-light conditions, consider using artificial lighting sources like flashes or studio lights to illuminate your subject.
-
Lens Selection: The lens you choose can significantly impact the look and feel of your photos. Wide-angle lenses are great for capturing vast landscapes or architectural shots, while telephoto lenses are ideal for zooming in on distant subjects and capturing intimate details. Prime lenses with a fixed focal length can offer sharper images and wider apertures for beautiful background blur. Experiment with different lenses to find the ones that suit your shooting style and desired outcome.
-
Focus and Depth of Field: Achieving sharp focus is essential in photography. Use your camera’s autofocus or manually adjust the focus to ensure your subject is crisp and clear. Understanding depth of field is also crucial in creating depth and separation between your subject and the background. A shallow depth of field, achieved with a wide aperture setting, can help isolate your subject and blur the background, while a narrow depth of field, achieved with a smaller aperture, can ensure more of the scene is in focus.
-
Post-Processing: Once you’ve captured your image, post-processing can help enhance its visual appeal further. Use software like Adobe Lightroom or Photoshop to adjust exposure, contrast, and saturation. Experiment with different editing techniques to create your desired style. Remember not to overdo it; subtlety is key in creating natural-looking and timeless images.
By applying these pro tips on composition, lighting, and lens selection, you can elevate the quality of your photography and create visually stunning images that leave a lasting impact. Remember, practice makes perfect, so get out there with your SLR camera and explore the endless possibilities that await you.
Q&A
Q: What is a SLR camera?
A: A SLR camera, short for Single-Lens Reflex camera, is a type of camera that uses a mirror and prism system to enable the photographer to see through the lens and accurately see what will be captured in the final image.
Q: What are the benefits of using a SLR camera?
A: SLR cameras offer several advantages, including interchangeable lenses that allow for different types of photography, a wide range of manual settings to control exposure and focus, and the ability to achieve a shallow depth of field for creating professional-looking photographs.
Q: How do I properly hold a SLR camera?
A: To hold a SLR camera correctly, use both hands: one hand should grip the camera body firmly while the other supports the lens. This ensures stability and minimizes camera shake.
Q: What are the different shooting modes available on a SLR camera?
A: SLR cameras typically offer various shooting modes, including Program, Aperture Priority, Shutter Priority, and Manual. Program mode automatically selects the exposure settings, while Aperture Priority and Shutter Priority modes allow you to control the aperture or shutter speed, respectively. Manual mode gives full control over both aperture and shutter speed.
Q: How can I achieve proper focus on a SLR camera?
A: To achieve proper focus with a SLR camera, use the focusing ring on the lens or the autofocus function. You can also use the camera’s focus points or focus lock feature to selectively focus on specific subjects within the frame.
Q: How can I adjust the exposure on a SLR camera?
A: SLR cameras provide various ways to adjust exposure, such as changing the aperture, shutter speed, or ISO sensitivity. Adjusting the aperture controls the amount of light by changing the size of the lens opening, while shutter speed determines the duration of time the camera’s sensor is exposed. ISO sensitivity affects the camera’s sensitivity to light, allowing you to adjust exposure in low-light situations.
Q: What are some basic tips for composition with a SLR camera?
A: When composing a photograph with a SLR camera, consider the rule of thirds. This involves mentally dividing the frame into a 3×3 grid and placing your subject along the lines or at the intersections for a visually appealing composition. Additionally, pay attention to leading lines, framing, and the background to enhance your images.
Q: How can I handle lighting conditions with a SLR camera?
A: To handle different lighting conditions, you can adjust your SLR camera settings accordingly. In low-light situations, increase the ISO sensitivity, widen the aperture, or use a tripod to avoid camera shake. For bright situations, decrease ISO sensitivity, use a smaller aperture, and adjust shutter speed to avoid overexposure.
Q: What are some essential accessories for a SLR camera?
A: Essential accessories for a SLR camera include additional lenses for different purposes (e.g., wide-angle, telephoto), a tripod for stability, a camera bag for storage and protection, extra memory cards, and filters for controlling light and enhancing images.
Q: How can I improve my photography skills with a SLR camera?
A: Improving your photography skills with a SLR camera requires practice and experimentation. Familiarize yourself with the camera’s settings and features, study composition techniques, and explore different photography genres. Joining photography workshops or communities can also provide valuable insights and feedback from experienced photographers. In conclusion, mastering the use of a SLR camera can be a rewarding experience for both hobbyists and aspiring photographers. By understanding its various components and settings, you can unleash your creativity and capture stunning images. Remember to start with the basics, such as correctly holding the camera and adjusting focus, before delving into more advanced techniques like exposure and composition. Regular practice and experimentation will help you gain confidence and refine your skills. While the process may seem overwhelming at first, take it one step at a time and never hesitate to consult the camera’s manual or seek advice from professionals. With patience and dedication, you’ll soon be well on your way to becoming a skilled SLR photographer. So, grab your camera, venture out into the world, and discover the endless possibilities that await you behind the lens. Happy shooting!


