The rotary table, a versatile machining accessory, empowers engineers and hobbyists alike by adding precision and efficiency to various operations. Whether you are a professional machinist seeking to streamline your work or an enthusiast delving into the world of machining, understanding how to utilize a rotary table is essential. This article serves as a comprehensive guide, providing step-by-step instructions and valuable insights on how to effectively use a rotary table for enhanced accuracy and expanded capabilities. Discover the key techniques and practical tips that will elevate your machining skills to new heights, enabling you to take on intricate projects with confidence and finesse.
Introduction to Rotary Tables
Rotary tables are powerful tools that have a wide range of applications in various industries. Whether you’re a machinist, engineer, or hobbyist, learning how to use a rotary table can greatly enhance your productivity and precision. In this post, we will explore the fundamentals of rotary tables and provide you with step-by-step instructions on how to use them effectively.
-
Understanding the Basics:
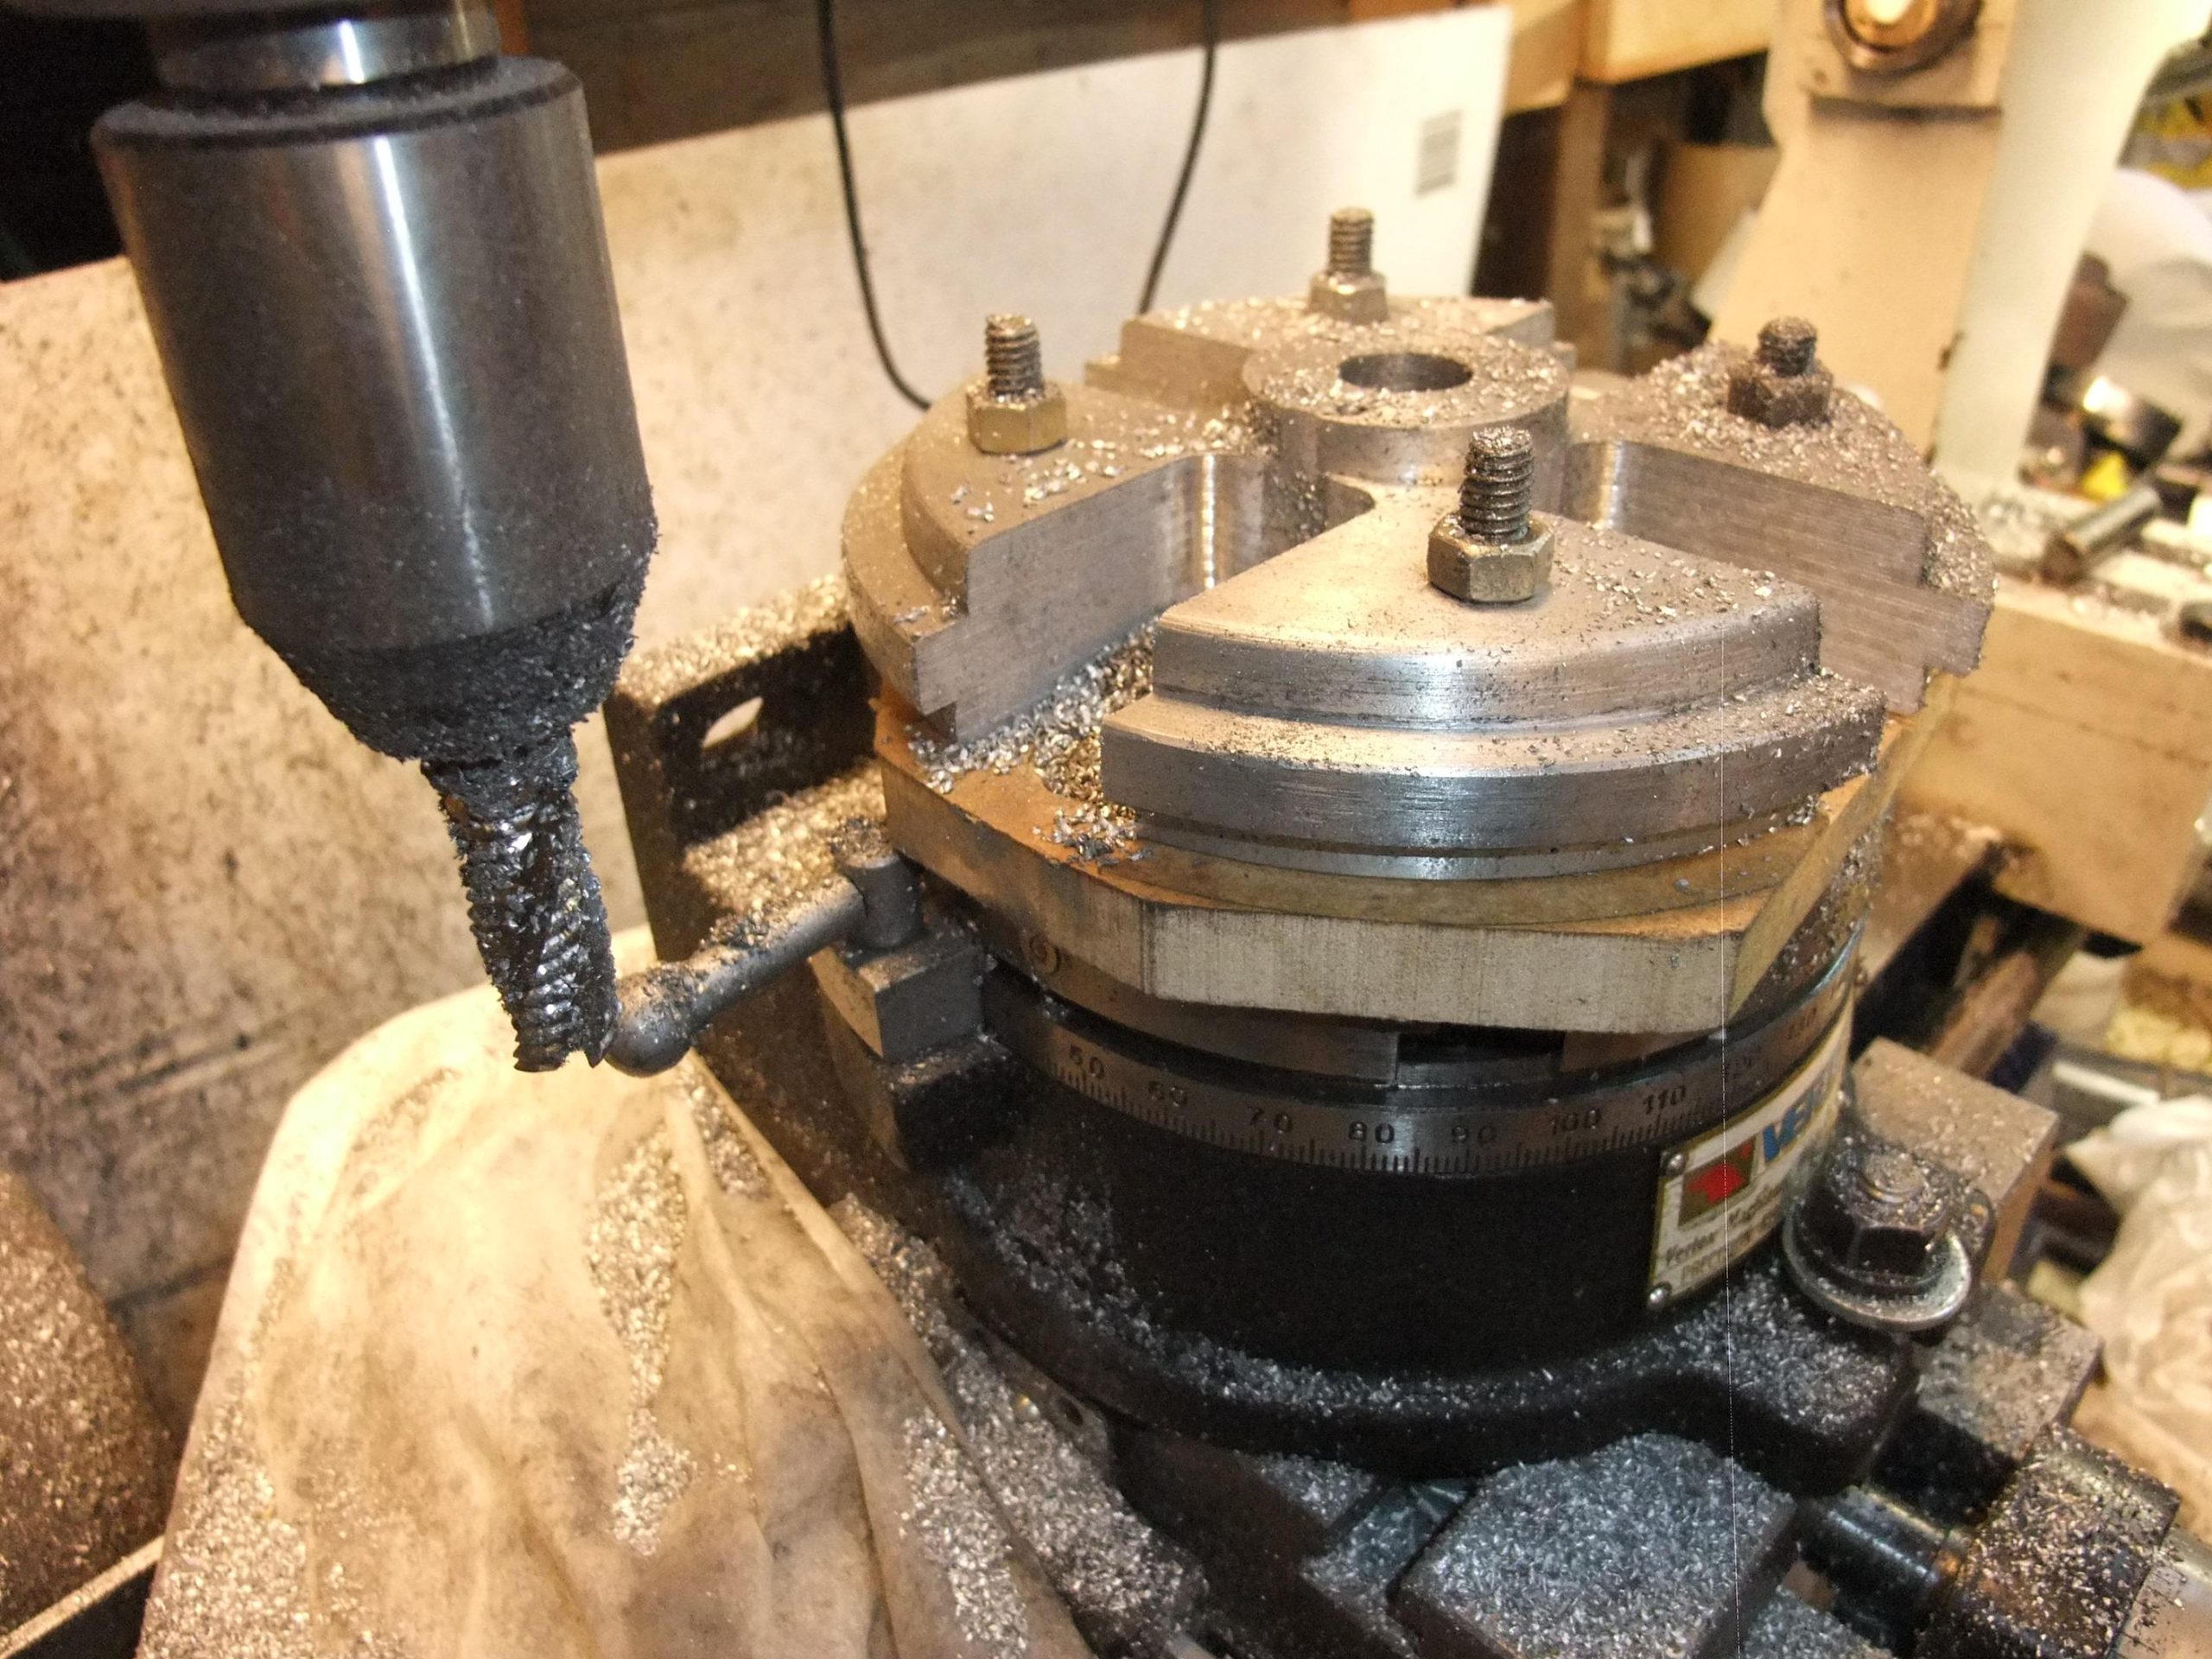
Before diving into the specifics, it’s crucial to understand what a rotary table is and how it works. A rotary table is a circular workholding device that can be attached to milling machines, grinders, or drill presses. It consists of a disc that rotates around its center axis, allowing for precise angular positioning of workpieces. Rotary tables typically have graduations or markings that facilitate accurate measurements and rotational control. -
Mounting the Rotary Table:
To use a rotary table, start by securely mounting it to your machine’s worktable. Depending on the type of machine you’re using, there may be different mounting options available. Ensure that the rotary table is aligned correctly and locked in place to prevent any unwanted movement during operation. -
Aligning the Workpiece:
The next step is aligning your workpiece on the rotary table. This typically involves centering the workpiece and ensuring that it is properly clamped or secured. You can use clamps, vise, or a custom fixture to hold the workpiece firmly in place. Remember to take appropriate safety precautions and wear protective gear when working with rotating machinery. -
Setting the Angle:
Once your workpiece is secured, it’s time to set the desired angle of rotation. Most rotary tables have graduated dials or degree markings that allow you to precisely adjust the angle. You can use a protractor or angle gauge for additional accuracy. Consider the specifications of your project and adjust the angle accordingly. -
Performing the Operation:
With the rotary table securely mounted, the workpiece aligned, and the desired angle set, you can now perform your machining operation. Depending on your specific requirements, this can involve milling, drilling, cutting, or grinding. Follow the appropriate safety guidelines for your machine and make sure you’re using the correct cutting tools for your task.
In conclusion, using a rotary table can greatly enhance your machining capabilities and improve the accuracy of your work. By understanding the basics, mounting the table correctly, aligning the workpiece accurately, setting the desired angle, and performing your operation safely, you’ll be able to make the most of this versatile tool. Remember to always follow manufacturer instructions and prioritize safety throughout the entire process.

Selecting the Right Rotary Table for Your Needs
Rotary Table Features and Considerations
When it comes to , there are a few key features and considerations to keep in mind. By understanding these factors, you can ensure that you choose a rotary table that will be able to meet your specific requirements and deliver optimal performance.
1. Size and Capacity: One of the first things to consider is the size and capacity of the rotary table. This will determine how large and heavy a workpiece you can accommodate. Make sure to choose a table that can handle the dimensions and weight of your project.
2. Type of Indexing: Rotary tables can offer different types of indexing, such as full indexing and partial indexing. Full indexing allows for precise positioning at regular intervals, while partial indexing enables more flexibility in positioning. Determine which type of indexing would best suit your needs.
3. Table Accuracy: Accuracy is a critical factor when it comes to rotary tables. Look for tables that offer high accuracy, as even a small discrepancy can have a significant impact on your workpiece. Consider the tolerance levels required for your specific projects.
4. Motorized or Manual Operation: Depending on your workflow and preference, you can choose between motorized or manual rotary tables. Motorized tables are ideal for automation and repetitive tasks, while manual tables offer more control and are suitable for intricate adjustments.
5. Integration and Compatibility: Lastly, consider the integration and compatibility of the rotary table with your existing equipment. Ensure that it will work seamlessly with your machinery and tools, and that it is compatible with the software or control system you are using.
Conclusion
By carefully considering the size and capacity, type of indexing, table accuracy, operation mode, and integration of the rotary table, you can select the perfect rotary table for your needs. Remember, it is essential to prioritize accuracy and compatibility to ensure optimal performance and efficiency in your projects. Take your time, do your research, and make an informed decision. With the right rotary table, you can enhance your productivity and achieve precision in your machining processes.

How to Set Up and Align Your Rotary Table
A rotary table is a versatile tool that can be used in various machining operations to enhance accuracy and productivity. In this post, we will guide you on to ensure precise and efficient machining processes. By following these steps, you’ll be able to maximize the potential of your rotary table and achieve outstanding results.
-
Checking the Mounting Surface
Before setting up your rotary table, it is essential to ensure that the mounting surface is clean, level, and smooth. Any imperfections or debris on the surface can affect the alignment and accuracy of the table. Use a spirit level to check if the surface is level in all directions. If needed, make adjustments to level the surface accurately. -
Positioning and Securing the Rotary Table
Once the mounting surface is prepared, place the rotary table on it and align it in a convenient position for your machining operation. Make sure the table is aligned parallel to the machine’s axes. Secure the table firmly to the mounting surface using appropriate clamps or bolts. This step is crucial to prevent any movement or vibration during machining. -
Aligning the Rotary Table with the Machine Axes
To ensure accurate positioning, you need to align the rotary table with the machine axes. Start by setting the rotary table to the zero position. This can be done by rotating the table until the indicator points to zero on the reading scale. Next, move the machine’s spindle or tool to align with the center of the rotary table. Use a dial indicator to fine-tune the alignment, adjusting the table’s position until the indicator shows zero deviation. -
Calibrating the Table’s Graduations
Most rotary tables come with graduations that allow you to precisely measure and position your workpiece. It is crucial to calibrate these graduations to ensure accurate readings. Begin by setting the table to the zero position and measuring the distance covered by one complete rotation. With this measurement, you can calculate the angular distance covered by each graduation on the rotary table. Use these calculations to create a reference table or chart for your future machining operations. -
Testing the Alignment and Adjusting as Needed
After completing the setup and alignment process, it is essential to perform a test run to verify the accuracy of the rotary table. Mount a test workpiece securely on the table and perform a machining operation. Measure and inspect the results to ensure they align with your desired specifications. If any adjustments are necessary, repeat the alignment process and make the necessary tweaks until the desired accuracy is achieved.
By following these steps, you can set up and align your rotary table effectively, guaranteeing precise and efficient machining operations. Remember to refer back to the reference table for accurate measurements and always perform regular maintenance to keep your rotary table in optimal condition. With the right setup and alignment, your rotary table will become an invaluable asset in your machining endeavors.
Using a Rotary Table for Precision Machining
When it comes to precision machining, a rotary table can be an invaluable tool. It allows for precise positioning and rotation of workpieces, enabling the creation of complex shapes and features. Whether you’re a seasoned machinist or just starting out, understanding how to use a rotary table can greatly enhance your machining capabilities.
1. Mounting the Rotary Table
The first step in using a rotary table is properly mounting it to your milling machine or workbench. Ensure that the table is securely fixed in place to prevent any movement during operation. Many rotary tables come with pre-drilled holes for easy mounting. Use bolts or clamps to secure the table, making sure it is aligned with the machine axis.
2. Aligning the Rotary Table
Before you can start machining, it’s crucial to align the rotary table properly. This ensures accurate positioning and rotation of the workpiece. To align the table, use a dial indicator to measure any deviation from parallel or perpendicular alignment. Adjust the table’s tilt and rotation until the indicator shows precise alignment.
3. Setting Up Workpieces
Once your rotary table is mounted and aligned, it’s time to set up your workpiece. Securely clamp or bolt the workpiece onto the table, ensuring it is centered and balanced. Use parallel blocks or shims if needed to level the workpiece. For complex shapes, consider using indexing plates or a dividing head to achieve precise angular and radial positioning.
4. Programming the Required Movements
Depending on the machining task, you may need to program specific movements for your rotary table. This is particularly important when using a CNC machine. Consider the required rotation angle, feed rate, and cutting parameters. Consult the machine’s manual or use programming software to input the necessary instructions accurately. Test the movements carefully before proceeding with the actual machining process.
5. Performing Precision Machining
With the rotary table set up and programmed, it’s time to perform the precision machining. Use appropriate cutting tools and techniques for the desired outcome. Monitor the machining process closely to ensure accuracy and make any necessary adjustments along the way. Remember to prioritize safety at all times by wearing protective gear and adhering to machine-specific safety guidelines.
By following these steps and understanding how to use a rotary table effectively, you’ll be able to achieve precise results in your machining projects. Experiment with different setups and techniques to unlock the full potential of this versatile tool and take your precision machining capabilities to new heights.

Mastering Advanced Techniques with a Rotary Table
Rotary tables are versatile tools that can greatly enhance your machining capabilities. Not only do they provide rotational movement, but when used systematically with other tools, they enable you to perform intricate operations with precision. In this post, we will explore some advanced techniques that can help you take full advantage of a rotary table and achieve professional-grade results.
1. Indexing
One of the primary functions of a rotary table is indexing. It allows you to precisely divide a full revolution of the table into smaller, equally spaced divisions. Whether you need to create multiple holes or cut complex gear teeth, indexing is key. To use the indexing feature, you will need to have an index plate attached to the rotary table along with a dividing head that enables precise movement.
Pro Tip:
- Use a vernier scale for more accurate indexing
- Explore indexing patterns like indexing plates with prime numbers for versatility
2. Helical Milling
Helical milling is a technique that involves cutting grooves, threads, or spirals in a workpiece with the help of a rotary table. By carefully controlling the movement of the table, you can create precise helical patterns. This technique is commonly used to produce cylindrical parts with helical flutes, such as screws and drill bits.
Pro Tip:
- Use a helical milling calculator for accurate calculations of stepovers and depths of cut
- Fix the workpiece securely to avoid any movement during the milling process
3. Circular Interpolation
Circular interpolation refers to the ability to cut circular shapes or arcs with a rotary table. By programming the right movements and utilizing specialized software, you can create complex curves with ease. This technique is commonly used in the production of gears, cam profiles, and circular pockets in machining operations.
Pro Tip:
- Ensure that the rotary table is properly aligned and leveled for accurate circular interpolation
- Use the correct cutting tools and speeds to avoid excessive heat generation or tool wear
4. Dividing Complex Angles
With a rotary table, you can easily divide complex angles to achieve precise machining results. Whether you need to create polygonal shapes or cut multi-sided holes, the ability to accurately divide angles is crucial. By leveraging the indexing feature and utilizing the correct calculations, you can achieve consistent and accurate results.
Pro Tip:
- Use a sine bar or sine plate for dividing angles
- Implement trigonometric calculations to determine the exact movements required
5. Combining Rotary Tables with Other Tools
To unlock the full potential of a rotary table, it is important to combine it with other tools and techniques. By integrating it with a milling machine or a lathe, you can perform complex operations such as machining gears, cutting spirals, and creating complex profiles. Additionally, utilizing additional fixturing methods can further enhance stability and precision.
Pro Tip:
- Explore the use of CNC (Computer Numerical Control) systems for increased automation and efficiency
- Invest in high-quality cutting tools and regularly maintain them for optimum performance
requires practice, precision, and a thorough understanding of the capabilities of both the table and the complementary tools. By expanding your knowledge and continuously improving your skills, you can unlock endless possibilities and create intricate, high-quality machined parts.
Q&A
Q: What is a rotary table?
A: A rotary table is a precision tool used in machining operations to rotate workpieces in a controlled manner. It is commonly used in milling machines for various applications, including indexing, cutting arcs, and creating circular patterns.
Q: How does a rotary table work?
A: A rotary table consists of a circular disc mounted on a spindle, which can be rotated in both horizontal and vertical planes. It is connected to the machine’s drive system and can rotate accurately at specific angles. The workpiece is secured to the rotary table, allowing it to rotate while the cutting tool remains stationary or moves along a straight path.
Q: What are the benefits of using a rotary table?
A: Using a rotary table offers numerous advantages in machining operations. It allows for precise and repeatable positioning of workpieces, enabling complex cuts or drilling at specific angles. This versatility saves time and effort, as the table eliminates the need for extensive machine readjustment or the use of additional tools.
Q: How can a rotary table be used for indexing?
A: Indexing is a common application of a rotary table. By unlocking the table’s position, the user can rotate the table to the desired angle and lock it back in place. This provides precise divisions that enable accurate machining when performing tasks like drilling holes, cutting notches, or milling evenly spaced features.
Q: What are some other applications of a rotary table?
A: Besides indexing, a rotary table can be used for machining circular patterns, cutting arcs or curves, and producing multiple, identical parts by replicating the same operations at different angles. It can also be utilized as a fourth axis in CNC (Computer Numerical Control) milling machines, allowing for more complex and accurate machining.
Q: How do I set up and use a rotary table?
A: To use a rotary table, start by securing it to the milling machine’s worktable using suitable clamps or fixtures, ensuring it is aligned with the machine’s spindle. Next, secure the workpiece to the rotary table, making sure it is centered and properly tightened. Finally, set the desired rotation angle on the table’s scale and lock it in place. When setting up, always refer to the manufacturer’s instructions and make sure the table is clean, lubricated, and the locking mechanism is working correctly.
Q: Are there any safety considerations when using a rotary table?
A: Yes, safety is crucial when using a rotary table. Always wear appropriate personal protective equipment, such as safety glasses, gloves, and hearing protection. Ensure that the rotary table is securely fastened to the machine and that the workpiece is properly secured. Avoid loose clothing or jewelry that could become entangled in the rotating components. Lastly, follow safe machining practices and operate the machine within its recommended parameters.
Q: Can a rotary table be used with different types of milling machines?
A: Yes, rotary tables can be used with various types of milling machines, such as horizontal mills, vertical mills, and even CNC machines. However, it is important to check that the rotary table’s specifications and mounting options are compatible with the specific mill you are using. Additionally, take into consideration the weight capacity of both the rotary table and the milling machine to ensure safe operation.
Q: Are there any limitations or drawbacks to using a rotary table?
A: While rotary tables are versatile tools, there are a few limitations and drawbacks to keep in mind. The size and weight capacity of the rotary table may limit the size and weight of the workpiece that can be machined. Additionally, the use of a rotary table may require additional setup time and may not be necessary for simpler machining operations. Lastly, the initial cost investment for a rotary table might be higher compared to other accessories, depending on the quality and desired features. In conclusion, mastering the art of using a rotary table can significantly enhance your precision machining capabilities. As we have discussed throughout this article, understanding the various components, operations, and techniques involved will provide you with the necessary foundation to incorporate this versatile tool into your machining process effectively. Remember to carefully select the appropriate rotary table for your specific application, ensuring compatibility and precision. With practice, patience, and a thorough understanding of the principles outlined here, you will undoubtedly unlock a multitude of possibilities that a rotary table brings to your workshop. Embrace this powerful tool and let it revolutionize your machining projects, taking your craftsmanship to new levels of accuracy and efficiency.


