Jumper cables are a rescue must-have for any vehicle owner, potentially saving us from the dreaded dead battery situation. Simple and effective, using jumper cables correctly can revive your car’s battery and get you back on the road in no time. In this informative article, we will delve into the step-by-step process of using jumper cables, ensuring that you have the knowledge and confidence to tackle battery emergencies with ease. Whether you are a seasoned driver or a novice, understanding the proper technique for using jumper cables is a valuable skill that can prevent inconvenience and frustration. So, let’s dive in and explore the essential tips and guidelines to safely and effectively employ jumper cables whenever the need arises.
Safety Precautions to Follow Before Jump Starting a Vehicle
In order to safely jump start a vehicle using jumper cables, it is important to take certain precautions. Following these steps will not only prevent accidents but also ensure that both vehicles are not damaged in the process.
1. Park both vehicles in a safe location
Make sure both vehicles are parked securely and are not in a busy road or on an incline. This will minimize any potential risks of accidents or rolling vehicles during the jump-start process.
2. Turn off ignition and all electrical systems
Prior to connecting the jumper cables, turn off the ignition and all electrical systems such as headlights, fans, and radios. This is necessary to prevent any possible electrical surges or damage to the vehicle’s electrical system.
3. Identify and connect the jumper cables correctly
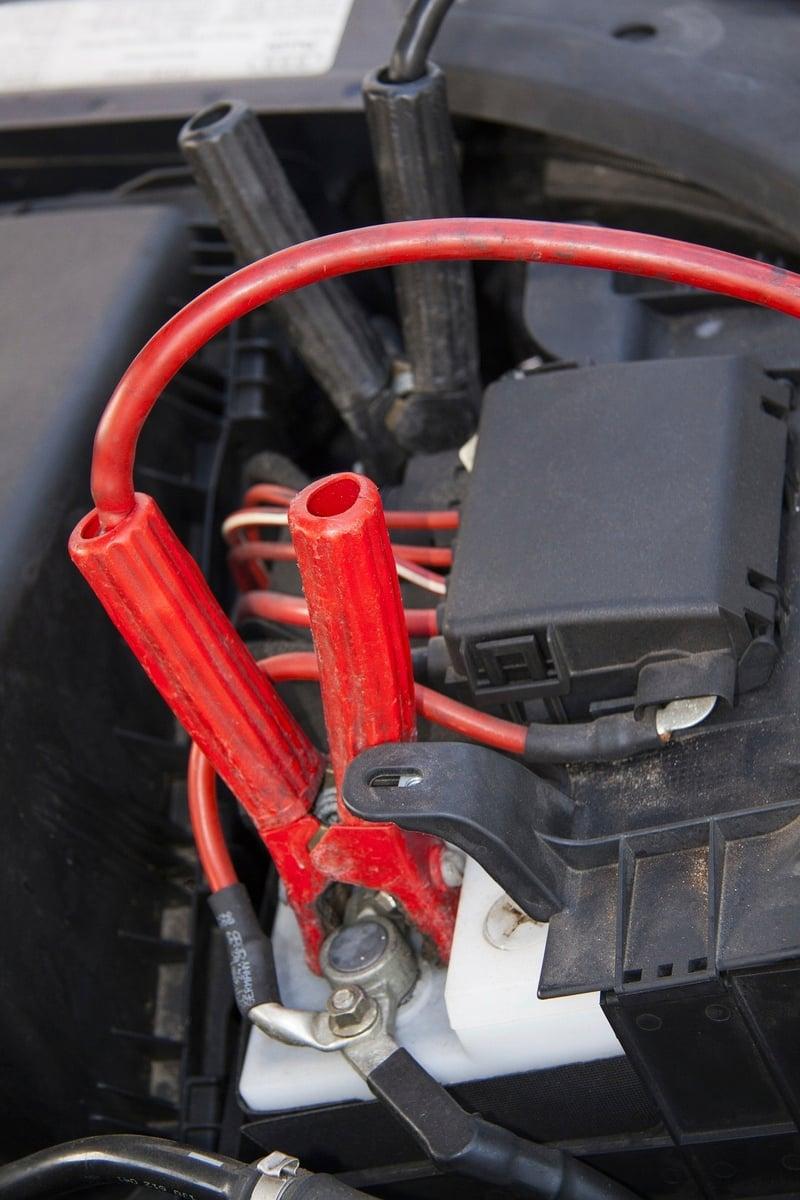
Identify the positive (+) and negative (-) terminals on the dead battery and the assisting vehicle’s battery. Connect the red jumper cable clamp to the positive terminals and the black jumper cable clamp to the negative terminals. Ensuring correct connections is crucial to avoid any sparks or electrical short circuits.
4. Start the assisting vehicle and wait
Start the assisting vehicle and let it run for a few minutes to charge the dead battery. Avoid revving the engine excessively, as it may cause damage. Allow the assisting vehicle to run while you attempt to start the vehicle with the dead battery.
5. Disconnect the cables in the reverse order
Once the vehicle with the dead battery starts, carefully disconnect the jumper cables in the reverse order of how they were connected. Start with the black clamp on the assisting vehicle’s negative terminal, followed by the black clamp on the previously dead battery’s negative terminal. Repeat the same process with the red clamps. This prevents any sparks or accidental damage to the vehicles.
| Problem | Solution |
|---|---|
| Vehicle still won’t start | Make sure the cables are securely connected and try again. If it still doesn’t start, you may need professional assistance to check the battery or electrical system. |
| Sparks when connecting cables | Double-check the connections and ensure that the clamps are securely attached to the battery terminals. Reconnect them carefully to avoid sparks. |
| Dead battery repeatedly | It may be time to replace the battery. Consult a professional to determine the proper solution. |

Essential Tools and Equipment Needed for Jump Starting
Jump starting a car can be a lifesaver in certain situations, especially when you find yourself stranded with a dead battery. To successfully jump start a vehicle, you will need a few essential tools and equipment. Here is a list of items you should have on hand:
- Jumper cables: Also known as booster cables, these heavy-duty cables are crucial for transferring power from one vehicle to another. Make sure you choose cables with sufficient gauge and length to reach both batteries comfortably.
- A fully charged battery: You will need a functioning battery to provide the necessary power to jump start the dead battery. Ensure the battery used for jump starting is fully charged to avoid complications.
- Protective gloves: Safety should always be a priority when working with car batteries. Don a pair of sturdy gloves to protect your hands from potential electrical sparks or battery acid.
- Eye protection: Along with gloves, wearing eye protection is essential to shield your eyes from any battery acid or debris that may splatter during the jump starting process.
- A functioning vehicle: You will need another vehicle with a fully charged battery to provide the power needed for the jump start. Ensure the vehicle is in working condition before attempting to jump start another car.
Now that you have gathered the necessary tools and equipment, it’s time to understand the step-by-step process of jump starting a car. Remember, safety should always be a priority, so be cautious and follow the instructions carefully to avoid any mishaps. Here’s how to use jumper cables:
Step 1: Position the vehicles – park both cars close enough so that the jumper cables can reach both batteries, but make sure they’re not touching to prevent any accidents.
| Red Jumper Cable | Black Jumper Cable |
|---|---|
| Connect to the positive terminal of the working battery (+) | Connect to the negative terminal of the working battery (-) |
| Connect to the positive terminal of the dead battery (+) | Attach the other end to an unpainted metal surface in the engine bay |
Step 2: Once the cables are properly connected, start the engine of the functioning vehicle and let it run for a couple of minutes to allow the battery to charge.
Step 3: After a few minutes, attempt to start the vehicle with the dead battery. If it starts successfully, keep both engines running for a few more minutes to ensure proper charging.
Step 4: Once the dead vehicle is running smoothly, carefully disconnect the jumper cables in the reverse order of connection. Start by removing the black cable from the unpainted metal surface, then from the negative terminal of the dead battery. Proceed to remove the red cable from both batteries’ positive terminals.
By following these steps and using the essential tools and equipment mentioned above, you can safely and successfully jump start a car in case of a dead battery. Always remember to exercise caution and prioritize safety throughout the entire process.
A Step-by-Step Guide to Properly Connect the Jumper Cables
Jumper cables are an essential tool to have in your car emergency kit, as they can be a lifesaver if your battery dies unexpectedly. Knowing how to properly connect the jumper cables is crucial to avoid any damage to the vehicles involved and ensure a safe and effective jump start. In this step-by-step guide, we will walk you through the process of connecting jumper cables correctly.
Step 1: Assess the situation and ensure the safety of everyone involved. Park the two cars close enough for the jumper cables to reach each other but with enough space to open the hood fully. Make sure that the ignition is off in both vehicles and engage the parking brakes.
Step 2: Identify the positive and negative terminals on both car batteries. The positive terminal is usually red, and the negative terminal is usually black. It is important to connect the cables correctly, as reversing the polarity can cause damage to the electrical systems of the cars.
Step 3: Start by connecting one end of the red jumper cable to the positive terminal of the dead battery. Ensure that the connection is secure. Then, attach the other end of the red cable to the positive terminal of the working battery.
Step 4: Connect one end of the black jumper cable to the negative terminal of the working battery. Again, make sure that the connection is tight. Now, this is where it gets a bit different. Instead of connecting the other end of the black cable to the negative terminal of the dead battery, find an unpainted metal surface, such as the engine block or a bolt, in the engine compartment of the dead vehicle, and attach it there. This is done to avoid any sparks near the battery that could potentially ignite gases emitted by the battery.
Step 5: With all the connections secure, it’s time to start the working vehicle and let it run for a few minutes. This will allow the dead battery to gain some charge. Once you feel confident that the dead battery has received enough charge, attempt to start the vehicle with the dead battery. If it starts successfully, carefully disconnect the jumper cables in the reverse order of how they were connected.
Remember, these steps are a general guide, and it’s always recommended to consult your car’s owner manual for specific instructions on jump-starting your vehicle. By following these steps and taking the necessary precautions, you can safely and effectively use jumper cables to get your car back on the road in no time. Stay safe and happy driving!
Common Mistakes to Avoid When Using Jumper Cables
When it comes to jump-starting a dead car battery, using jumper cables is a common method that many people rely on. However, there are a few common mistakes that can be easily avoided to ensure a successful jump-start. By understanding these mistakes and taking the necessary precautions, you can safely and effectively use jumper cables to get your car back on the road.
1. Incorrect Cable Connection
One of the most common mistakes people make when using jumper cables is connecting them to the wrong terminals. It’s crucial to identify the positive (+) and negative (-) terminals on both vehicles before connecting the cables. Ensure that the red cable is connected to the positive terminal on the dead battery and the live battery. Likewise, the black cable should be connected to the negative terminal on the live battery, and a metal ground on the dead battery vehicle (such as a bolt or unpainted metal surface).
2. Insufficient Cable Length
Another mistake to avoid is using jumper cables that are too short. Inadequate cable length may limit your ability to position the vehicles safely for a jump-start. Ideally, you should use cables that are at least 12 feet long to provide flexibility in maneuvering the vehicles into the proper position.
3. Ignoring the Correct Starting Sequence
Following the correct starting sequence is essential to prevent any potential damage to the vehicles’ electrical systems. Start by turning off all electronics and ensuring both cars are in park or neutral with their parking brakes engaged. Then, start the live vehicle and let it run for a few minutes before attempting to start the dead vehicle.
4. Allowing Cables to Touch
It’s vital to keep the jumper cables from touching each other during the jump-start process. If the cables come into contact, it may cause sparks or a short circuit, risking damage to the vehicles’ electrical systems. Ensure the cable clamps are securely attached to the battery terminals and are not touching any other metal parts.
5. Removing the Cables Too Soon
Once the dead vehicle is successfully started, it’s important to leave the engine running for a few minutes before removing the jumper cables. This allows the alternator to recharge the battery fully. Start by removing the negative cable from the previously dead vehicle, then the negative cable from the live battery. Proceed by removing the positive cable from the live battery and, finally, the positive cable from the once-dead battery.

Additional Tips for a Successful Jump Start
While jumper cables are a powerful tool to get your car running again, there are a few extra precautions you can take to ensure a successful jump start. Following these additional tips will not only make the process efficient but also protect your vehicle and ensure your safety.
1. Check the cables: Before starting the jump start, inspect the cables for any signs of damage, such as fraying or exposed wires. Faulty cables can lead to accidents or damage to your vehicle’s electrical system, so it’s important to use cables that are in good condition.
2. Identify the positive and negative terminals: Each vehicle has a battery with two terminals – the positive (+) and negative (-). It’s crucial to correctly identify them to avoid any mishaps. The positive terminal is usually marked with a plus sign, while the negative terminal may have a minus sign or the letters “NEG.” Always double-check to ensure that you’re connecting the cables correctly.
3. Follow the correct sequence: When connecting the jumper cables, it is essential to follow the correct sequence. The standard procedure is as follows:
- Connect one end of the red cable to the positive terminal of the dead battery.
- Attach the other end of the red cable to the positive terminal of the working battery.
- Connect one end of the black cable to the negative terminal of the working battery.
- Finally, attach the other end of the black cable to a grounded metal surface on the dead vehicle, away from the battery.
4. Keep the vehicles off: Before connecting the jumper cables, ensure that both vehicles are turned off. This precautionary measure prevents electrical shorts and reduces the risk of accidental sparking. Leave the vehicles off while the cables are being connected, and remember to turn them off when disconnecting the cables as well.
| Jumper cables | Our recommendation |
|---|---|
| Length of cables | 8-10 feet |
| Cable gauge | at least 4 or 6 gauge |
| Cable material | prefer copper over aluminum |
5. Allow the dead battery to charge: After connecting the cables, let the dead battery charge for a few minutes before attempting to start the vehicle. This will ensure that enough power is transferred from the working battery to the dead one. Once you start the vehicle with the dead battery, avoid turning it off immediately and drive it for at least 15-20 minutes for the alternator to recharge the battery fully.
By following these additional tips, you can safely and efficiently jump-start your vehicle. Remember, if you are unsure or uncomfortable with the jump-start process, it is always best to seek assistance from a professional to avoid any damage or injury.
Q&A
Q: What are jumper cables?
A: Jumper cables are heavy-duty insulated cables with clamp connectors at each end, which are used to jump-start a vehicle with a dead battery.
Q: What do I need to jump-start a dead battery?
A: To jump-start a dead battery, you will need a set of jumper cables, a working vehicle with a charged battery, and a safe, flat space for both vehicles to park close to each other.
Q: How do I properly connect the jumper cables to the dead battery?
A: Begin by positioning the two vehicles so that their batteries are as close to each other as possible. Ensure that both engines are turned off, and then open both hoods. Identify the positive (+) and negative (-) terminals on each battery. Connect one end of the red/positive jumper cable clamp to the positive terminal of the dead battery.
Q: What is the next step after connecting the positive clamp?
A: After connecting the red/positive clamp to the dead battery, attach the other end of the same cable to the positive terminal of the working battery on the other vehicle. It’s important to ensure a secure connection on both terminals.
Q: How should I connect the negative clamp?
A: Connect one end of the black/negative clamp to the negative terminal of the working battery, and the other end to an unpainted metal surface on the engine block or chassis of the dead vehicle. Make sure the connection is secure, and avoid any moving parts.
Q: What precautions should I take during the jump-start process?
A: Safety should be a top priority while jump-starting a vehicle. Never allow the clamps of the jumper cables to touch each other once they are connected to the batteries. Ensure that the cables are clear of any moving parts or hot engine components. Always follow the manufacturer’s instructions for both vehicles involved.
Q: How long should I leave the jumper cables connected?
A: After the cables are properly connected, start the engine of the working vehicle and let it run for a few minutes. Allow the dead battery to charge before attempting to start the vehicle. The duration can vary, but 5-10 minutes should suffice in most cases.
Q: Can I jump-start a vehicle without a working battery?
A: No, a working battery is required to jump-start another vehicle. Jumper cables function by transferring power from a working battery to the dead battery, essentially providing a temporary boost to start the vehicle with the dead battery.
Q: Should I keep the engine running on the vehicle with the dead battery after jump-starting it?
A: Yes, keeping the engine running on the previously dead vehicle helps recharge the battery. However, it is recommended to drive the vehicle for at least 20 minutes to allow the alternator to fully charge the battery.
Q: Are there any risks involved in jump-starting a vehicle?
A: There can be some risks involved in jump-starting a vehicle, such as sparks, electrical shocks, or damage to the electrical system of either vehicle. It is crucial to follow the safety precautions and ensure a correct and secure connection when using jumper cables. In conclusion, learning how to use jumper cables properly can be a valuable skill that may come to your rescue in an unfortunate situation of a dead car battery. By following these step-by-step instructions, you can safely jump-start your vehicle and be back on the road within minutes. Remember, safety should always be your top priority, so never hesitate to seek professional assistance if you feel unsure or uncomfortable with any aspect of the process. With a little practice and understanding, you can confidently assist others or handle a dead battery situation on your own. Stay informed, stay prepared, and always ensure a smooth ride ahead.