The framing square, also known as a carpenter’s square, is an invaluable tool for both novice and seasoned craftsmen alike. With its traditional L-shaped design and various graduations, this versatile instrument is key to ensuring precise measurements and accurate layouts in countless woodworking and construction projects. Whether you’re embarking on a simple DIY endeavor or tackling a complex build, understanding how to effectively use a framing square can significantly enhance your craftsmanship. In this article, we’ll explore the fundamentals of this essential tool, detailing its components, functions, and practical applications, enabling you to effortlessly master the art of utilizing a framing square.
Introduction
A framing square is an essential tool for carpenters and DIY enthusiasts alike. Whether you are building a deck, framing a house, or working on any project that requires accurate right angles and measurements, a framing square is a must-have in your toolkit.
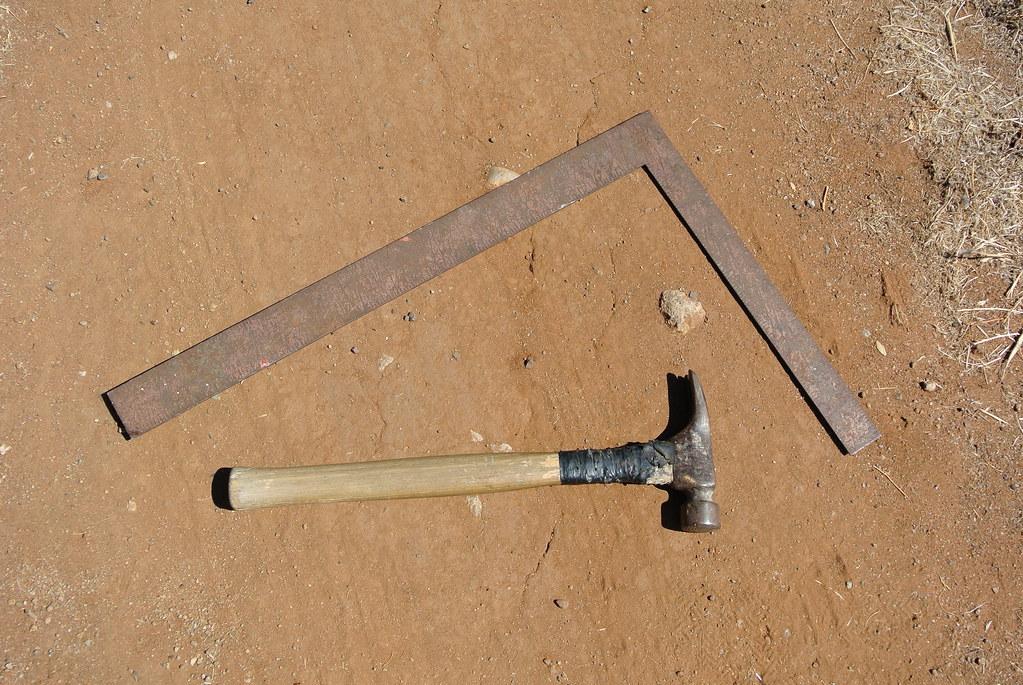
The framing square gets its name from its square shape, usually made of steel or aluminum, with two arms of equal length that meet at a 90-degree angle. One arm is longer than the other, typically 16 inches, and is called the body, while the shorter arm, usually 6 inches, is known as the tongue.
The tongue of the framing square features a series of measurements, such as inches, centimeters, and angles, that allow you to take precise measurements and make accurate cuts. The body of the square has measurements and markings for various uses, including marking perpendicular lines, laying out angles, and checking for squareness. These measurements and markings are engraved or etched onto the surface, ensuring durability and long-lasting performance.
Using a framing square is quite straightforward. To start, hold the square against the edge of the material you want to measure or mark, making sure the body is flush with one edge and the tongue extends along the other. You can then take measurements using the markings on the tongue or body, depending on your specific needs.
One of the most common uses of a framing square is to check for squareness by comparing the lengths of the two sides of a right angle. Simply place the square in the corner of the material or structure and examine the alignment. If the square fits snugly and both sides measure the same length, the angle is square. If not, adjustments will be needed to make it square.

Understanding the Anatomy of a Framing Square
A framing square is an essential tool for builders, carpenters, and DIY enthusiasts alike. While its primary use is for creating right angles and laying out floor and roof rafters, can unlock a world of other uses. In this post, we will explore the different parts of a framing square and how to use them effectively.
-
Body:
The body of a framing square is usually made of steel and has two arms, called the tongue and the blade, that meet at a 90-degree angle. This part of the square is used to measure and mark right angles and straight lines accurately. The size of the body can vary, but the most commonly used is a 16-inch by 24-inch design. -
Face:
The face of a framing square is the flat surface on the inside of the body. It often has stamped measurements and markings, such as inches and angles, which aid in precise measurements. The face is a crucial reference point when aligning the framing square with the material you are working with. -
Graduated Scale:
The graduated scale is a ruler-like feature found on the blade of the framing square. It is divided into inches and fractions, allowing you to measure lengths quickly and accurately. The scale is especially useful when working on projects that require consistent measurements, like building a deck or framing a wall. -
Pivot Point:
Located at the junction of the tongue and the body, the pivot point acts as a hinge that allows the framing square to rotate freely. This movement is essential for various applications, such as finding angles, transferring measurements, or scribing lines. -
Rafter Tables:
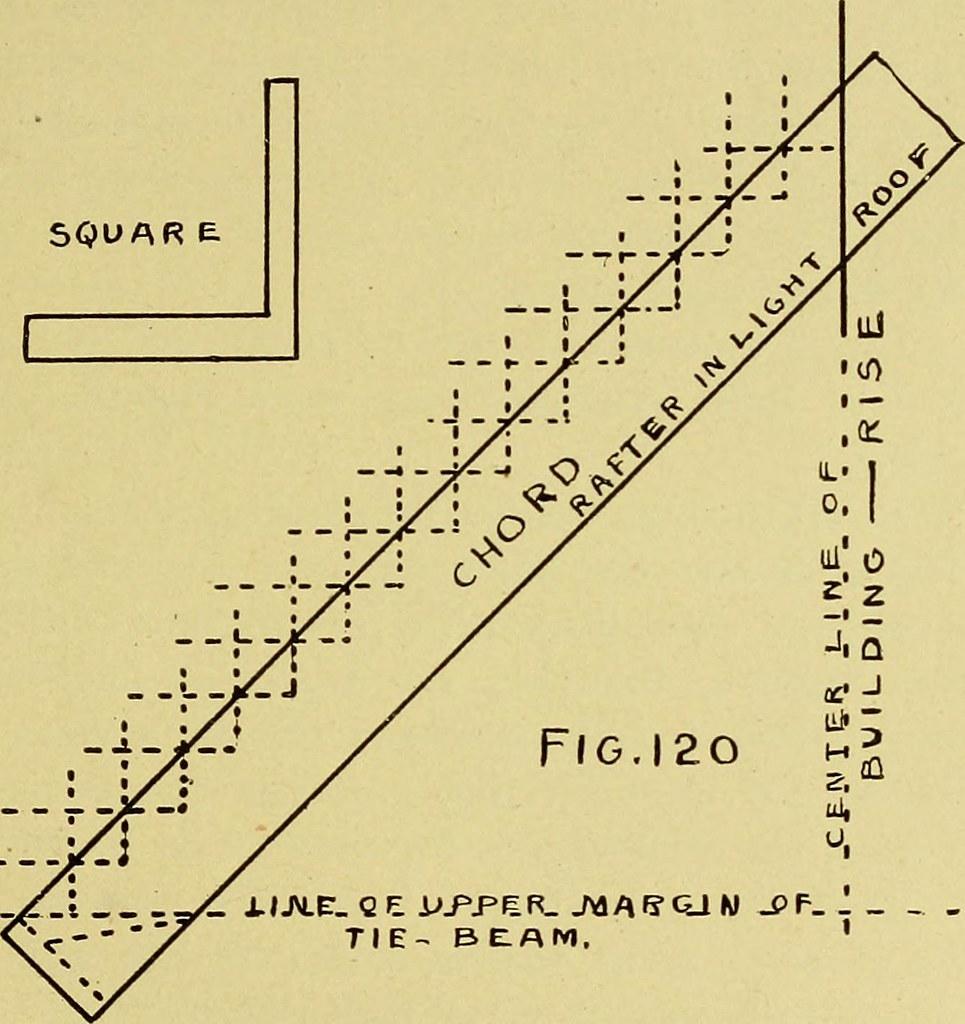
One of the most valuable parts of a framing square is the rafter tables, which are printed on the face of the square. These tables provide measurements and angles for common roof rafters based on the pitch of the roof. By consulting the rafter tables, you can quickly determine the length, angles, and cuts needed to perfectly fit your rafters for a stable roof structure.
is the first step towards mastering its use in carpentry and construction projects. By familiarizing yourself with the body, face, graduated scale, pivot point, and rafter tables, you can confidently tackle a variety of tasks, from framing walls to building roofs. Remember to always refer to the manufacturer’s instructions for specific guidelines and safety precautions to ensure accurate and safe usage of your framing square.
Using a Framing Square for Accurate Measurement and Layout
A framing square is an essential tool for anyone involved in construction or carpentry projects. It is designed to help ensure accurate measurements and layout, making it crucial for achieving precise cuts and angles. In this post, we will guide you on how to effectively use a framing square for accurate measurement and layout.
Step 1: Understanding the Anatomy of a Framing Square
Before you can start using a framing square, it’s important to familiarize yourself with its various components. A typical framing square consists of two arms connected at a 90-degree angle, forming an L-shape. One of the arms is longer than the other, usually measuring 24 inches, while the shorter arm is typically around 16 inches. The longer side is known as the body, and the shorter side is called the tongue. Additionally, a framing square has various scales, numbers, and markings on both its body and tongue.
Step 2: Utilizing the Body for Measuring and Marking
The body of a framing square is ideal for measuring and marking longer distances. To use it, simply place the square against the surface you want to measure, aligning the body along the edge. Make sure it is securely placed and doesn’t wobble. Then, using a pencil, mark the desired measurement along the body of the square. This method ensures accurate and consistent measurements for your project.
Step 3: Using the Tongue for Layout and Angles
The tongue of a framing square is perfect for creating precise angles and layouts. To utilize it, position the square with the tongue marking the desired angle or layout line. Hold it firmly against the surface and mark the line with a pencil. The tongue’s shorter length makes it easier to maneuver and ensures accuracy when creating smaller, detailed layouts or angled cuts.
Step 4: Additional Tips for Using a Framing Square
- Always double-check your measurements before making any cuts or adjustments.
- Use clamps or a second pair of hands to secure the square in place to avoid slippage during marking.
- Consider using a speed square or combination square for more precise measurements in tight spaces.
- Regularly clean and maintain your framing square to ensure accuracy and prolong its lifespan.
Step 5: Putting Your Framing Square to Work
Now that you have a better understanding of how to use a framing square, it’s time to put your newfound knowledge into practice. Whether you’re framing a wall, building a shed, or tackling any other carpentry project, a framing square will be an invaluable tool in achieving accurate measurements and layouts. Remember to take your time, be patient, and always prioritize safety when working with tools.
Performing Common Carpentry Tasks with a Framing Square
A framing square is one of the most versatile tools in a carpenter’s arsenal. With its right angles and various measurements, it’s a crucial tool for performing common carpentry tasks. Whether you’re constructing a deck or framing a wall, the framing square is an indispensable tool that can help you achieve accurate and precise results.
One of the primary functions of a framing square is to mark and measure angles. By placing the square against a piece of lumber, you can easily mark 90-degree angles for making square cuts. Additionally, the framing square can be used to mark other angles, such as 45 degrees or 30 degrees, by aligning the square’s edge with the desired angle on the appropriate scale. This makes it an essential tool for creating precise mitre cuts and accurate measurements.
Aside from measuring angles, a framing square can also be used to lay out and mark cuts. By aligning the square’s ruler edge with the edge of your material, you can quickly mark parallel lines for making precise cuts. The square’s ruler also features various measurements, such as inches and centimeters, allowing you to easily mark and measure lengths. This feature is especially useful when building furniture or undertaking any project that requires accurate measurements.
Another handy feature of the framing square is its ability to find the center of a board or determine the length of an unknown side. By using the square’s pivot holes and its tongue, you can effortlessly locate the center point of a piece of lumber. This is especially useful when installing cabinets, hanging pictures, or positioning anything with precision. Moreover, if you need to determine the length of a side that is hidden or inaccessible, the framing square can serve as a reliable measuring tool.
In addition to its measuring and marking capabilities, the framing square can also be used for checking corners and ensuring that they are perfectly square. By aligning the square’s edge with the corner joint, you can quickly determine if it is square or requires adjustment. This is crucial for maintaining structural integrity and preventing future problems. The framing square’s large size and sturdy construction make it a reliable tool for verifying the accuracy of corners.
Lastly, a framing square can be used as a guide for making straight cuts with a circular saw or a jigsaw. By clamping the square to your material and running your saw alongside its edge, you can achieve accurate and straight cuts. This technique is especially useful when working with large sheets of plywood or other materials that require long, straight cuts. The framing square’s solid construction ensures stability and acts as a reliable guide, allowing for precise cuts every time.
In conclusion, a framing square is an invaluable tool for any carpenter or DIY enthusiast. Its ability to measure angles, mark cuts, locate centers, check corners, and act as a cutting guide makes it an essential tool for performing common carpentry tasks. Whether you’re a professional builder or a weekend warrior, having a framing square in your toolbox will undoubtedly enhance your woodworking skills and help you create precise and accurate projects.
Exploring Advanced Techniques for Precision and Efficiency
A framing square is a versatile and indispensable tool for carpenters, woodworkers, and DIY enthusiasts. It is commonly used for measuring angles, cutting rafters, checking for squareness and leveling, among other tasks. This post will explore some advanced techniques for using a framing square that can help improve precision and efficiency in your projects.
- Measuring Angles:
- One of the primary purposes of a framing square is to measure angles accurately. To do this, place the square on the workpiece and align it with the desired angle. Then, mark the angle using a pencil or a scribing tool.
- To measure an angle on a narrow piece of wood, you can extend the arm of the framing square by attaching a longer piece of wood to it. This extension will give you a larger surface to align with your workpiece.
- Checking for Squareness:
- A framing square is an excellent tool for ensuring that your workpiece is square. Place the square’s 90-degree corner against the edge of your workpiece and observe if the other corner aligns perfectly with the adjacent edge. If it does, your workpiece is square.
- To check the squareness of larger structures, such as walls or door frames, use a plumb bob. Hang the plumb bob from the corner of the square and check if it aligns with the opposite corner. This technique will help you detect any discrepancies in squareness.
- Marking and Cutting Rafters:
- When cutting rafters for a roof, a framing square is immensely helpful. The square’s body represents the plumb cut, while the tongue represents the bird’s mouth cut. Use the body of the square to mark the plumb cut angle, and the tongue for the bird’s mouth angle.
- Determining Pitch and Slope:
- A frame square can also be used to determine the pitch and slope of a roof. By measuring the rise and run of the roof, you can quickly calculate the pitch or slope using the helpful markings on most framing squares.
- To determine the rise of a roof, place the square’s body on the roof surface and align it with the edge of the roof. The measurement at the point where the tongue touches the roof will give you the rise.
- Layout Markings:
- The framing square is ideal for laying out markings on large sheets of plywood or other materials. With its straight edges and 90-degree corner, you can create accurate lines and markings quickly.
- To achieve consistent spacing between markings, you can use the tongue of the framing square as a guide. Align the tongue with the previous marking, and then mark the next position. Repeat this process for precise and evenly spaced layout markings.
These advanced techniques will enable you to maximize the versatility of your framing square and achieve more precise and efficient results in your woodworking and carpentry projects. Remember to choose a high-quality framing square and always check for accurate measurements before making any cuts or markings. With practice, you’ll become adept at utilizing the framing square’s various features to tackle any project with confidence and accuracy.
Q&A
Q: What is a framing square?
A: A framing square, also known as a carpenter’s square or steel square, is a versatile tool used primarily in woodworking and framing projects. It consists of a long arm, known as the blade, and a shorter arm, known as the tongue, which are joined at a 90-degree angle.
Q: What are the uses of a framing square?
A: A framing square is primarily used for laying out right angles, checking for squareness, and transferring measurements. It is commonly used in construction and carpentry for tasks such as laying out stair stringers, determining roof angles, squaring up walls, and creating precise 90-degree cuts.
Q: How do I utilize a framing square to check for squareness?
A: To check for squareness, place the shorter tongue of the square against one edge of the item, and align the longer blade along the perpendicular edge. Ensure that the square is flush with both edges and check if the square edge aligns perfectly. If it does, the item is square. If not, adjustments need to be made.
Q: Can a framing square help determine roof pitch angles?
A: Yes, a framing square is an excellent tool for that purpose. By using the square’s measurements and markings along both the blade and the tongue, you can easily determine the roof pitch angle required for accurate construction or repairs.
Q: How can a framing square assist in cutting precise 45-degree angles?
A: To make a 45-degree angle cut, position the blade of the framing square at a 45-degree angle to the edge of the material being cut. Then use the tongue as a guide for the saw or marking tool. This method guarantees an accurate and clean 45-degree cut.
Q: Are there other measurements and markings on a framing square?
A: Yes, framing squares often have additional features, such as rafter tables, brace measurements, and various angles marked along the blade and tongue. These helpful measurements can assist with tasks like finding common rafter lengths, determining board lengths for braces, and laying out difficult angles.
Q: Any tips on how to use a framing square more effectively?
A: When using a framing square, it’s crucial to ensure that it lies flat against the material and that the edges are aligned properly. Take your time to make accurate measurements and markings. Additionally, keeping the square clean and free from debris enhances its functionality.
Q: Can a framing square be used for non-carpentry related projects?
A: Definitely! While primarily designed for carpentry purposes, a framing square can be used in an array of DIY or home improvement projects that involve making precise measurements, laying out angles, or checking for squareness. Its versatility makes it a valuable addition to any toolbox.
Q: How can I maintain my framing square?
A: To maintain your framing square’s accuracy and prolong its lifespan, store it in a clean and dry location. Regularly clean off any sawdust or dirt that may accumulate on its surface. Additionally, avoid dropping or mishandling the tool, as this can result in bent or damaged edges, affecting its accuracy. In conclusion, the framing square is an invaluable tool that can greatly simplify and improve your woodworking and construction projects. By understanding its various markings and angles, you can quickly and accurately measure and lay out cuts, angles, and joints. Remember to always use a sturdy framing square made of high-quality materials to ensure accurate and reliable results. Whether you are a seasoned professional or a DIY enthusiast, mastering the use of a framing square will undoubtedly enhance your skills and efficiency in the workshop. With patience and practice, you will soon find yourself confidently wielding this versatile tool to tackle any framing or layout challenge that comes your way. So, grab your framing square, embark on your next project, and experience the satisfaction of precision and craftsmanship in every cut. Happy framing!


