Are you a graphic design enthusiast looking to maneuver your way through the world of image editing? Look no further! In this informative article, we will guide you step by step on how to utilize GIMP – a powerful, free, and open-source software for image manipulation. Whether you’re an amateur designer or a professional artist, this comprehensive guide will equip you with the necessary skills to navigate through GIMP’s features and unleash your creativity. So, grab your digital artist’s hat and let’s delve into the fascinating world of GIMP!
Introduction to Gimp: A Comprehensive Guide for Beginners
GIMP, short for GNU Image Manipulation Program, is a powerful and versatile software that allows users to edit and enhance digital images. Whether you are a professional graphic designer or a beginner looking to explore the world of digital editing, GIMP is an excellent tool to have in your arsenal. In this comprehensive guide, we will walk you through the basics of GIMP and teach you how to use its key features to create stunning images.
1. Getting Started with GIMP:
Before diving into the world of GIMP, it is essential to familiarize yourself with the software’s interface and basic functionalities. The GIMP interface may seem overwhelming at first glance, but don’t worry – we’ll break it down for you. Learn how to navigate through different windows, customize the layout, and access the various tools and menus GIMP has to offer.
2. Editing Tools and Techniques:
Once you are comfortable with the GIMP interface, it’s time to explore the vast range of editing tools at your disposal. From simple tasks like cropping, resizing, and rotating images to more advanced techniques like layers, masks, and filters, GIMP has got you covered. Discover how to make precise selections, apply different effects, and manipulate colors and tones to transform your images.
3. Mastering Layers and Masks:
Layers and masks are the secret weapons of image editing, allowing you to create complex compositions and seamlessly blend different elements together. Learn how to work with multiple layers, adjust their opacity and blending modes, and use masks to hide or reveal specific parts of an image. Unlock the true potential of GIMP by mastering these essential features.
4. Text and Typography:
Adding text to your images can bring them to life, whether it’s for a poster, social media graphic, or website banner. GIMP provides a range of tools and options for working with text and typography. Discover how to add and format text, manipulate fonts, align and warp text, and create eye-catching typographic designs using GIMP’s text capabilities.
5. Advanced Tips and Tricks:
Now that you have a solid understanding of the basics, it’s time to take your GIMP skills to the next level. In this section, we’ll share some advanced tips and tricks to enhance your workflow and boost your creativity. Learn how to create custom brushes and patterns, automate repetitive tasks using scripts, and utilize plugins to expand GIMP’s capabilities. Unlock the full potential of GIMP with these invaluable techniques.
With this comprehensive guide, you’ll be on your way to becoming a GIMP guru. Whether you’re just starting out or looking to refine your skills, GIMP offers endless possibilities for your creative projects. So grab your mouse, fire up GIMP, and let’s delve into the exciting world of image manipulation!
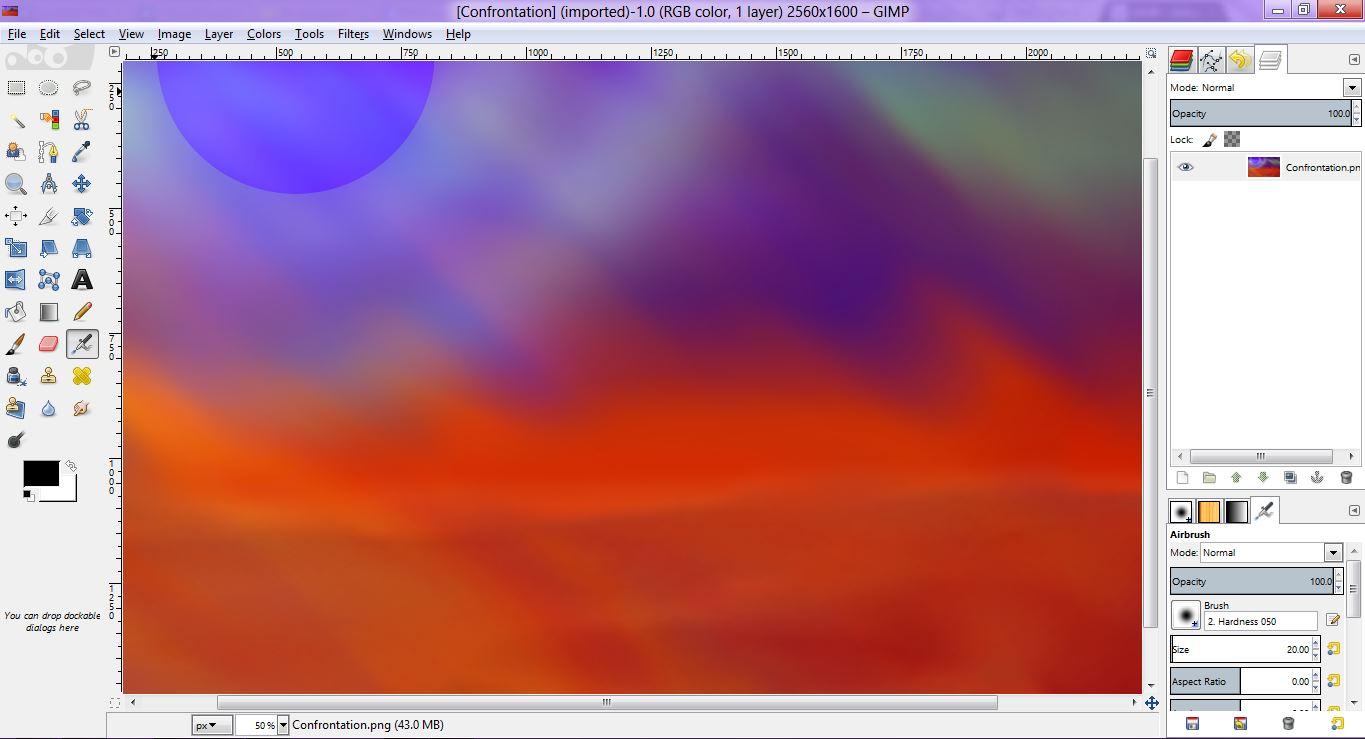
Understanding the User Interface and Essential Tools in Gimp
The user interface of Gimp, an open-source image editing software, may seem overwhelming at first glance. However, understanding the interface and essential tools can greatly enhance your editing experience. In this post, we will walk you through the key elements of the Gimp user interface and introduce you to some essential tools that will help you effortlessly navigate this powerful software.
-
Main Menu and Toolbars: At the top of the Gimp window, you’ll find the main menu, which contains various options for file management, editing, and customization. Below the main menu, you’ll see toolbars that provide quick access to commonly used tools. These tools range from selection and painting tools to image manipulation and filter options. Familiarizing yourself with the main menu and toolbars is crucial for efficient editing.
-
Image Window and Layers Dialog: The image window is where your images are displayed and edited. It consists of multiple layers that can be added, manipulated, and organized. Understanding layers is essential for non-destructive editing, as each layer can be edited separately without affecting the original image. The Layers dialog allows you to manage and modify layers, including adjusting opacity, applying blending modes, and rearranging their order.
-
Tool Options and Dockable Dialogs: Whenever you select a tool from the toolbars, you’ll notice that the tool options change in the options panel. This panel, typically located beneath the toolbars, provides additional settings and customization options for each tool. Additionally, Gimp offers various dockable dialogs, such as the Brushes dialog, Gradients dialog, or Paths dialog, which can be docked in the interface for quick access to specific features or functions.
-
Navigation and Zooming: Navigation tools play a vital role in moving around your image. The hand tool allows you to drag the image within the window, while the zoom tool enables you to zoom in or out for precise editing. Keyboard shortcuts and the navigation dialog can also be used to explore large images easily. Mastering these navigation techniques will significantly improve your efficiency in working with Gimp.
-
Customization and Shortcuts: Gimp provides extensive customization options to suit your personal preferences and workflow. You can rearrange or hide panels, customize toolbars, and even create your own keyboard shortcuts. This flexibility allows you to tailor the Gimp interface to your specific needs, ensuring a smooth and efficient editing experience.
In conclusion, is crucial for effective image editing. As you become familiar with the main menu, toolbars, layers, tool options, and navigation techniques, you’ll be able to navigate Gimp efficiently and make the most of its powerful features. Customize the interface to suit your preferences, and don’t hesitate to explore all the tools and functionalities Gimp has to offer. Happy editing!
Step-by-Step Tutorial: Editing Photos with Gimp’s Powerful Features
Gimp is a powerful and free photo editing software that offers a wide range of features. In this step-by-step tutorial, we will explore some of Gimp’s most powerful features and learn how to edit photos like a pro.
Step 1: Import Your Photo
To begin editing your photo in Gimp, first import it into the software by clicking on “File” in the menu bar, then selecting “Open.” Browse for the desired image on your computer and click “Open” to import it into Gimp. Alternatively, you can also drag and drop the image directly into the software.
Step 2: Familiarize Yourself with the Gimp Interface
Upon importing your photo, take a moment to familiarize yourself with the Gimp interface. Gimp offers a variety of tools and options that can be accessed through the menu bar at the top and the toolbox on the left. Spend some time exploring the different features and options available, such as layers, brushes, and filters.
Step 3: Make Enhancements with Adjustments and Filters
Gimp provides a range of adjustment options to enhance your photos. You can adjust brightness, contrast, saturation, and color levels. To access these adjustments, click on “Colors” in the menu bar and select the desired option. Additionally, you can experiment with various filters to add special effects or correct imperfections.
Step 4: Utilize Layers for Non-Destructive Editing
One of Gimp’s most powerful features is its layer functionality. Layers allow you to make edits to specific parts of your photo without affecting the original image. You can create new layers, add text, apply filters, or adjust opacity. To access the layers panel, click on “Windows” in the menu bar and select “Dockable Dialogs”, then choose “Layers”. Experiment with different layer styles and blending modes to create unique effects.
Step 5: Export and Save Your Edited Photo
Once you are satisfied with your editing, it’s time to save and export your photo. Click on “File” in the menu bar and select “Export As”. Choose a file name and location, and select the desired file format (such as JPEG or PNG). Finally, click “Export” to save your edited photo. Remember to save a separate copy to preserve your original image.
Mastering Advanced Techniques in Gimp: Filters, Layers, and Masks
In this post section, we will explore the advanced techniques in Gimp that will allow you to take your editing skills to the next level. With a focus on filters, layers, and masks, you will soon be an expert in unleashing the full potential of this powerful editing tool.
Filters play a vital role in enhancing your images, and Gimp offers a wide array of options to choose from. Whether you want to add a vintage touch with the Retro filter or give your images a dramatic effect using the Drama filter, Gimp has got you covered. Experiment with different filters to create unique and stunning visuals that will captivate your audience.
Layers are an essential feature in Gimp that allow you to work on different elements of your image separately, making it easy to edit and manipulate individual parts without affecting the rest. From adjusting the brightness and contrast of specific areas to applying various effects, layers give you complete control over your editing process. Learn how to create, organize, and blend layers to achieve the desired outcomes.
Masks are a powerful tool in Gimp that enable you to hide or reveal specific parts of an image. By using masks, you can selectively apply filters, adjust colors, or add effects to specific areas. With the ability to precisely control the opacity and feathering of masks, you can seamlessly blend different elements together, creating seamless and professional-looking edits.
To help you grasp these techniques better, here are some useful tips for working with filters, layers, and masks in Gimp:
-
Experiment with different filter combinations to achieve the desired look. Apply filters to individual layers to see how they interact with each other.
-
Use layer masks to make targeted adjustments. By painting on black or white masks, you can hide or reveal parts of the layer, allowing for precise editing.
-
Blend modes can further enhance your edits by changing how different layers interact with each other. Experiment with different blend modes to achieve the desired effect.
-
Use the Gaussian Blur filter in combination with layer masks to create a shallow depth of field effect, drawing focus to specific areas of the image.
-
Create a cohesive edit by using the same filters, adjustments, and masks across multiple layers. This will help maintain consistency and give your images a professional touch.
Remember, mastering advanced techniques in Gimp takes time and practice. Don’t be afraid to experiment and push your creativity boundaries. With these powerful tools at your disposal, you’ll soon be creating stunning edits that will truly stand out.
Expanding Your Creative Horizons with Gimp: Designing Graphics and Logos
Gimp is a powerful open-source software that allows you to expand your creative horizons by designing stunning graphics and logos. Whether you’re a professional designer or just starting out, Gimp offers a wide range of features and tools to help you bring your ideas to life. In this post, we will be exploring how to use Gimp effectively and make the most of its capabilities.
-
Getting started with Gimp:
- Download and install Gimp from the official website.
- Familiarize yourself with the user interface, which consists of a toolbox, layers, and a canvas.
- Customize the layout to suit your preferences by rearranging or adding/removing panels.
- Take advantage of Gimp’s keyboard shortcuts to speed up your workflow.
-
Creating graphics:
- Use the various drawing and painting tools to create shapes, lines, and patterns.
- Experiment with different brushes and their settings to achieve the desired effects.
- Apply filters and effects to enhance your graphics, such as blurring, sharpening, or adding textures.
- Utilize layers to organize and manipulate elements independently, allowing for easy editing and adjustments.
-
Designing logos:
- Start by sketching out your logo concept on paper or digitally in a separate program.
- Import your sketch into Gimp and use it as a reference layer.
- Use the selection tools to define shapes and fill them with colors or gradients.
- Add text using the text tool and experiment with fonts, sizes, and styles to find the perfect combination.
-
Tips and tricks:
- To maintain the quality of your graphics, work with higher resolution images.
- Save your projects in Gimp’s native .xcf file format to preserve layers and other editable elements.
- Export your finished designs in commonly used formats such as .png or .jpg for sharing or printing.
- Take advantage of Gimp’s numerous plugins and scripts to extend its functionality and automate repetitive tasks.
-
Resources and learning:
- Explore Gimp’s official documentation and tutorials for in-depth guides on specific features and techniques.
- Join online communities, forums, or social media groups dedicated to Gimp to connect with fellow users and learn from their experiences.
- Consider investing in comprehensive tutorials or books that provide step-by-step instructions and project-based learning.
- Experiment, practice, and don’t be afraid to make mistakes – Gimp offers unlimited creative possibilities, so let your imagination run wild!
By harnessing the power of Gimp and following these guidelines, you’ll be well on your way to creating impressive graphics and logos. Whether you’re designing for personal projects or professional clients, Gimp’s versatility and affordability make it an excellent choice for unleashing your creative potential. So, why wait? Start exploring Gimp today and see where your artistic journey takes you!
Q&A
Q: What is GIMP?
A: GIMP, which stands for GNU Image Manipulation Program, is a free and open-source photo editing software widely used for graphic design, image retouching, and image composition. It offers powerful tools and features comparable to professional software like Adobe Photoshop.
Q: What operating systems is GIMP compatible with?
A: GIMP is compatible with various operating systems including Windows, macOS, and Linux, making it accessible to a wide range of users.
Q: Is GIMP free to use?
A: Yes, GIMP is completely free to download and use. Being an open-source program, it allows users to modify and distribute it freely.
Q: How can I download and install GIMP?
A: To download GIMP, you can visit its official website (www.gimp.org) and choose the appropriate version for your operating system. Once downloaded, follow the installation instructions provided by the installer.
Q: What are the main features and tools in GIMP?
A: GIMP offers a comprehensive set of tools for image editing, such as selection, painting, color correction, cropping, resizing, and many others. Some advanced features include layers, masks, filters, and customizable brushes. It also supports a wide range of file formats.
Q: Are there tutorials or documentation available to help me learn GIMP?
A: Yes, GIMP provides extensive tutorials and documentation on its official website. Beginners can find step-by-step guides to get started, while advanced users can explore more advanced techniques to enhance their editing skills.
Q: Can I use GIMP for professional work?
A: Yes, GIMP is a powerful tool that can be used for professional work. Many graphic designers, photographers, and artists utilize GIMP to create stunning visual content. However, keep in mind that GIMP might not have some advanced features found in commercial software, so it’s essential to evaluate your specific requirements.
Q: Can I use GIMP to open and edit RAW image files?
A: Absolutely! GIMP has built-in support for opening and editing RAW image files. It allows you to manipulate the image properties without losing the original data, granting you increased flexibility during the editing process.
Q: How does GIMP compare to Adobe Photoshop?
A: While GIMP and Adobe Photoshop offer similar functionalities, Photoshop has a wider range of advanced features and a more refined interface. However, GIMP can still be an excellent alternative for those who prefer a free and open-source photo editing software.
Q: Can I use GIMP for basic photo retouching and enhancing images?
A: Yes, GIMP is great for basic photo retouching tasks like removing red-eye, adjusting brightness and contrast, removing blemishes, and enhancing colors. Its wide array of tools allows you to achieve professional-looking results.
Q: Is GIMP suitable for creating digital artwork or illustrations?
A: Definitely! Many artists and illustrators use GIMP to create stunning digital artwork. Its versatile set of brushes, layers, and effects enable artists to unleash their creativity and produce intricate and visually appealing digital illustrations.
Q: Does GIMP offer any community support or forums?
A: Yes, GIMP has an active online community. Users can engage in forums, participate in discussions, seek help, or share their knowledge with other GIMP enthusiasts. The GIMP community is known for being helpful and supportive. In conclusion, mastering the Gimp software can open up a world of possibilities for digital artists and photographers alike. By following the step-by-step instructions and utilizing the various tools and features available, users can enhance their images, create stunning visuals, and unleash their creativity. From basic tasks like cropping and adjusting brightness to more advanced techniques such as layers and filters, Gimp offers a comprehensive platform for all levels of expertise. With patience and practice, anyone can harness the power of Gimp to bring their artistic vision to life. So, get started today and let your imagination run wild with this versatile software. Happy editing!


