In today’s technologically advanced era, managing your website requires a solid understanding of various tools and platforms. One such platform that has gained widespread popularity among website administrators is cPanel. Whether you are a novice or an experienced user, mastering cPanel can significantly enhance your ability to control and manage your website efficiently. This comprehensive guide aims to provide you with the fundamental knowledge and step-by-step instructions on how to navigate through cPanel’s user-friendly interface, enabling you to make the most of its multitude of features. So, let’s delve into the world of cPanel and unlock its limitless potential to streamline your website management tasks.
Accessing CPanel
is a crucial step in managing your website effectively. CPanel is a powerful web hosting control panel that allows you to take control of various aspects of your website, such as managing files, databases, email accounts, and much more. In this post, we will guide you through the steps on how to use CPanel effectively.
To access CPanel, you will first need to log in to your web hosting account. Typically, your web hosting provider will provide you with the necessary login credentials. Once you have your credentials, open your preferred web browser and enter your website’s URL followed by “/cpanel”. For example, if your website is www.example.com, you would enter www.example.com/cpanel in the browser’s address bar.
Upon entering the correct URL, you will be redirected to the CPanel login page. Here, enter your username and password provided by your web hosting provider. It is crucial to keep these login credentials secure to prevent unauthorized access to your website’s control panel.
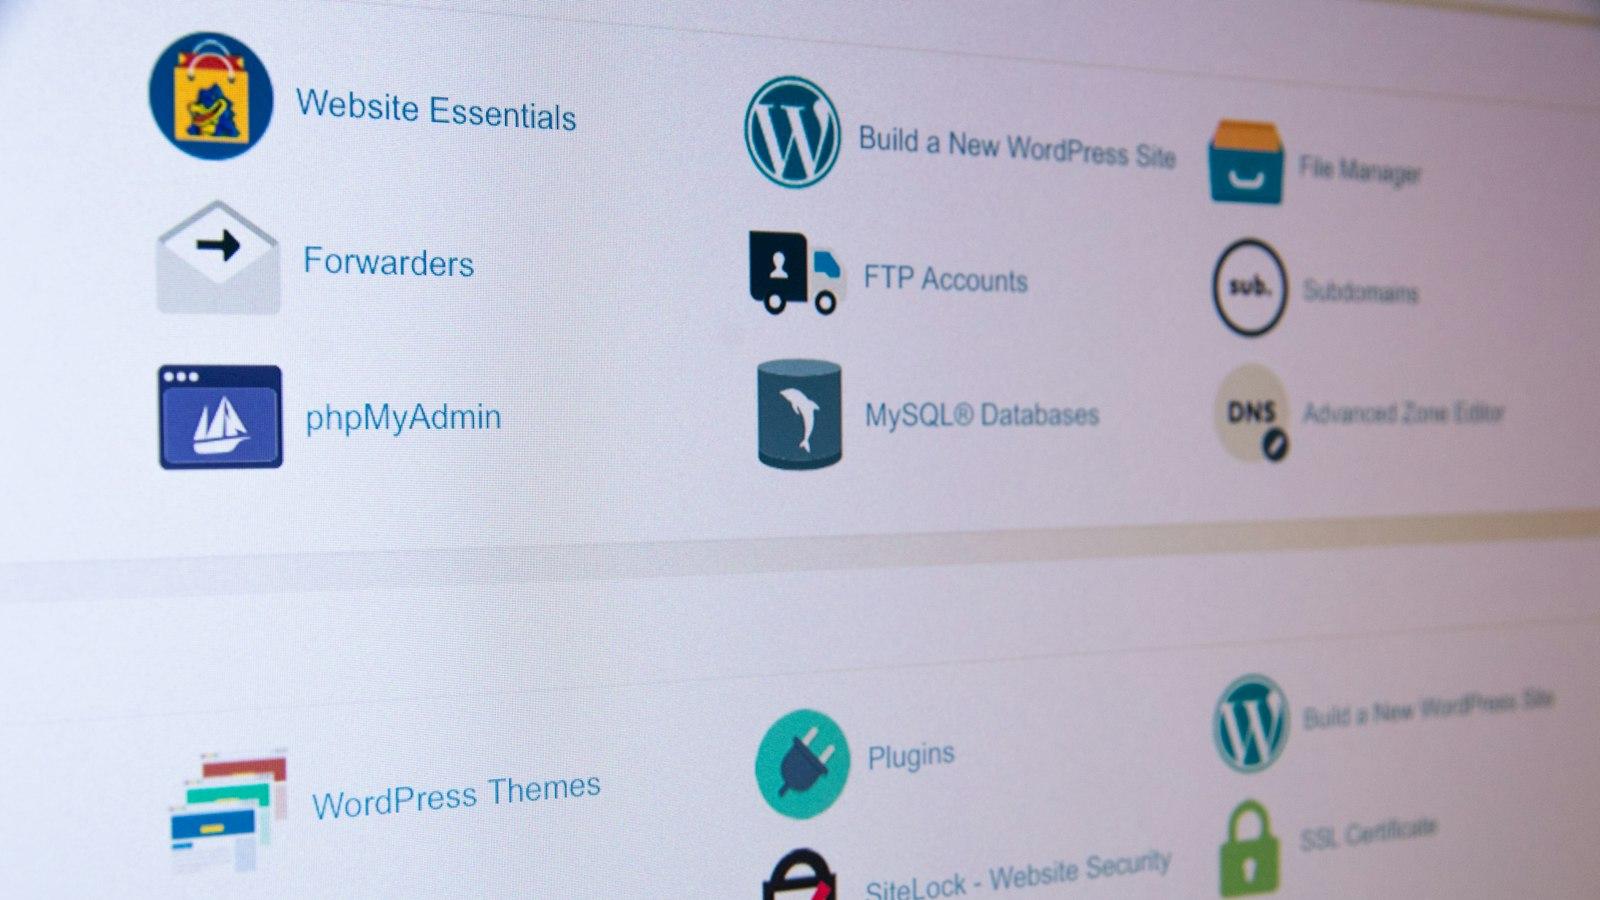
After successfully logging in, you will be greeted with the CPanel interface. The interface is user-friendly and organized into different sections, making it easy to navigate and find the tools you need. You can customize the appearance of the interface by selecting different themes and layouts to suit your preferences.
One of the essential features of CPanel is its file manager. It allows you to upload, modify, and delete files on your server. Using the file manager, you can easily navigate through your website’s directories and make changes as necessary. It also provides you with options to compress files, change their permissions, and much more.
Another important aspect of CPanel is the ability to manage email accounts. With CPanel, you can create and manage email accounts associated with your domain. You can set up email forwarding, create autoresponders, set spam filters, and perform various other email-related tasks. This feature is particularly helpful for businesses that require professional email addresses for their employees.
Overall, CPanel is a powerful tool that simplifies the management of your website. Whether you need to upload files, manage databases, set up email accounts, or perform other essential tasks, CPanel provides you with the necessary tools to accomplish them efficiently. Familiarizing yourself with CPanel’s interface and exploring its various features will enable you to make the most out of this invaluable control panel. So log in to your CPanel and unlock the full potential of your website management capabilities!

Navigating CPanel’s Interface
Once you have accessed CPanel, you will find yourself in a powerful yet user-friendly interface that puts all the necessary tools at your fingertips. In this section, we will take a closer look at the various sections and features available, helping you master the art of navigating this robust platform.
-
Dashboard: The CPanel dashboard is your home base, providing an overview of your website’s vital statistics. From here, you can access and monitor important information such as disk usage, bandwidth, and website statistics. This central hub allows you to keep a close eye on your website’s performance and make necessary optimizations effortlessly.
-
File Manager: The file manager is where you can manage the files and folders that make up your website. With an intuitive directory structure, you can easily upload, delete, or modify files without ever needing to access an external FTP client. Don’t forget to take advantage of the search function and the ability to compress and extract files to keep your website organized and running smoothly.
-
Domains: In the domains section, you can administer all aspects of your website’s domain name. Whether you need to add new domains, redirect existing ones, or set up subdomains, you will find the tools you need here. Additionally, the ability to manage domain aliases and DNS settings ensures that you have full control over your website’s domain-related configurations.
-
Email Accounts: Want to create a professional email address that matches your domain? CPanel’s email accounts section has got you covered. With just a few clicks, you can create and manage email accounts, set up email forwarding, or even enable autoresponders. Keep your inbox organized and efficient with the built-in email filtering tools.
-
Databases: For websites that rely on databases to function, the databases section is essential. Here, you can easily create, manage, and delete databases, as well as manage database users and permissions. With support for popular database management systems like MySQL and PostgreSQL, CPanel ensures a seamless experience for developers and website owners alike.
In conclusion, CPanel’s interface provides an incredible amount of functionality, giving you complete control over your website’s every aspect. From managing files and domains to setting up email accounts and databases, CPanel simplifies these tasks with its user-friendly design and powerful features. Take full advantage of the tools at your disposal, and you’ll be navigating CPanel like a pro in no time.

Managing Domains and Subdomains
Paragraph 1:
One of the key features offered by CPanel is its ability to easily manage domains and subdomains. With CPanel, you can effortlessly add, remove, and modify both domains and subdomains for your website. Domains are the main addresses of your websites, while subdomains can be used for various purposes, such as creating separate sections or language-specific versions of your site. CPanel provides a user-friendly interface that allows you to perform all these tasks with just a few clicks.
Paragraph 2:
Adding a new domain or subdomain in CPanel is a straightforward process. Simply navigate to the “Domains” section and click on “Add Domain” or “Subdomain,” depending on what you want to create. Fill in the necessary details like the domain name, the document root directory, and any additional settings you require. Once you click “Add Domain” or “Add Subdomain,” CPanel will automatically set up the necessary DNS records and make your new domain or subdomain active on your website.
Paragraph 3:
Removing a domain or subdomain from your website can also be done effortlessly within CPanel. In the “Domains” section, you will find an option to manage your existing domains and subdomains. Simply locate the domain or subdomain you wish to remove and click on the delete icon. CPanel will prompt you to confirm the action, ensuring that you do not accidentally delete any crucial elements of your website. After confirming, CPanel will remove the domain or subdomain from your site, update the DNS records accordingly, and ensure that the deleted address is no longer accessible.
Paragraph 4:
CPanel not only allows you to manage domains and subdomains but also provides advanced options for their customization. You can easily redirect domains or subdomains to specific URLs, ensuring seamless navigation for your visitors. CPanel also offers the flexibility to create domain aliases, which can redirect multiple domains to a single website. This feature is particularly useful if you have variations of your domain or want to redirect common misspellings to the correct address.
Paragraph 5:
Furthermore, CPanel enables you to control the available subdomains for each domain. This granular control allows you to create subdomains for specific purposes, such as hosting a blog or a forum. By organizing your website into subdomains, you can enhance the structure and organization of your content, making it easier for both users and search engines to navigate. With CPanel’s intuitive interface and comprehensive features, becomes a hassle-free task, giving you full control over your website’s architecture and online presence.
Configuring Email Accounts in CPanel
can be a straightforward process that allows you to manage your emails effectively. With CPanel’s user-friendly interface, you can easily create email accounts, set up forwarders, and manage your mailbox storage. In this post, we will walk you through the steps to configure email accounts in CPanel.
To get started, log in to your CPanel account and navigate to the “Email” section. Here, you will find various options related to managing your email accounts. Locate the “Email Accounts” icon and click on it to access the email account management interface.
Once you’re on the email account management page, you can create a new email account by clicking on the “Create” button. Fill in the necessary details, such as the email address and password for the new account. You can also set the mailbox storage quota, which determines the amount of space allocated for the emails in that account.
If you want to forward emails from one account to another, CPanel provides an easy way to set up email forwarding. In the email account management interface, scroll down to the “Forwarders” section and click on the “Add Forwarder” button. Enter the email address you want to forward from and the destination email address where the emails should be sent. You can even set up multiple forwarders to different email addresses.
CPanel also offers the option to configure email clients to access your emails. Under the email account management interface, you’ll find a section called ”Connect Devices.” Here, you can find the settings and configuration details required for popular email clients like Microsoft Outlook, Apple Mail, and Thunderbird. Just select the email client you’re using, and CPanel will provide you with the necessary configuration information.
Lastly, it’s essential to ensure the security of your email accounts. CPanel allows you to manage email authentication through tools like DKIM (DomainKeys Identified Mail) and SPF (Sender Policy Framework). These tools help verify the authenticity of your emails and prevent spoofing or phishing attempts. You can access these settings in the email account management interface under the “Email Deliverability” section.
By following these simple steps, you can easily configure email accounts in CPanel and streamline your communication process. Whether you’re setting up new email accounts, managing forwarders, or securing your emails, CPanel provides a user-friendly interface to handle all your email-related tasks efficiently. Take advantage of its features to ensure a smooth and organized email experience.
Optimizing Website Performance with CPanel
CPanel is a powerful web hosting control panel that provides users with a suite of tools to manage and optimize their websites. With its user-friendly interface and wide range of features, CPanel makes it easy to enhance your website’s performance. In this article, we will explore some key tips and tricks for .
-
Enable caching: Caching plays a crucial role in improving website performance. With CPanel, you can easily enable caching to store frequently accessed files locally, reducing the load on your server and speeding up page load times. To do this, navigate to the “Software” section in CPanel and select “Optimize Website.” From there, you can choose to enable caching by selecting the appropriate option.
-
Compress data: By compressing the data sent from your server to the user’s browser, you can significantly reduce page load times. CPanel offers a feature called “GZIP Compression” that allows you to compress the content of your website before it is sent to the user’s browser. To enable GZIP Compression, go to the “Software” section and select “Optimize Website.” From there, you can easily enable compression by clicking on the appropriate checkbox.
-
Minify CSS and JavaScript: Large CSS and JavaScript files can slow down your website’s performance. CPanel allows you to minify these files, removing unnecessary whitespace and reducing their size. To minify CSS and JavaScript files, navigate to the “Files” section in CPanel and select “File Manager.” Locate your website’s root directory and find the CSS and JavaScript files you wish to minify. Right-click on each file and select “Edit.” Then, manually remove unnecessary whitespace and save the changes.
-
Utilize Content Delivery Networks (CDNs): CDNs are a great way to improve website performance by distributing content to multiple servers around the world. CPanel integrates with popular CDNs like Cloudflare, making it easy to set up and manage. Simply navigate to the “Software” section and select “Cloudflare.” Follow the prompts to connect your website to Cloudflare and enjoy faster page load times.
-
Monitor website performance: It’s essential to continuously monitor your website’s performance to identify and resolve any issues promptly. CPanel provides several tools for monitoring performance, including Awstats and Webalizer. These tools offer valuable insights into website traffic, visitor behavior, and more. You can access these tools by navigating to the “Metrics” section in CPanel and selecting the desired option. Regularly reviewing these reports will help you make informed decisions to further optimize your website’s performance.
In conclusion, CPanel offers a plethora of features and tools to optimize your website’s performance. From enabling caching and compression to minifying CSS and JavaScript files, CPanel makes it easy to fine-tune your website and ensure faster page load times. By utilizing CDNs and monitoring performance, you can continuously improve your website’s speed and enhance the overall user experience. With CPanel’s intuitive interface and powerful capabilities, achieving optimal website performance has never been easier.
Q&A
Q: What is cPanel?
A: cPanel is a web hosting control panel that provides a user-friendly interface to manage different aspects of a website, such as files, domains, email accounts, databases, and more. It is widely used by web hosting providers to simplify website management for their customers.
Q: How can I access cPanel?
A: To access cPanel, you typically need to log in through your web hosting provider’s website. They will provide you with a unique username and password to access your cPanel interface. Some providers may offer a direct URL to access cPanel without logging in through their website.
Q: What can I do with cPanel?
A: cPanel offers a wide range of features and functionalities to manage your website. You can create and manage email accounts, add and remove domains, upload and manage files, install content management systems (CMS) like WordPress, create and manage databases, set up security measures such as SSL certificates, and much more.
Q: How can I manage my email accounts using cPanel?
A: In the “Email” section of cPanel, you can create new email accounts, set email quotas, manage email forwarders, and access webmail interfaces to check emails through a browser. Additionally, you can configure email clients like Microsoft Outlook or Apple Mail to retrieve emails using the provided server settings.
Q: Can I use cPanel to install website software?
A: Yes, cPanel provides a feature called “Softaculous” that allows you to install a variety of software applications with just a few clicks. You can install popular content management systems like WordPress, Joomla, or Drupal, as well as e-commerce platforms, forums, and other web applications.
Q: How can I manage files in cPanel?
A: cPanel offers a file manager tool that allows you to upload, download, edit, and organize files on your website’s server. You can create new folders, rename files, change file permissions, compress and extract files, and even edit code directly within the file manager.
Q: Is it possible to secure my website using cPanel?
A: Absolutely! cPanel provides various security features to protect your website. You can easily generate and install SSL certificates to enable secure HTTPS connections. Additionally, cPanel offers options to set up password-protected directories, IP blockers, and email authentication to enhance security.
Q: Can I set up automatic backups in cPanel?
A: Yes, cPanel provides tools to schedule and manage automatic backups for your website. You can configure backups to be performed regularly and customize which data should be included, such as website files, databases, email accounts, and settings. It is highly recommended to regularly back up your data to prevent any unforeseen issues.
Q: Are there any additional resources available to learn more about cPanel?
A: Yes, there are plenty of resources available to further understand and optimize the use of cPanel. You can visit the official cPanel documentation, watch video tutorials on platforms like YouTube, and participate in online forums or communities where you can ask questions and interact with other cPanel users.
Q: Can I use cPanel if I’m not technically inclined?
A: Absolutely! cPanel is designed with user-friendliness in mind, allowing anyone, regardless of technical expertise, to manage their website efficiently. The interface is intuitive, and with some time spent exploring its features, you can easily navigate and utilize cPanel’s functionalities effectively. In conclusion, mastering the usage of cPanel can greatly enhance your website management experience. From streamlining the setup process to maintaining the functionality and security of your site, this comprehensive control panel offers an array of powerful features. By following the step-by-step instructions provided in this article, you can confidently navigate through cPanel’s extensive range of tools and effortlessly carry out essential tasks such as managing email, domains, databases, and more. Furthermore, through its intuitive interface and user-friendly design, cPanel makes website management accessible to users of all skill levels. So whether you are a beginner or an experienced web administrator, acquainting yourself with cPanel’s functionalities will undoubtedly prove invaluable in elevating your website’s performance and success. With cPanel at your fingertips, take charge of your online presence and unlock the full potential of your website effortlessly!


