
Micrometers are indispensable tools in the realm of precision measurements, providing accurate readings essential in various industries and applications. Whether you are an engineer, machinist, or simply an enthusiast seeking precise measurements, understanding how to effectively use a micrometer is a vital skill to possess. In this article, we will delve into the intricacies of micrometer usage, exploring its various types, components, and step-by-step instructions to assist you in mastering this precise measuring instrument. By the end, you will be equipped with the knowledge to confidently operate a micrometer, ensuring precise measurements and enhancing your precision-based endeavors.
Introduction to Micrometers
Micrometers are precision measuring instruments commonly used in mechanical engineering and manufacturing industries. They are designed to measure very small dimensions with high accuracy, making them indispensable tools for a wide range of applications. In this post, we will explore the basics of using a micrometer and provide you with some tips and tricks to get the most out of this versatile tool.
-
Understanding the parts of a micrometer:
- Frame: The main body of the micrometer that houses all its components.
- Anvil and spindle: These are the two jaws that come into contact with the object being measured.
- Thimble and sleeve: The thimble rotates as you make measurements, while the sleeve remains stationary.
- Ratchet stop: A feature that allows you to apply consistent pressure when measuring.
-
Taking measurements with a micrometer:
- Ensure that the micrometer is clean and free from any debris before use.
- Close the jaws lightly around the object being measured and then tighten the ratchet stop until you feel some resistance.
- Read the measurement on the sleeve where it aligns with the thimble. Each division on the thimble represents a small unit of measurement, usually 0.001 inches or 0.01 millimeters.
- Take multiple measurements at different points along the object to ensure accuracy. Calculate the average value for precise results.
-
Maintaining accuracy:
- Regularly clean the anvil and spindle to prevent dust or dirt buildup that could affect measurements.
- Use a known standard object to calibrate the micrometer periodically, especially if you are relying on its accuracy for critical measurements.
- Keep the micrometer stored in a protective case when not in use to minimize the risk of damage or contamination.
-
Tips for using a micrometer:
- Use gentle and even pressure when closing the jaws to avoid distorting the object being measured.
- If the object is too small to be directly measured, use a gauge block or slip gauges to bridge the gap and measure the combined thickness.
- When measuring the thickness of thin objects, such as paper or foil, support the object on a flat surface to avoid misalignment.
-
Common applications of micrometers:
- Manufacturing: Micrometers are extensively used in machining processes to ensure precise measurements of components and parts, aiding in quality control and process optimization.
- Mechanical engineering: Micrometers are useful for measuring the clearances and tolerances of various mechanical systems, such as bearings and shafts.
- Carpentry and woodworking: Micrometers can be employed to measure the thickness of wood and other materials, enabling accurate construction and fitting.
In conclusion, micrometers are indispensable tools for measuring small dimensions with great accuracy. By understanding the parts, using proper techniques, and following maintenance practices, you can ensure reliable measurements and maximize the utility of your micrometer in various industries and applications.

Understanding the Parts and Functions of a Micrometer
A micrometer is an essential tool for precise measurement in various fields. Whether you are a machinist, engineer, or hobbyist, is crucial to ensure accurate measurements. In this post, we will delve into the components of a micrometer and their respective functions, helping you become proficient in using this indispensable tool.
-
Frame: The frame is the main body of the micrometer, typically made of steel or aluminum. It provides stability and support for all the other components. The frame is designed to be rigid and durable, ensuring consistent measurements even in harsh conditions.
-
Thimble: Located at the top of the micrometer, the thimble is a rotating disk with engraved markings. It allows for fine adjustments of the measurement range. Each mark on the thimble corresponds to a small increment, usually 0.001 inch or 0.01 millimeter, enabling precise measurements.
-
Barrel: The barrel acts as a housing for the spindle and thimble. It houses the micrometer’s internal mechanism, ensuring smooth movement and proper alignment of the measuring components. The barrel also provides protection against external factors, such as dust or debris, which could affect measurement accuracy.
-
Spindle: The spindle is a threaded rod that moves forward or backward as the thimble is rotated. It carries the anvil, the fixed measuring surface, at the end. Precise alignment of the spindle is crucial for accurate measurements, and it needs to be maintained and calibrated regularly.
-
Anvil: The anvil is the fixed part of the micrometer that comes into contact with the object being measured. It is usually flat or spherical, depending on the type of measurement required. The anvil provides a stable reference point for accurate and repeatable measurements.
Additionally, some micrometers may have additional features, such as a ratchet stop or a lock nut. The ratchet stop ensures consistent and repeatable pressure when taking measurements, while the lock nut helps secure the measurement in place once obtained.
Understanding the various parts and functions of a micrometer is key to using it effectively. It allows you to make precise measurements with confidence and ensure the accuracy of your work. With practice and familiarity, you will develop the necessary skills to operate a micrometer proficiently, expanding your capabilities in various industries and applications.

Step-by-Step Guide for Measuring with a Micrometer
A micrometer is a vital tool for accurate measurements in various industries such as manufacturing, engineering, and woodworking. Whether you are a professional or a hobbyist, understanding how to use a micrometer correctly is crucial for obtaining precise measurements. In this step-by-step guide, we will walk you through the process of using a micrometer effectively.
Step 1: Familiarize Yourself with the Micrometer
Before you start measuring, it is important to know the different parts of a micrometer. Familiarize yourself with the anvil, spindle, thimble, sleeve, and lock nut. Understanding how each component works together will help you operate the micrometer smoothly.
Step 2: Clean the Measuring Surfaces
To achieve accurate measurements, ensure that the measuring surfaces of the micrometer are clean and free of debris. Any dirt or residue can interfere with the precision of your readings. Use a lint-free cloth or a specialized cleaning solution to wipe the anvil and spindle surfaces carefully.
Step 3: Zero the Micrometer
Zeroing the micrometer is crucial to ensure accurate measurements. To zero the micrometer, close the jaws and rotate the thimble until the zero line on the sleeve aligns with the zero line on the thimble. Ensure that the micrometer is properly balanced and not tilted.
Step 4: Take the Measurement
Place the object you want to measure between the anvil and spindle, ensuring it sits snugly. Slowly turn the thimble clockwise until the object is securely held. Read the measurement on the thimble and sleeve. The thimble usually gives the whole number measurement, while the sleeve provides the decimal places.
Step 5: Interpret the Measurements
Understanding how to interpret the measurements is essential. The zero line on the sleeve represents one whole unit, for example, one millimeter. Each line on the thimble corresponds to a fraction of the unit. Count the lines on the thimble to determine the decimal part of the measurement. Always ensure accurate alignment of the lines for precise readings.
Using a micrometer may seem daunting at first, but with practice and attention to detail, you can become proficient in measuring with this precise tool. Remember to handle the micrometer with care, avoid excessive force when tightening, and store it in a protective case when not in use. With these guidelines and a steady hand, you can confidently take accurate measurements with a micrometer for all your projects.
Tips and Best Practices for Accurate Micrometer Usage
Using a micrometer can be a precise and accurate way to measure small distances in a variety of applications. Whether you are a machinist, engineer, or simply someone needing to make accurate measurements, here are some tips and best practices to ensure you are using a micrometer correctly and getting accurate results.
-
Prepare the Micrometer:
Before using a micrometer, it’s important to make sure it is clean and in good working condition. Remove any debris or dust from the measuring surfaces using a soft brush or cloth. Inspect the anvils and spindle for any signs of damage or wear. If necessary, lubricate the moving parts with a small amount of machine oil. This will ensure smooth movement and prevent any interference with the measurements. -
Proper Technique:
To get the most accurate measurements with a micrometer, it is essential to use the proper technique. Start by ensuring the micrometer is properly zeroed or calibrated. Gently close the measuring jaws until they lightly touch, then turn the thimble to adjust the zero line on the sleeve to match the edge of the thimble. When taking measurements, always apply gentle, even pressure to close the jaws, and avoid over-tightening. This will help prevent any distortion or inaccurate readings. -
Reading the Micrometer:
Reading the measurement on a micrometer can appear daunting at first, but with practice, it becomes second nature. The sleeve and thimble have markings indicating the measurements. The sleeve represents whole millimeters, and each line represents 0.5 mm. The thimble, on the other hand, has markings indicating hundredths of a millimeter (0.01 mm). To read the measurement, align the line on the sleeve with the edge of the thimble and note the number closest to the thimble line. Add this number to the number of whole millimeters on the sleeve, and you have your measurement. -
Taking Multiple Measurements:
To ensure accuracy, it’s best to take multiple measurements and calculate the average. This will help eliminate any slight variations or errors in technique. Record each measurement and then calculate the average by adding all the measurements together and dividing by the number of readings taken. This method helps minimize the impact of any outliers and provides a more reliable and accurate measurement. -
Maintenance and Storage:
To ensure the longevity and accuracy of your micrometer, proper maintenance and storage are essential. After each use, clean the micrometer thoroughly with a soft cloth to remove any dirt or particles. If necessary, apply a thin layer of rust-preventive oil to protect the measuring surfaces. Store the micrometer in a clean, dry place, away from dust or excessive humidity. If possible, keep it in a protective case to prevent any accidental damage.
In conclusion, using a micrometer accurately requires proper preparation, technique, reading, and care. Following these tips and best practices will help you achieve precise measurements in your work, whether it’s in a professional setting or for personal use. Remember to always handle the micrometer with care and practice regularly to become proficient in its usage.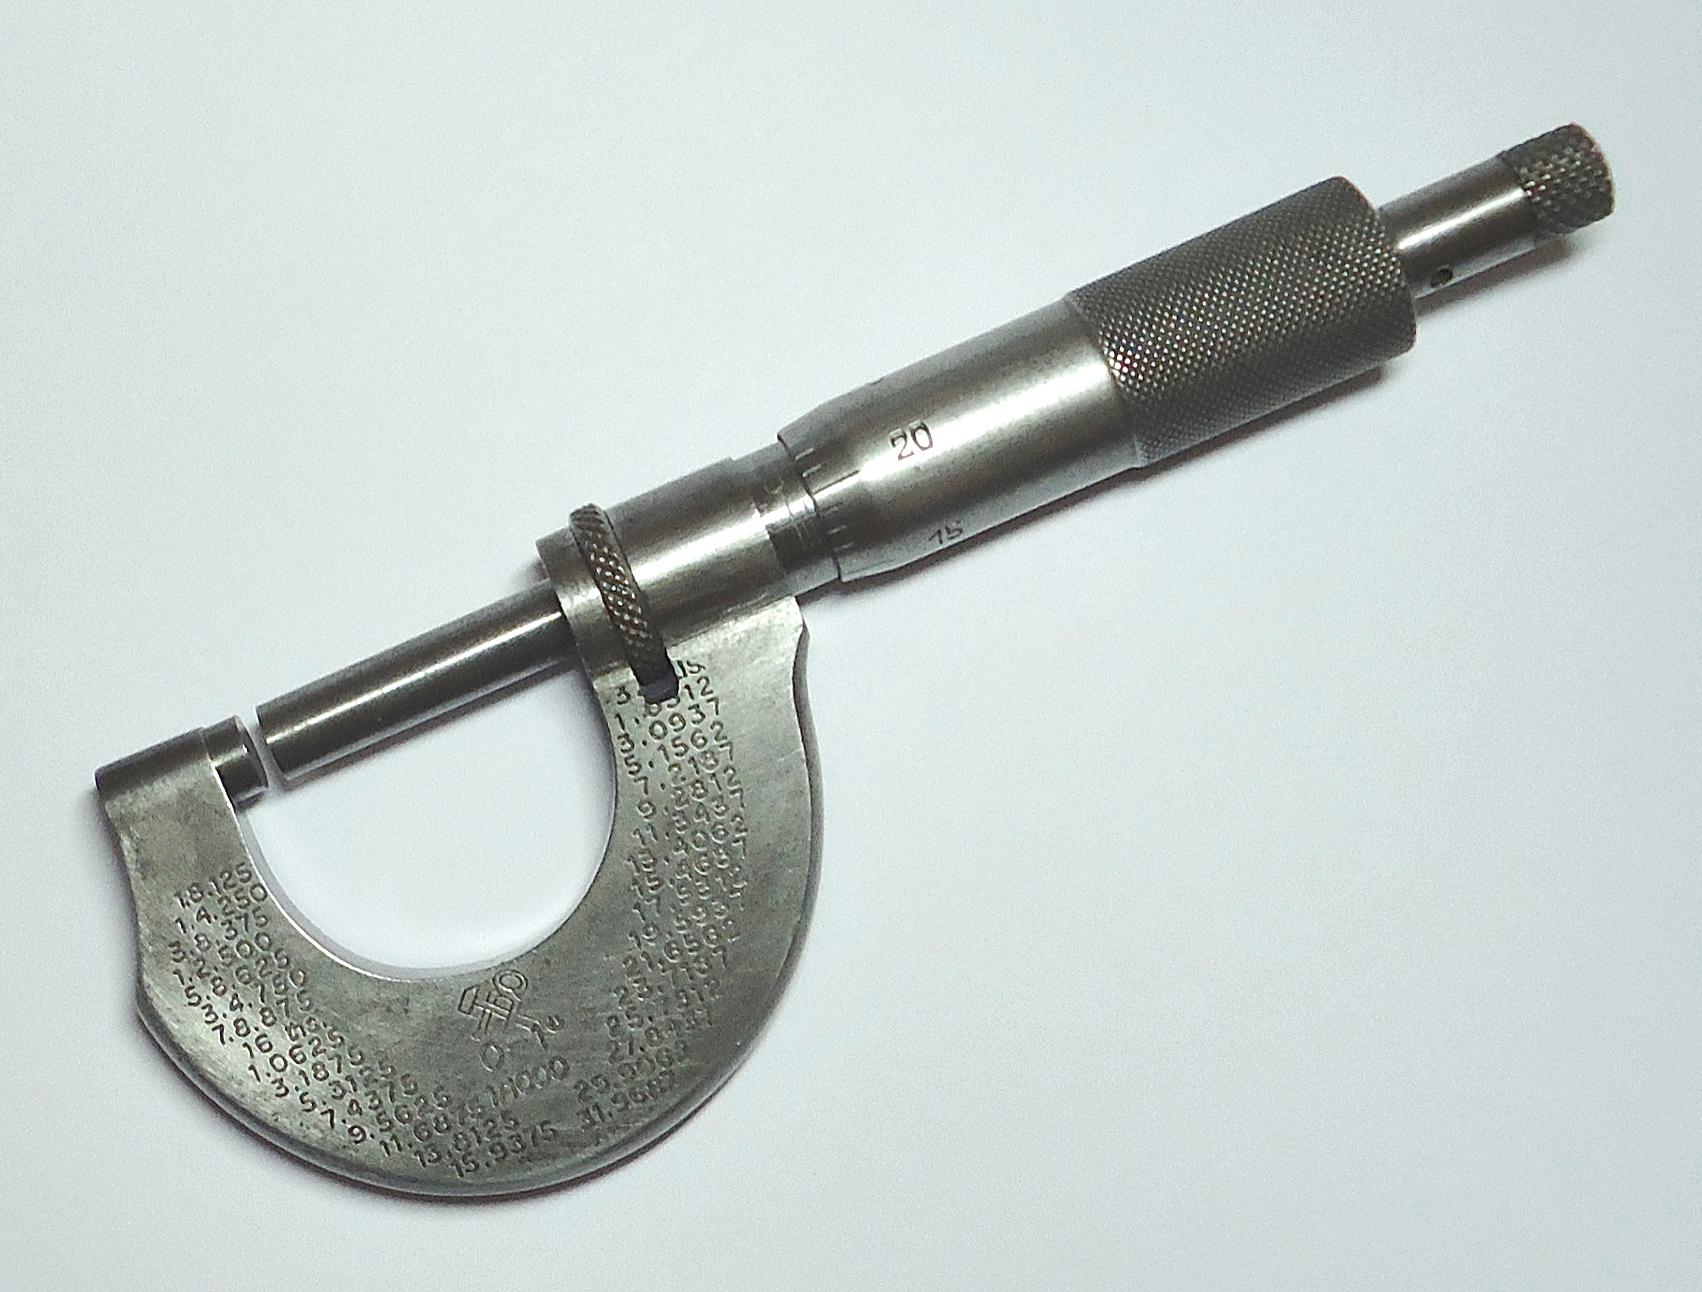
Common Mistakes to Avoid When Using a Micrometer
Using a micrometer may seem straightforward, but even the most experienced machinists can make mistakes that affect their measurements. Avoiding these common mistakes will ensure accurate readings and reliable results. Here are five :
1. Applying Excessive Force
One of the most common mistakes is applying too much force when using a micrometer. This can lead to inaccurate readings and potential damage to the instrument. Remember, a micrometer is a precise tool that requires a delicate touch. Use just enough force to make contact with the object being measured, and avoid excessive pressure that may compress or distort the object.
2. Ignoring Calibration
Calibration is crucial when using a micrometer. Failing to calibrate the instrument regularly can result in inaccurate measurements. It is important to check the micrometer against a known standard and make adjustments if necessary. Regular calibration ensures that the micrometer is functioning correctly and provides reliable measurements.
3. Misalignment of the Anvil and Spindle
Improper alignment of the anvil and spindle can significantly impact measurements taken with a micrometer. Ensure that the anvil and spindle are perfectly aligned before taking any measurements. Misalignment can occur due to wear and tear or mishandling, so it is crucial to check and re-align the micrometer regularly.
4. Not Using Proper Technique
Using a micrometer requires a specific technique to obtain accurate measurements. Avoid common mistakes like not holding the micrometer perpendicular to the measured surface, not taking multiple measurements to ensure consistency, or not allowing the instrument to settle properly. Familiarize yourself with the correct technique and practice it consistently for reliable results.
5. Neglecting Maintenance
Micrometers are precision instruments that require proper maintenance to ensure longevity and accuracy. Ignoring regular cleaning, lubrication, and storage guidelines can lead to malfunction or degradation of measurement quality. Keep your micrometer clean, lubricate it as instructed by the manufacturer, and store it properly in a protective case when not in use.
Q&A
Q: What is a micrometer and what is it used for?
A: A micrometer is a precision measuring instrument used to measure small distances with high accuracy. It is commonly used in various industries and professions that require precise measurements, such as manufacturing, engineering, and machining.
Q: How does a micrometer work?
A: A micrometer functions by utilizing a calibrated screw to measure the distance or thickness of an object. When the screw is rotated, the spindle moves towards or away from the anvil, allowing the user to obtain precise measurements.
Q: What are the different types of micrometers available?
A: Micrometers come in various types depending on the specific measurement needs. Some commonly used types include the outside micrometer (used for measuring outer dimensions), inside micrometer (for measuring inner dimensions), depth micrometer (used to measure depths), and thickness micrometer (for measuring thicknesses).
Q: How do I properly read a micrometer’s measurements?
A: Micrometers commonly have a thimble, barrel, and sleeve. The thimble generally has markings representing millimeters and half-millimeter increments, while the barrel and sleeve have markings representing tenths and hundredths of a millimeter. To accurately read a micrometer, align the lines on the sleeve with the corresponding line on the thimble and barrel, thereby obtaining the measurement.
Q: How can I use a micrometer to measure an exterior object?
A: To measure an object’s outer dimensions using an outside micrometer, close the micrometer’s jaws around the object ensuring a firm grip. Then, rotate the thimble until it applies a slight pressure against the object. Take note of both the whole millimeters and fractional readings shown on the thimble and barrel.
Q: Can a micrometer be used to measure internal dimensions?
A: Yes, an inside micrometer is specifically designed to measure internal dimensions like the diameter of a hole. Insert the measuring tips into the hole, expand them by rotating the thimble, and take the required measurements from the markings on the thimble and barrel.
Q: Is it possible to measure the depth of a hole using a micrometer?
A: Absolutely! A depth micrometer can be used to measure hole depths by gently inserting the rod-like extension into the hole. Once the rod is properly positioned, lock it in place and read the measurement from the thimble and barrel, as explained before.
Q: How can I measure the thickness of an object using a micrometer?
A: A thickness micrometer is specifically designed to measure the thickness of objects. Place the object between the anvil and spindle, rotate the thimble until both meet and create a friction feel, then obtain the measurement by reading the markings on the thimble and barrel.
Q: What precautions should be taken when using a micrometer?
A: It is essential to keep the micrometer clean and free from dirt or debris that could affect its accuracy. Additionally, avoid applying excessive force while using a micrometer as it may cause damage. Proper storage and regular calibration are also recommended to maintain its optimal performance.
Q: Are there any additional tips for effectively using a micrometer?
A: Yes, it is always advisable to take multiple measurements and average the results for increased accuracy. Additionally, learning how to read and handle a micrometer correctly through practice will enhance proficiency and yield more reliable measurements. In conclusion, mastering the usage of a micrometer opens up a world of precision measurement and the ability to ensure accurate results in various industries and applications. As we have discussed, the micrometer is a valuable tool that provides precise measurements down to the micrometer level. By following the step-by-step guide provided, you can confidently operate a micrometer, understand its key components, and accurately measure the dimensions of various objects. Remember, practice makes perfect, so don’t hesitate to experiment and improve your skills with this powerful instrument. With patience and attention to detail, you will undoubtedly become proficient in utilizing a micrometer to its fullest potential. Keep in mind the critical factors, such as proper handling, avoiding damage to the instrument, and regular calibration, to guarantee the longevity and accuracy of your micrometer. Whether you are a machinist, engineer, or DIY enthusiast, the micrometer is an indispensable tool that will help you achieve impeccable precision and quality in your work. So go ahead, unleash the full potential of this remarkable measuring instrument, and elevate the accuracy and efficiency of your measurements. Happy micrometer measuring!


