When it comes to diagnosing and troubleshooting issues with your vehicle’s air conditioning system, having the right tools is essential. One of the key tools professionals and experienced DIYers rely on is a manifold gauge set. This versatile instrument allows you to accurately measure and analyze important parameters of the air conditioning system, helping you identify potential problems and make necessary adjustments. In this article, we will provide a comprehensive guide on how to use a manifold gauge set, enabling you to confidently tackle air conditioning maintenance and repairs. Whether you’re new to automotive maintenance or looking to expand your knowledge, the information presented here will equip you with the necessary understanding and skills to effectively utilize a manifold gauge set. So, let’s dive in and explore the world of manifold gauges, their components, and how to put them to use for optimal AC system performance.
Introduction to Manifold Gauge Set
A manifold gauge set is a valuable tool for any mechanic or HVAC technician. Its purpose is to measure the pressure and temperature of the refrigerant in an air conditioning system. Whether you are a professional or a DIY enthusiast, understanding how to use a manifold gauge set is essential for proper maintenance and troubleshooting of your AC unit.
To begin using a manifold gauge set, you will need to gather a few additional tools: a refrigerant charging hose, a vacuum pump, and a can of refrigerant. Before starting any work on your AC system, it is important to ensure that you are working in a well-ventilated area and wearing appropriate safety gear, such as gloves and goggles.
Once you have gathered all the necessary tools and have taken the necessary safety precautions, it is time to connect the manifold gauge set to the AC unit. Start by attaching the blue low-pressure hose to the low-side service port on the AC unit. The low-side service port is typically marked with an “L” or “LOW” and is usually located on the larger refrigerant line.
Next, attach the red high-pressure hose to the high-side service port on the AC unit. The high-side service port is typically marked with an “H” or “HIGH” and is usually located on the smaller refrigerant line. It is important to note that some AC systems may have multiple service ports, so be sure to consult your unit’s manual for the correct ports to use.
Once the hoses are securely connected, it is time to turn on the AC unit and the manifold gauge set. Allow the system to run for a few minutes to stabilize before taking any readings. Using the manifold gauge set, you can now measure both the pressure and temperature of the refrigerant in the system.
The pressure readings on the manifold gauge set will give you insight into the health and efficiency of the AC system. High-pressure readings may indicate an overcharged system, while low-pressure readings may suggest a refrigerant leak or a blockage in the system. Similarly, the temperature readings will help you determine if the system is functioning within the recommended range.
In conclusion, a manifold gauge set is an indispensable tool for anyone working with air conditioning systems. By learning how to use it correctly, you can effectively monitor and diagnose issues with your AC unit. Remember to always follow safety guidelines and consult your unit’s manual for specific instructions.
Components of a Manifold Gauge Set
A manifold gauge set is an essential tool for any HVAC technician or automotive mechanic. It allows you to accurately measure and monitor the pressure of refrigerant in an air conditioning or refrigeration system. By understanding the , you can effectively use this tool to diagnose and troubleshoot issues with these systems.
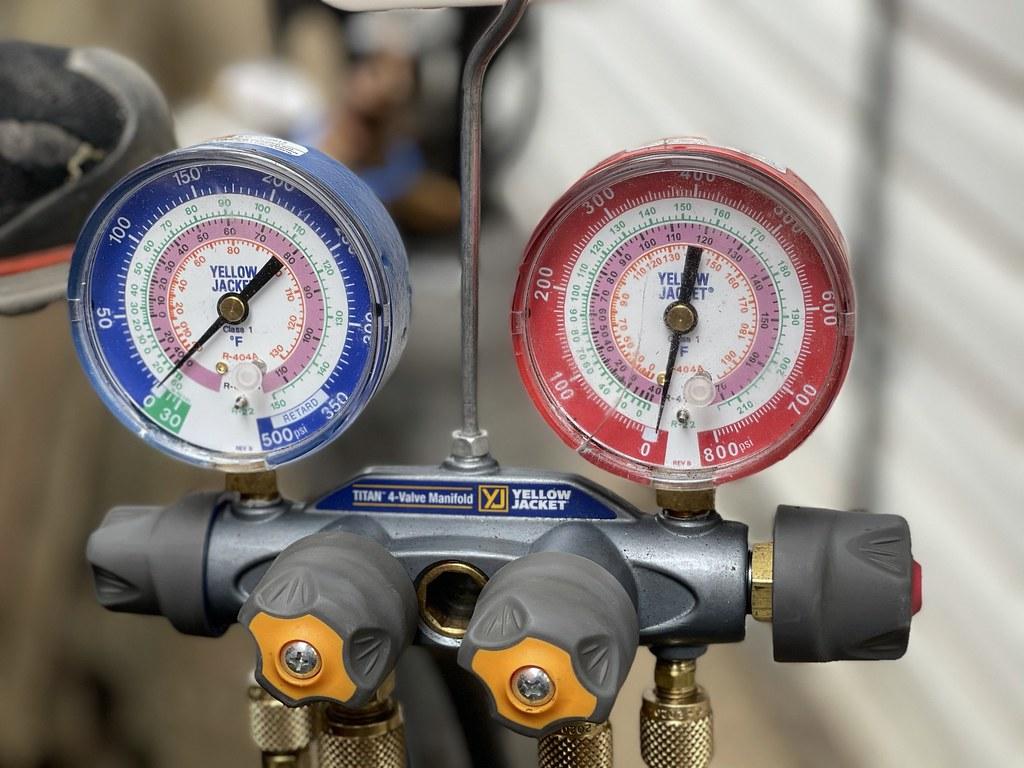
First and foremost, a manifold gauge set consists of three main components: the manifold valves, the hoses, and the gauges. The manifold valves are responsible for controlling the flow of refrigerant. They typically have two to three valves, including high-side and low-side valves, and a valve for refrigerant recovery. The hoses connect the manifold valves to the system being tested and allow the refrigerant to flow. These hoses are typically color-coded for easy identification, with blue representing the low side, red representing the high side, and yellow representing the refrigerant recovery side. Lastly, the gauges provide a visual display of the pressure readings for both the low and high sides of the system.
In addition to these main components, a manifold gauge set may also include various accessories and attachments. These can enhance the functionality of the tool and make it easier to use. Some common accessories include temperature clamps or probes, which allow you to measure the temperature of the refrigerant or the ambient temperature. Another useful accessory is a sight glass, which provides a visual indication of the state of the refrigerant, such as any contaminants present.
Using a manifold gauge set involves a series of steps to ensure accurate measurements and readings. Firstly, you need to connect the hoses to the appropriate ports on the system being tested. This includes attaching the blue hose to the low-side port, the red hose to the high-side port, and the yellow hose to the refrigerant recovery port. Once the hoses are connected, you can open the manifold valves and allow the refrigerant to flow. This will enable the gauges to provide pressure readings. Remember to keep an eye on the gauges and ensure that the pressures stay within the acceptable range for the system you are testing.
To interpret the readings on the gauges, it’s important to understand the pressure-temperature relationship for the refrigerant used in the system. This relationship can vary depending on the type of refrigerant being used, so it’s essential to consult the manufacturer’s specifications or a comprehensive refrigerant pressure-temperature chart. By comparing the pressure readings to the corresponding temperatures, you can determine if the system is operating correctly or if there are any issues that need to be addressed.
In conclusion, a manifold gauge set is a vital tool for anyone working with air conditioning or refrigeration systems. Understanding the components and how to use them properly is crucial for accurate diagnosis and troubleshooting. By following the steps outlined above, you can confidently use a manifold gauge set to measure and monitor the pressure of refrigerant, ensuring the optimal performance of these systems.

How to Connect a Manifold Gauge Set to a Refrigeration System
When it comes to working on a refrigeration system, using a manifold gauge set is essential. This tool allows you to analyze and regulate the pressure and temperature of the system, ensuring its optimal performance. Connecting a manifold gauge set to a refrigeration system may seem daunting at first, but with the right steps, you’ll be able to use it effectively and efficiently.
Step 1: Gather the necessary tools
Before you begin, make sure you have all the tools you need. Besides the manifold gauge set itself, you’ll also need a refrigeration system that you want to connect it to, a charging hose, and a compatible refrigerant. Additionally, having a service manual for your specific refrigeration system can be helpful.
Step 2: Prepare the refrigeration system
Before connecting the manifold gauge set, ensure that the refrigeration system is turned off. This is crucial for both your safety and the protection of the system. Also, make sure the system is clean and free from any debris or obstructions that could interfere with the accuracy of your readings.
Step 3: Connect the manifold gauge set
Now it’s time to connect the manifold gauge set to the refrigeration system. Start by identifying the high-pressure and low-pressure ports on the system. The high-pressure port is usually red and the low-pressure port is blue. Ensure that the valves on both gauges are closed before connecting them to the corresponding ports. Once connected, open the valves slowly to allow the refrigerant to flow through the gauges.
| Gauge | Port | Color |
|---|---|---|
| High-pressure gauge | High-pressure port | Red |
| Low-pressure gauge | Low-pressure port | Blue |
Step 4: Read and interpret the gauges
Once the manifold gauge set is connected, you’ll be able to monitor the pressure and temperature readings on the gauges. The high-pressure gauge measures the pressure of the vapor before it enters the compressor, while the low-pressure gauge measures the pressure of the vapor after it leaves the evaporator. Use these readings to diagnose any issues with the refrigeration system and adjust the pressure and temperature as needed.
Step 5: Disconnect the manifold gauge set
After you have finished using the manifold gauge set, it’s important to disconnect it properly. Begin by closing the valves on both gauges to prevent any refrigerant leaks. Then, disconnect the hoses from the ports on the refrigeration system. Always handle the manifold gauge set with care and store it properly to ensure its longevity and future usability.

Interpreting Readings on a Manifold Gauge Set
When it comes to HVAC systems, understanding how to use a manifold gauge set is essential. This tool allows you to accurately interpret readings and diagnose issues with your system. Whether you’re a professional technician or a DIY enthusiast, having this knowledge can save you time and money.
To start using a manifold gauge set, you’ll first need to connect it to your HVAC system. Locate the service valves on both the high and low-pressure sides of your system. Attach the corresponding hoses from the gauge set to these valves, ensuring a secure connection. The high-pressure side is usually marked with the color red, while the low-pressure side is marked with blue. Always refer to the manufacturer’s instructions for your specific gauge set as colors may vary.
Once the gauge set is properly connected, you can begin taking readings. The manifold gauge set consists of three gauges – one for high pressure, one for low pressure, and one for vacuum. Each gauge provides valuable information about your HVAC system’s performance.
Interpreting the readings on a manifold gauge set requires an understanding of the normal ranges for each gauge. A typical reading for the high-pressure side of the system is between 250 to 450 PSI (pounds per square inch). On the low-pressure side, a reading of 60 to 80 PSI is considered normal. If the readings fall outside of these ranges, it could indicate a problem with your system, such as a refrigerant leak or a faulty compressor.
Another useful feature of a manifold gauge set is the ability to measure vacuum levels. This gauge is used when evacuating or charging your HVAC system. Typically, a reading of 29.9 inches of mercury (inHg) is considered a complete vacuum. Monitoring the vacuum level helps ensure proper system operation and prevents moisture or contaminants from entering the system.

Tips for Properly Using and Maintaining a Manifold Gauge Set
Using a manifold gauge set is essential for anyone involved in HVAC or refrigeration systems. These tools allow you to measure and monitor the pressure of refrigerant in the system, helping you diagnose any issues and ensure optimal performance. To properly use and maintain a manifold gauge set, follow these helpful tips.
Familiarize yourself with the components: A manifold gauge set consists of three main components – the high-pressure gauge, the low-pressure gauge, and the manifold valves. The high-pressure gauge measures the pressure on the discharge side of the system, while the low-pressure gauge measures the pressure on the suction side. The manifold valves control the flow of refrigerant and allow you to connect and disconnect the gauges.
Connect the gauge set properly: Before connecting the manifold gauge set, ensure that the system is off and the service valves are closed. Start by connecting the red hose to the high-pressure port, the blue hose to the low-pressure port, and the yellow hose to the refrigerant can or recovery tank. Make sure the connections are secure to avoid any leaks.
Interpret the readings: Once the gauge set is connected, open the valves slowly and allow the pressure to stabilize. The high-pressure gauge will show the pressure on the discharge side, while the low-pressure gauge will display the suction side pressure. Compare the readings with the manufacturer’s specifications to determine if the system is functioning properly. High or low pressure could indicate a potential issue.
Perform regular maintenance: To ensure accurate readings and prolong the lifespan of your manifold gauge set, it’s crucial to maintain it regularly. Clean the gauges after each use and store them in a dry and dust-free area. Lubricate the manifold valves with a few drops of oil to keep them functioning smoothly. Additionally, check the hoses for any cracks or damage, and replace them as needed.
Follow safety precautions: When working with a manifold gauge set, safety should always be a priority. Wear protective goggles and gloves to protect yourself from potential refrigerant leaks. Avoid over-tightening the connections as it may cause damage or leaks. If you notice any signs of refrigerant leakage or an abnormal pressure reading, consult a professional technician for assistance.
In conclusion, using and maintaining a manifold gauge set is essential for ensuring the proper functioning of HVAC and refrigeration systems. By following these tips, you can confidently use your gauge set to diagnose issues, monitor pressure, and maintain optimal performance. Remember to always prioritize safety and consult a professional if needed.
Q&A
Q: What is a manifold gauge set?
A: A manifold gauge set is a tool used in automotive repair and air conditioning systems to measure pressure levels, temperature, and diagnose possible issues within these systems.
Q: What are the components of a manifold gauge set?
A: A typical manifold gauge set includes three gauges, color-coded hoses, and various connectors. The gauges measure high pressure, low pressure, and vacuum levels. The hoses connect the gauges to the system being tested, and the connectors allow for easy attachment to different systems.
Q: How do I connect a manifold gauge set to an automotive system?
A: Start by ensuring that the system is turned off and depressurized. Attach the blue hose to the low-pressure side and the red hose to the high-pressure side. The yellow hose is connected to the refrigerant canister if recharging the system. Follow the manufacturer’s instructions on how to properly connect the gauge set to your specific system.
Q: How do I interpret the readings on the gauges?
A: The gauges display pressure levels in PSI (pounds per square inch) or bar units. The low-pressure gauge measures the suction pressure, while the high-pressure gauge measures the discharge pressure. Compare the readings on the gauges to the recommended levels for your specific system, which can usually be found in the car’s manual or air conditioning system guidelines.
Q: How can a manifold gauge set help diagnose issues with a system?
A: By providing pressure and temperature readings, a manifold gauge set can help determine if a system is overcharged, undercharged, or has a potential leak. If the readings deviate significantly from the recommended levels, it may indicate a problem that needs further investigation.
Q: What precautions should I take when using a manifold gauge set?
A: It is vital to wear protective gear, such as gloves and safety glasses, to prevent injury. Always follow the manufacturer’s instructions and take caution when working with high-pressure systems. Make sure the connection points are secure and free of leaks before starting the system.
Q: Can I use a manifold gauge set without proper training?
A: It is strongly recommended to have adequate knowledge and training before using a manifold gauge set. Understanding how to interpret the readings and troubleshooting potential issues requires experience and expertise. If uncertain, seek assistance from a qualified technician.
Q: Are manifold gauge sets only used for automotive purposes?
A: While manifold gauge sets are commonly used in automotive repair, they can also be employed in industrial refrigeration systems, home air conditioning units, and commercial refrigeration systems. They are versatile tools and can be adapted to various applications.
Q: How do I maintain a manifold gauge set?
A: Proper maintenance includes regular cleaning and inspection of the hoses and connectors for any signs of wear or damage. Keep the gauges clean and store them in a safe and dry place. Follow the manufacturer’s guidelines on maintenance, and if any parts need replacement, ensure you use compatible and high-quality components.
Q: Can I use a manifold gauge set to recharge my air conditioning system without professional help?
A: While it is possible to recharge your air conditioning system with a manifold gauge set, it is generally advised to seek professional help. Correctly recharging an air conditioning system requires a certain level of expertise and knowledge to prevent overcharging, undercharging, or potential damage to the system. In conclusion, understanding how to use a manifold gauge set can greatly enhance your ability to diagnose and troubleshoot a variety of issues in your HVAC system or automobile. By utilizing this versatile tool, you gain valuable insights into the pressures and temperatures within the system, allowing for accurate analysis and informed decision-making. Remember to familiarize yourself with the different components of the gauge set, ensuring a proper connection to the service ports. Take note of the initial system readings, and monitor the changes as you introduce refrigerant or make adjustments. Always prioritize safety and follow the manufacturer’s instructions when handling refrigerants. With practice and experience, utilizing a manifold gauge set will become second nature, becoming an indispensable tool in your toolkit. So, whether you are a seasoned professional or a DIY enthusiast, by mastering the use of a manifold gauge set, you can efficiently maintain and optimize the performance of your HVAC system or automobile, saving both time and money in the process.