The Kreg Jig is a versatile tool that has revolutionized the world of woodworking, making it easier than ever to create strong and precise pocket hole joints. Whether you’re a seasoned craftsman or just starting out in the world of woodworking, understanding how to use a Kreg Jig can greatly enhance your project capabilities. In this article, we will guide you through the various steps and techniques involved in using a Kreg Jig, empowering you to create professional-grade joinery with confidence and efficiency. Let’s dive in and explore the fundamentals of this indispensable tool.
Choosing the Right Kreg Jig for Your Project
When it comes to woodworking, having the right tools is crucial to ensure precise and clean cuts. One tool that is commonly used and known for its efficiency is the Kreg Jig. The Kreg Jig is a pocket hole jig that helps create strong and hidden joints in your woodworking projects. However, can be a bit overwhelming, especially with the wide range of options available in the market. Here are some key factors to consider when selecting the perfect Kreg Jig for your needs:
-
Project Scope:
Before purchasing a Kreg Jig, it’s important to assess the scope of your project. Are you working on a small DIY project or tackling larger furniture pieces? For smaller projects, a basic Kreg Jig like the Kreg K4 would be suitable. However, for larger and more complex projects, investing in a more advanced model such as the Kreg Foreman would be the way to go. Understanding the scale of your project will help determine the appropriate Kreg Jig to achieve optimal results. -
Material Compatibility:
Different materials require different approaches when it comes to pocket hole joinery. While most Kreg Jigs are versatile and can be used for a variety of materials, it’s essential to consider the type of wood or material you’ll be working with. Thicker and denser material might require a more heavy-duty Kreg Jig, whereas lighter materials could be handled by a standard model. Be sure to check the specifications and capabilities of each Kreg Jig to ensure it is compatible with the material you plan to use. -
Budget:
Like with any other tool, budget plays a significant role in choosing the right Kreg Jig. The price range for Kreg Jigs can vary quite a bit depending on the features and level of automation they offer. While it’s tempting to go for the top-of-the-line models, it’s important to balance your budget with your woodworking needs. Consider the features that are essential for your projects and find a Kreg Jig that offers the best value for your money. -
Ease of Use:
If you’re just starting out with pocket hole joinery, it’s crucial to choose a Kreg Jig that is user-friendly and easy to operate. Look for models that come with clear instructions, built-in guides, and simple adjustments. The Kreg K5 is highly recommended for beginners due to its intuitive design and easy setup. Additionally, consider if you prefer a manual Kreg Jig or if you would benefit from advanced automation options. Finding a Kreg Jig that suits your skill level and comfort level will make your woodworking experience more enjoyable. -
Additional Features:
Lastly, don’t forget to consider the additional features that each Kreg Jig offers. Some models come with clamping mechanisms to securely hold your workpiece, while others may have built-in storage compartments for screws and drill bits. These little extras can make a big difference in the overall convenience and efficiency of your woodworking projects. Take a closer look at the specifications and accessories of each Kreg Jig to determine which features are important to you.
Remember, is essential to achieve professional-looking results. By considering the project scope, material compatibility, budget, ease of use, and additional features, you’ll be able to find the perfect Kreg Jig that meets all your woodworking needs. So, take your time, do your research, and select the Kreg Jig that will become your trusted companion in your woodworking journey.
Understanding the Key Components of a Kreg Jig
A Kreg Jig is a versatile and essential tool for anyone looking to improve their woodworking skills. will allow you to use it effectively and create strong, secure joints in your projects. In this post, we will break down each component and explain its function, ensuring that you have all the knowledge you need to confidently use a Kreg Jig.
-
Drill Guide:
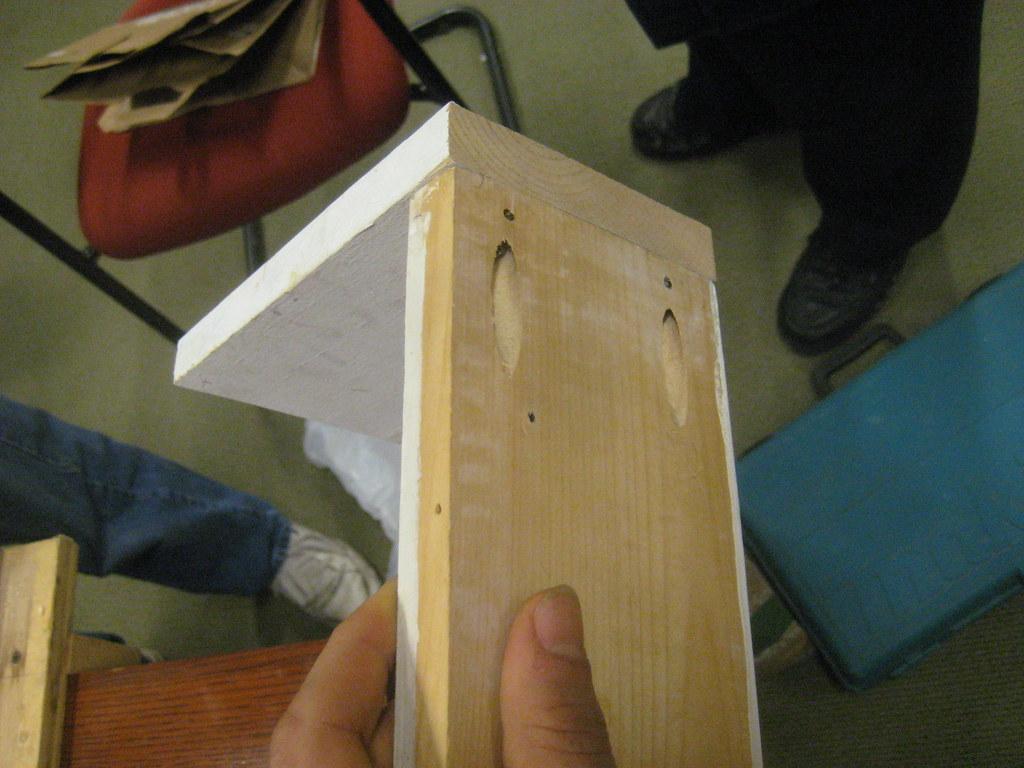
The drill guide is the heart of the Kreg Jig, where all the magic happens. It consists of a body with a series of preset holes at specific angles. These holes allow you to drill pocket holes into your workpiece, which will later be joined together using special pocket screws. The drill guide ensures that the pocket holes are drilled at the correct angle and depth for a strong joint. -
Depth Collar:
The depth collar is a small collar that fits onto the drill bit and controls the depth of the pocket hole. By adjusting the position of the depth collar, you can ensure that the pocket hole is drilled to the precise depth required for the thickness of your material. This feature is crucial for creating flush joints and preventing the screws from protruding. -
Clamping Mechanism:
To secure the workpiece and prevent any movement while drilling, the Kreg Jig is equipped with a clamping mechanism. This adjustable mechanism consists of a clamp pad and a clamp lever. It allows you to firmly hold the workpiece in place and align it accurately with the drill guide. Clamping is essential to ensure precision and minimize errors when drilling pocket holes. -
Drill Bit:
A specialized stepped drill bit is used with the Kreg Jig to create the pocket holes. This drill bit has a unique design with multiple cutting edges that gradually increase in diameter. As you drill into the workpiece, the bit removes just enough material to create a pocket hole with a precisely sized opening for the pocket screw. It’s important to note that using the correct drill bit is crucial for optimal results. -
Pocket Screws:
Once the pocket holes are drilled, they can be joined together using pocket screws. These specialized screws have a self-tapping design, making them easier to drive into the pocket holes. They also have a flat pan head that sits flush with the surface of the material, resulting in a clean and professional finish. Different length and thread options are available, allowing you to choose the right screws for your project.
is the first step towards mastering its usage. By familiarizing yourself with the drill guide, depth collar, clamping mechanism, drill bit, and pocket screws, you can confidently tackle woodworking projects and create strong, durable joints. The versatility and precision of a Kreg Jig make it a must-have tool for any woodworking enthusiast. So, grab your Kreg Jig and start creating beautiful, sturdy pieces with ease!
Step-by-Step Guide to Setting Up Your Kreg Jig
One of the essential tools every DIY enthusiast should have in their arsenal is a Kreg Jig. This versatile woodworking tool allows you to create strong and hidden pocket holes, making your projects look sleek and professional. In this step-by-step guide, we will walk you through the process of setting up your Kreg Jig so you can start using it with ease.
Step 1: Gather your materials
Before you begin, make sure you have everything you need. Here are the materials you will need to set up your Kreg Jig:
- Kreg Jig
- Drill
- Appropriate Kreg Jig screws for your project
- Clamp (optional but recommended)
Step 2: Adjust the drill bit depth
Properly adjusting the drill bit depth is crucial for successful pocket hole joinery. Start by loosening the collar on the drill bit guide of your Kreg Jig. Slide the drill bit up or down until the shoulder touches the top surface of the jig. Once aligned, tighten the collar to secure the drill bit in place.
Step 3: Set the drill bit stop collar
To ensure consistent hole depth, use the provided drill bit stop collar. Slide the stop collar onto the drill bit, leaving enough space for the desired hole depth. Tighten the collar against the drill bit using the included Allen wrench. This will prevent the drill bit from drilling too deep into your materials.
Step 4: Adjust the pocket hole depth
For different material thicknesses, you’ll need to adjust the pocket hole depth. The depth can be adjusted by sliding the stop collar along the stepped drill bit. Refer to the Kreg Jig chart or website for the recommended settings based on your material thickness. This will help you achieve maximum joint strength and minimize the risk of breakthroughs.
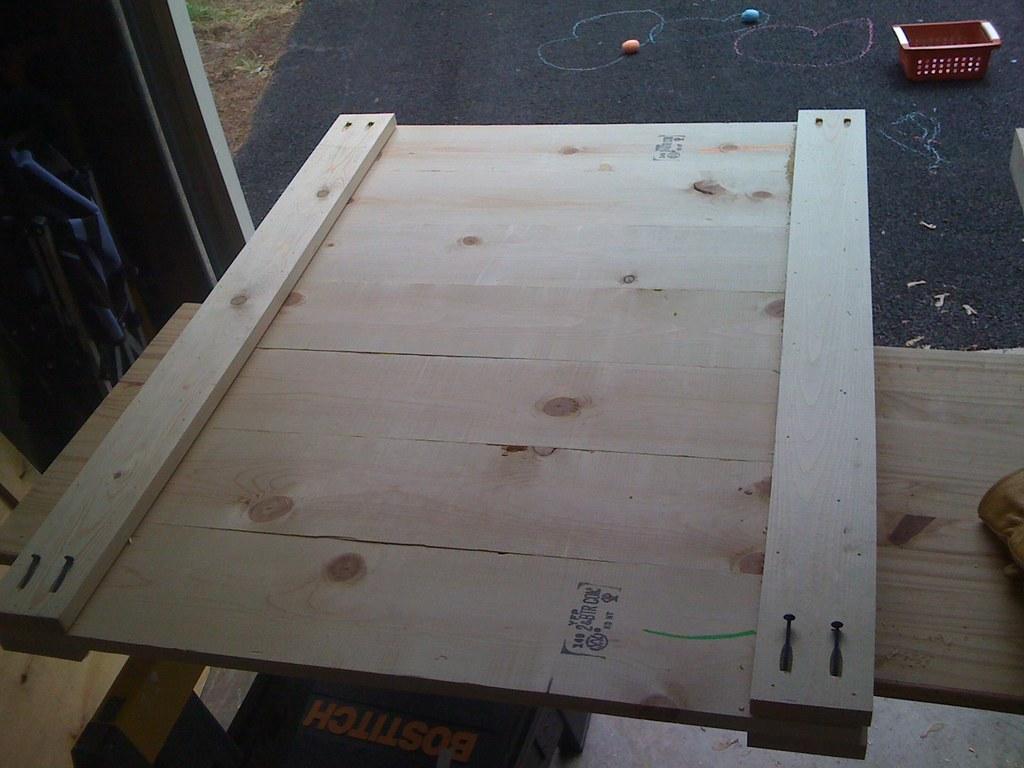
Step 5: Secure your workpiece and start drilling
Now that your Kreg Jig is set up correctly, it’s time to secure your workpiece. Place your workpiece in the jig, making sure it is flush against the jig’s fence. Optionally, you can use a clamp to firmly hold the workpiece in place. Position the drill bit in the guide hole and start drilling, applying steady and even pressure. Make sure to drill until the stop collar touches the jig’s top surface.
By following these steps, you’ll be able to set up your Kreg Jig and start utilizing its pocket hole joinery capabilities. Remember to always wear appropriate safety gear and practice good woodworking techniques for a successful and satisfying project. Happy creating!

Mastering the Techniques: Joining Boards with a Kreg Jig
<p>Joining boards is an integral part of woodworking projects, and using a Kreg Jig can greatly simplify the process. This handy tool allows you to create strong and secure joints without the need for complex joinery techniques. Whether you're a beginner or an experienced woodworker, mastering the techniques of joining boards with a Kreg Jig will enhance your woodworking skills and open up a world of possibilities for building custom furniture, cabinets, and more.</p>

<h3>Familiarize Yourself with the Kreg Jig</h3>

<p>Before you begin using a Kreg Jig, it's important to understand how it works and the different parts of the tool. The Kreg Jig consists of a base with a built-in drill guide, a clamping mechanism, and an adjustable depth collar. The drill guide has preset holes at specific angles, allowing you to easily drill pocket holes for joining boards. Familiarize yourself with these components and their functions to ensure you use the Kreg Jig effectively.</p>

<h3>Set Up the Kreg Jig Correctly</h3>

<p>Proper setup of the Kreg Jig is crucial for achieving accurate and reliable results. Start by adjusting the drill guide to the desired angle for your project, typically 45 degrees for most applications. Secure the clamp onto the workpiece to hold it in position and prevent any movement during drilling. Adjust the depth collar on your drill bit according to the thickness of the boards you're joining to ensure the pocket holes are drilled at the right depth.</p>

<h3>Create Strong and Discreet Joinery</h3>

<p>The beauty of using a Kreg Jig lies in its ability to create strong and discreet joinery. By drilling pocket holes on the underside or hidden areas of your project, you can ensure that the screws remain concealed and don't affect the aesthetic appeal of your finished piece. This allows you to achieve clean lines and a professional-looking result. Additionally, the pocket holes provide a strong connection between the boards, making the joints sturdy and durable.</p>

<h3>Practice Proper Screw Placement and Tightening</h3>

<p>When inserting screws into the pocket holes, it's essential to follow best practices for screw placement and tightening. Position the screws along the centerline of the boards to ensure even distribution of pressure across the joint. Use the correct screw length based on the thickness of the boards, taking care not to overdrive or strip the screws. Tighten the screws firmly, but avoid overtightening, which could lead to splitting or cracking of the wood.</p>
Top Tips for Ensuring Accurate and Professional Results with Your Kreg Jig
When it comes to woodworking projects, having the right tools is essential for achieving accurate and professional results. One tool that every woodworker should have in their arsenal is the Kreg Jig. This innovative tool simplifies the process of joining wood pieces together, allowing you to create strong, seamless connections. To help you make the most of your Kreg Jig and achieve top-notch results, we have compiled a list of valuable tips and tricks.
1. Choose the Right Screw Length
One of the key factors that determine the strength and stability of your joints is the length of the screws you use with your Kreg Jig. It’s crucial to select screws that are the appropriate length for your project. If the screws are too short, they won’t provide sufficient grip, resulting in weak connections. On the other hand, screws that are too long may penetrate through the other side of the wood, compromising the aesthetics of your project. Refer to the Kreg Jig screw selector chart or consult the user manual to ensure you’re choosing the correct screw length.
2. Clamp your Workpiece Securely
Properly securing your workpiece is vital for ensuring accurate and consistent drilling with your Kreg Jig. When drilling pocket holes, use clamps to firmly hold the workpiece in place. This will prevent any movement that could lead to misalignment or skewed angles. For added stability, consider using a Kreg Jig Portable Base or a custom jig setup. Taking the time to securely clamp your workpiece will result in precise and flawless pocket holes.
3. Adjust the Drill Bit Depth
Adjusting the drill bit depth is a critical step in using your Kreg Jig effectively. The depth collar on your drill bit determines how deep the pocket hole will be drilled. To achieve accurate results, you need to set the drill bit depth based on the thickness of the wood you’re working with. Measure the thickness and refer to the Kreg Jig depth collar gauge for easy reference. By setting the correct drill bit depth, you’ll create strong and visually appealing pocket holes in your woodworking projects.
4. Practice on Scrap Pieces
If you’re new to using a Kreg Jig or want to refine your skills, it’s always a good idea to practice on scrap pieces of wood before working on your actual project. This allows you to familiarize yourself with the tool, perfect your drilling technique, and ensure that the settings are properly adjusted. Not only will this help you gain confidence, but it will also minimize the chances of mistakes and maximize your chances of achieving accurate and professional results when it really counts.
5. Maintain and Clean Your Kreg Jig
Regular maintenance and cleaning of your Kreg Jig are essential for keeping it in optimal condition and ensuring accurate results. Clean the drill guide and drill bit after each use to remove any wood chips or debris that may affect drilling performance. Lubricate the drill bit occasionally with a drop of cutting oil or silicone spray to ensure smooth operation. Additionally, ensure that the screws and clamps are tightened properly to avoid any slippage that could compromise the accuracy of your pocket holes.
Q&A
Q: What is a Kreg Jig?
A: A Kreg Jig is a specialized woodworking tool used to create strong and concealed joints for various woodworking projects. It helps simplify the process of joining wood pieces together, whether you’re a professional woodworker or a DIY enthusiast.
Q: How does a Kreg Jig work?
A: A Kreg Jig operates by creating pocket holes in one wood piece, which act as a guide for screws to securely attach it to another piece. The pocket holes are placed at an angle, typically 15 degrees, allowing screws to be driven through the side of one board and into the end grain of the other, resulting in a strong and hidden joint.
Q: What are the benefits of using a Kreg Jig?
A: Using a Kreg Jig offers several advantages. Firstly, it provides a simple and efficient method to create sturdy joints, even for beginners. Additionally, it eliminates the need for visible nails, dowels, or other traditional joinery methods, resulting in a cleaner and more professional-looking finish. The Kreg Jig also allows for quick and secure assembly, saving both time and effort.
Q: What materials can be joined using a Kreg Jig?
A: A Kreg Jig can be used to join various types of wood, including pine, oak, plywood, and even composite materials. It is commonly employed in furniture construction, cabinetry, custom shelves, picture frames, and other woodworking projects where hidden joints are desired.
Q: What are the steps to using a Kreg Jig?
A: The following are the general steps to use a Kreg Jig:
- Set the appropriate drilling depth on the jig.
- Adjust the drill guide block to match the thickness of the wood.
- Clamp the jig securely to the workpiece, positioning it where the pocket holes are desired.
- Drill pocket holes using the appropriate drill bit.
- Repeat the process on the other wood pieces that need to be joined.
- Apply glue to the joint for added strength (optional).
- Align and secure the wood pieces together using screws driven through the pocket holes.
- Trim or sand the excess length of screws if necessary.
Q: Are there any important precautions to consider when using a Kreg Jig?
A: Yes, while using a Kreg Jig, it is important to wear protective eyewear to prevent any potential injury from wood chips or debris while drilling. Also, make sure to select the correct drill bit for the thickness of your wood, as this will affect the size of the pocket hole. Lastly, always ensure the jig is securely clamped to the workpiece to prevent any movement or misalignment during drilling.
Q: Can a Kreg Jig be used on thin or narrow wood pieces?
A: Yes, a Kreg Jig can be used on thin or narrow wood pieces. Kreg offers a variety of specialized jigs, such as the Micro Pocket Hole Jig, specifically designed for these types of projects. These jigs allow you to create smaller pocket holes suitable for thin materials, providing the same strength and stability as the standard Kreg Jigs.
Q: Is a Kreg Jig suitable for professional woodworking?
A: Absolutely! While Kreg Jigs are often introduced to DIY enthusiasts, they are widely used by professional woodworkers as well. It offers a time-efficient, durable, and versatile method to create strong joints. Even expert carpenters and cabinetmakers incorporate Kreg Jigs into their projects to improve efficiency and achieve superior results.
Q: Can a Kreg Jig be used for metal or other materials besides wood?
A: No, a Kreg Jig is specifically designed for use with wood and wood-based materials. It is not suitable for use with metals, plastics, or other materials as they may require different joining methods specific to their characteristics.
Q: Where can I purchase a Kreg Jig?
A: Kreg Jigs can be purchased online through various woodworking retailers, as well as in physical stores specializing in woodworking tools. Kreg Tools, the manufacturer, has an official website where you can find information about their products and a list of authorized dealers. In conclusion, learning how to use a Kreg Jig can greatly enhance your woodworking skills and improve the overall quality of your projects. By following the step-by-step instructions provided, you can effectively and efficiently join pieces of wood together with strong and durable pocket-hole joints.
Remember, the key to success with a Kreg Jig is ensuring precise measurements, selecting the appropriate screw length, and securing the jig properly to your workpiece. Take your time to familiarize yourself with the different features and settings of the jig, and don’t hesitate to practice on scrap wood before starting your actual project.
Once you’ve mastered the basic techniques, you can explore the various applications of the Kreg Jig and experiment with different joint configurations. From building furniture and cabinets to constructing sturdy outdoor structures, the possibilities are limitless.
Investing in a Kreg Jig is undoubtedly a worthwhile decision for any woodworker, whether you’re a hobbyist or a professional. With its user-friendly design and versatile functionality, it’s a tool that will undoubtedly become a valuable addition to your workshop.
So, dust off your Kreg Jig, gather your materials, and embark on your woodworking journey with confidence. With the knowledge gained from this article and a little practice, you’ll be creating beautiful and sturdy wood projects in no time.
Remember, the key to successful woodworking lies in continuous learning and practice. So go ahead and explore the endless possibilities of the Kreg Jig, and let your creativity soar. Happy woodworking!


