
Telnet, an application protocol used for remote access, allows users to communicate with remote devices over a network. Whether you are a network administrator, a tech enthusiast, or simply curious about exploring the world of command-line interfaces, understanding how to use Telnet can be a valuable skill. In this article, we will provide you with a step-by-step guide on utilizing Telnet, from connecting to a remote host to executing commands and troubleshooting potential issues. By the end, you’ll have a solid grasp of Telnet’s functionality and be ready to embark on exciting remote communication journeys.
Introduction to Telnet
Telnet is a network protocol that allows you to connect to and communicate with remote servers using a text-based interface. It has been widely used for remote administration, debugging, and accessing network resources for decades. In this section, we will guide you on how to use Telnet effectively to connect to a remote server.
Before we dive into the actual steps, let’s talk about the prerequisites. To use Telnet, you need to have the Telnet client software installed on your computer. Most operating systems come pre-installed with Telnet, but if it’s not available, you can easily add it through the system settings or by downloading a Telnet client application.
Once you have the Telnet client installed, the next step is to open a command prompt or terminal window. In Windows, you can do this by pressing Win + R, typing “cmd,” and hitting enter. On a Mac, you can go to Applications > Utilities > Terminal. Now, let’s proceed with the Telnet connection.
To establish a Telnet connection, you need to know the IP address or the hostname of the remote server you want to connect to. In the command prompt or terminal, type “telnet” followed by either the IP address or the hostname, then hit enter. For example, if the server’s IP address is 192.168.0.1, you would type ”telnet 192.168.0.1.”
Once you hit enter, Telnet will attempt to establish a connection with the remote server. If the connection is successful, you will see a login prompt. Enter your credentials (username and password) if required. Note that Telnet transmits data in plain text, so it is not recommended to use it for transmitting sensitive information like passwords. For security reasons, it is advised to use Secure Shell (SSH) instead.
After logging in, you can start using Telnet to execute commands on the remote server. Telnet is primarily used for interaction with text-based services like SMTP, HTTP, or POP3. You can communicate with the server by typing commands directly in the Telnet window and pressing enter. The server will then process the command and provide a response, which will be displayed in the Telnet window.
In conclusion, Telnet is a powerful tool for remote server management and network troubleshooting. By following these steps, you can establish a Telnet connection, log in to a remote server, and interact with text-based services. However, due to its lack of encryption, it is recommended to use secure alternatives like SSH whenever possible. Now that you have a basic understanding of Telnet, you can explore its capabilities and leverage its potential for your networking needs.
Understanding the Telnet Protocol: Features and Functionality
Telnet is a widely used network protocol that allows users to remotely access and manage devices over a network. Understanding the features and functionality of the Telnet protocol can greatly enhance your ability to use this powerful tool effectively. In this post, we will explore how to use Telnet and provide you with a comprehensive guide to maximize its potential.
-
Getting Started with Telnet:
To use Telnet, you need to have a Telnet client installed on your computer. Most operating systems come with a pre-installed Telnet client, but if yours doesn’t, you can easily download and install one from the internet. Once you have a Telnet client ready, open the command prompt or terminal on your computer. -
Connecting to a Remote Device:
To connect to a remote device using Telnet, you need to know the IP address or hostname of the target device. In the command prompt or terminal, type the Telnet command followed by the IP address or hostname. For example, “telnet 192.168.1.1” or “telnet hostname”. Press Enter to initiate the connection. -
Navigating Telnet Sessions:
Once you establish a Telnet session with a remote device, you can interact with it using simple text commands. Telnet sessions are typically used to manage network devices like routers or switches. You can execute various commands, configure settings, or troubleshoot issues remotely. Remember to consult the device’s documentation for the specific commands and syntax. -
Telnet vs. SSH:
Telnet is a clear-text protocol, which means that the information exchanged between your computer and the remote device is not encrypted. This can pose a security risk, especially if you’re working with sensitive information. To ensure secure remote access, it is recommended to use SSH (Secure Shell) instead of Telnet. SSH provides encryption and authentication, making it a more secure option. -
Troubleshooting Telnet Connections:
If you encounter connection issues while using Telnet, there are a few common troubleshooting steps you can follow. Firstly, ensure that the remote device’s Telnet service is running and accessible. You can also check if your computer’s firewall is blocking the Telnet traffic. Additionally, double-check the IP address or hostname you are using to connect. If all else fails, try using a different Telnet client to rule out any software compatibility issues.
Telnet is a versatile protocol that allows for remote management of devices over a network. By understanding how to use Telnet and its features, you can streamline network administration tasks and troubleshoot issues efficiently. Remember to prioritize security and consider using SSH for secure remote access whenever possible. With Telnet in your arsenal, managing network devices becomes a breeze.
Step-by-Step Guide to Using Telnet: Establishing a Connection
Telnet is a powerful tool that allows you to establish a connection with remote servers and devices. Using Telnet, you can perform a wide range of tasks such as troubleshooting network issues, checking if a port is open, or remotely accessing a device’s command line interface. In this step-by-step guide, we will walk you through the process of establishing a connection using Telnet.
Step 1: Launch the Telnet client
First, you need to launch the Telnet client on your computer. The Telnet client is usually pre-installed on most operating systems, but if it’s not available, you can easily install it by following the instructions provided by your operating system’s documentation.
Step 2: Specify the server or device’s IP address
Next, you need to specify the IP address or hostname of the server or device you want to connect to. This can be done by typing the command ”telnet” followed by the IP address or hostname in the command prompt or terminal window. For example, if you want to connect to a server with the IP address 192.168.0.1, you would type ”telnet 192.168.0.1″.
Step 3: Specify the port number
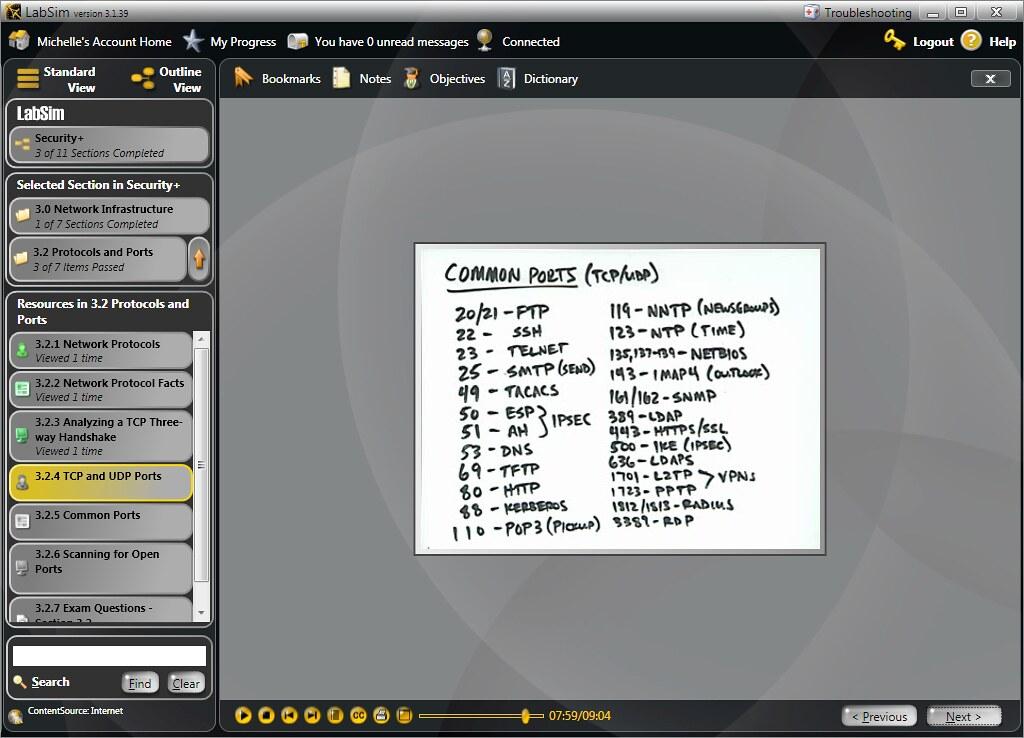
After specifying the IP address or hostname, you need to specify the port number you want to connect to. By default, Telnet uses port 23, which is the standard port for Telnet connections. However, some devices or services may use a different port. To specify a different port, simply append it to the IP address or hostname using a colon. For example, if the server is listening on port 8080, you would type “telnet 192.168.0.1:8080”.
Step 4: Establish the connection
Once you have specified the IP address or hostname and the port number, you can proceed to establish the connection by pressing the enter key. The Telnet client will then attempt to establish a connection with the specified server or device. If the connection is successful, you will see a blank screen indicating that you are now connected to the remote server or device.
Step 5: Interact with the remote server or device
Congratulations! You have successfully established a Telnet connection. Now, you can interact with the remote server or device by entering commands or sending data. The exact commands and data you can enter will depend on the remote server or device you are connected to. To disconnect from the server or device, simply type the command “quit” or “exit” and press enter.
Remember, Telnet is a powerful tool that provides direct access to remote servers and devices. It is important to use Telnet responsibly and only connect to systems that you have proper authorization to access. With this step-by-step guide, you can now confidently use Telnet to establish connections and perform various tasks.
Practical Tips for Efficient Telnet Usage
When it comes to utilizing the Telnet protocol effectively, following some practical tips can greatly enhance your experience and make your usage more efficient. Whether you are a beginner or an experienced user, these tips will help you utilize Telnet to its fullest potential.
1. Choose the Right Telnet Client
Before you start using Telnet, it is essential to select the appropriate Telnet client for your needs. There are various options available, each with its own set of features and capabilities. Some popular Telnet clients include PuTTY, SecureCRT, and Tera Term. Take some time to explore their functionalities and pick the one that suits your requirements the best.
2. Familiarize Yourself with Telnet Commands
Having a good understanding of Telnet commands is crucial for efficient usage. Telnet commands allow you to navigate through remote systems and execute tasks seamlessly. Some common Telnet commands include “open” to establish a connection, ”close” to terminate the connection, and “logout” to exit the Telnet session. Familiarize yourself with these commands to optimize your Telnet experience.
3. Customize Your Telnet Settings
Customizing your Telnet settings can significantly improve your efficiency. Many Telnet clients offer advanced settings, allowing you to tailor the experience to your preferences. For instance, you can adjust the font size, color scheme, and window size for better readability. Experiment with these settings to find the configuration that works best for you.
4. Utilize Telnet’s Automation Capabilities
Telnet’s automation capabilities can save you time and effort. By utilizing Telnet scripting, you can automate routine tasks, such as configuring network devices or running commands across multiple servers simultaneously. Take advantage of Telnet’s scripting language, which often includes loops, conditionals, and variables, to streamline your workflow and achieve greater efficiency.
5. Ensure Secure Telnet Connections
When utilizing Telnet for remote access, it is crucial to establish secure connections. Telnet inherently lacks encryption capabilities, making it vulnerable to eavesdropping and data interception. To ensure secure connections, consider using SSH (Secure Shell) as an alternative to Telnet. SSH provides strong encryption and secure remote administration, protecting your data and enhancing your overall usage experience.

Troubleshooting Telnet Connection Issues
Having trouble establishing a Telnet connection can be frustrating, but don’t worry, we’ve got you covered! In this troubleshooting guide, we’ll walk you through some common Telnet connection issues and help you resolve them quickly and easily.
<h3>Telnet Connection Refused</h3>
<p>If you are experiencing a "Connection Refused" error message, it typically means that the host or server you are trying to connect to isn't accepting Telnet connections. To fix this, ensure that the remote server's Telnet service is running and properly configured. Additionally, check if any firewall or security software is blocking the Telnet port (usually port 23) and add an exception if necessary. </p>

<h3>Incorrect Login Credentials</h3>
<p>It's common to encounter login issues when using Telnet. If you're unable to log in, double-check your username and password for accuracy. Remember that passwords are often case-sensitive. If you've forgotten your login credentials or suspect they are incorrect, consider contacting the system administrator for assistance.</p>

<h3>Slow Telnet Response</h3>
<p>If you're experiencing a delayed response when using Telnet, it could be due to various reasons. Start by checking your internet connection to ensure its stability. Additionally, high network traffic or server load may cause poor Telnet performance. If the issue persists, try connecting to the remote server during off-peak hours or consider contacting the network administrator to investigate further.</p>

<h3>Telnet Connection Timing Out</h3>
<p>Does your Telnet connection frequently time out? A connection timeout occurs when the Telnet client doesn't receive a response within a certain period. This might be due to network congestion, server unavailability, or a slow response from the remote host. Adjusting the Telnet timeout settings can sometimes help mitigate this issue. If the problem persists, consider using a different Telnet client or consult with your network administrator for further assistance.</p>

<h3>Telnet Command Not Found</h3>
<p>If you receive a "Command Not Found" error when trying to execute Telnet commands, it likely means that the Telnet client is not installed on your system. To resolve this, install the Telnet client software on your computer. On Windows, you can enable Telnet through the Control Panel or by using Command Prompt. On Unix-based systems, the Telnet client may need to be installed via the package manager.</p>
Q&A
Q1. What is Telnet and what can it be used for?
Telnet is a network protocol that allows users to establish remote terminal connections to communicate with other computers and devices over a network. It can be used for various purposes like troubleshooting, configuring network devices, testing remote services, and managing systems remotely.
Q2. How does Telnet work?
Telnet works by establishing a connection between a local computer and a remote host over a TCP/IP network. It enables users to access the command line interface of the remote server or device, providing a text-based interface for interaction.
Q3. What are the prerequisites for using Telnet?
To use Telnet, you need a Telnet client installed on your local computer or device. Most operating systems come with a built-in Telnet client, but in some cases, you may need to install it manually. Additionally, it is essential to have network access to the remote host you want to connect to.
Q4. How do I start a Telnet session?
To start a Telnet session, open a command prompt or terminal window on your local computer and use the Telnet command followed by the IP address or the hostname of the remote host you wish to connect to. For example, “telnet 192.168.0.1″ or ”telnet example.com”.
Q5. What are some useful Telnet commands?
Telnet commands vary depending on the remote host or device you are connected to. However, common commands include sending data to the host, closing the connection, changing terminal settings, and querying information from the remote system.
Q6. Can Telnet be secured?
Telnet, by default, sends all data, including usernames and passwords, in plain text, making it vulnerable to interception. To secure Telnet communications, it is advisable to use alternative protocols like Secure Shell (SSH), which encrypts the data transmitted between the client and the host.
Q7. Are there any alternatives to Telnet?
Yes, there are alternatives to Telnet. Secure Shell (SSH) is widely used as a secure replacement for Telnet, offering encryption and stronger authentication mechanisms. Additionally, other remote management protocols like Remote Desktop Protocol (RDP) and Virtual Network Computing (VNC) provide graphical interfaces for remote access.
Q8. Can Telnet be used on any device or operating system?
Telnet can be used on most devices and operating systems that support network connectivity. Commonly used operating systems such as Windows, macOS, and Linux provide built-in Telnet clients. Other devices, such as network routers, switches, and embedded systems, may also have Telnet capabilities.
Q9. What are some common issues when using Telnet?
Some common issues include misconfigured firewall settings that block Telnet connections, incorrect remote host addresses, authentication failures, and network connectivity problems. It is essential to ensure that you have the correct network access and proper credentials to establish a Telnet connection successfully.
Q10. Are there any risks involved in using Telnet?
Using Telnet over unsecured networks presents security risks as information transmitted can be captured by attackers. Furthermore, unauthorized access to remote systems can also be a concern if proper access controls and authentication measures are not in place. It is crucial to consider the potential risks and implement appropriate security measures when using Telnet. In conclusion, understanding how to use Telnet can greatly enhance your network troubleshooting skills and provide valuable insights into your network infrastructure. By following the step-by-step instructions provided in this article, you now have a clear understanding of how to install and utilize Telnet on various operating systems. Remember to always exercise caution when using Telnet and ensure that you are only connecting to trusted and secure hosts. Whether you are a network administrator or simply an individual interested in exploring the depths of networking, Telnet remains a powerful tool that can assist you in diagnosing and resolving network connectivity issues. So, go ahead, get connected, and explore the vast potential of Telnet for efficient network administration.


